|
|

|
PIRATES OF THE
CARIBBEAN |
| Welcome to part two of the in-depth review of Pirates Of The Caribbean. Part one looked at the playfield layout, the shots and the features as well as the hardware making up the game. We'll begin this second part by looking at the game's ruleset.
So you've pressed the start button and the ball is kicked into the shooter lane. What happens next? The first thing you get, if you've got the sound turned up, is a nice eerie and melancholy rendition of "Yo ho, yo ho, a pirate's life for me" before the main theme kicks in.
You have two options on where to plunge the ball.
A full strength plunge will send the ball to the upper playfield whereas a weaker plunge sends it through a one way gate and onto the wireform feeding the right ramp. No award is given for the weaker plunge but you get the ball to the flippers quickly which can be useful for one of the timed or countdown features.
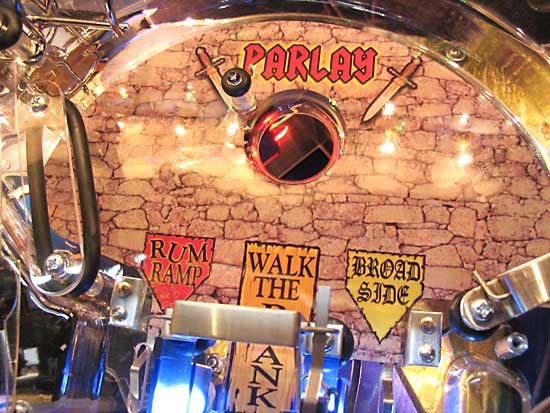
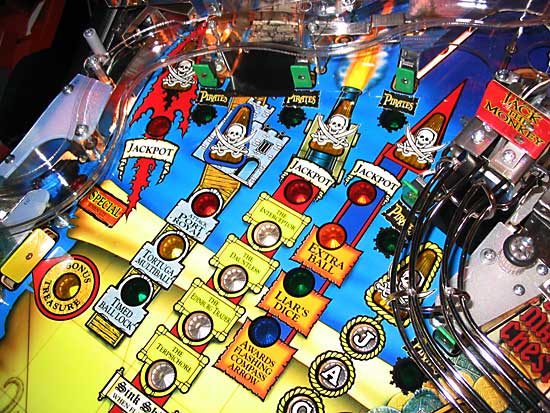
There are four possible exits from the upper playfield. The Parlay sink hole awards letters to complete P-A-R-L-A-Y.
If you're going for your first Parlay, you are awarded two letters each time you make the sink hole. Once you've complete it, you only get one letter for subsequent shots.
When you complete the P-A-R-L-A-Y letters, one of the two outlanes is lit for a ball saver.
The lit lane changes with slingshot hits but if you complete Parlay again, both lanes are lit. If a ball drains down a lit lane it is saved and relaunched. Parlay is one exit from the upper playfield. The others are the three lanes at the bottom, each of which has a corresponding green lamp on the backboard and awards a K-E-Y letter.
The Rum Ramp feeds to the left flipper inlane and lights the major shots for a Rum Combo award starting at 250K. It also lights the left most green lamp on the backboard.
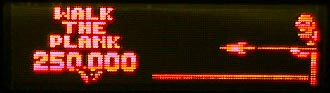
The centre lane is Walk The Plank and seemed to be the most frequent choice on this machine.
It is a simple points award of 250K which increases by 150K each time. As you might gather, this can become a significant points value before long, although it resets back to 250K at the start of each ball. This also lights the centre green lamp on the backboard. The final exit is Broadside.
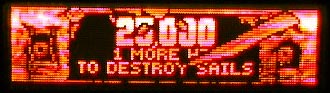
This sends the ball onto the right wireform and to the right flipper for a shot at the ship. If you make it and have previously knocked the sails down, the ship is sunk immediately amidst much cursing from the Captain. This is a great time saver and advances you quickly through the ships if you can make the lane and shot combo reliably. Making the Broadside lane lights the right-most green lamp on the backboard.
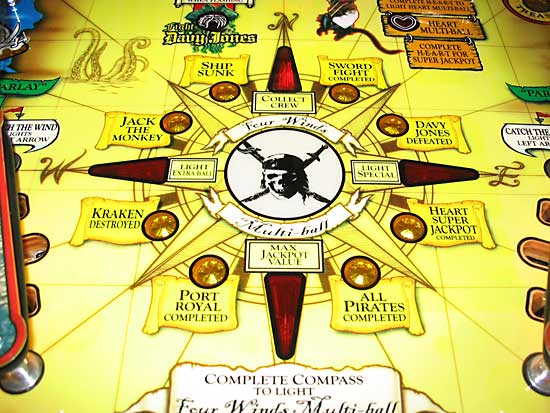
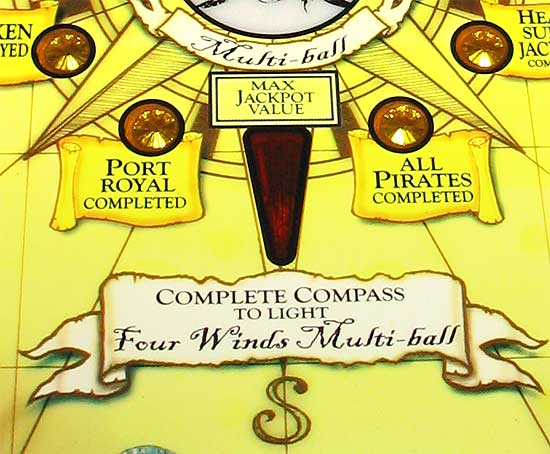
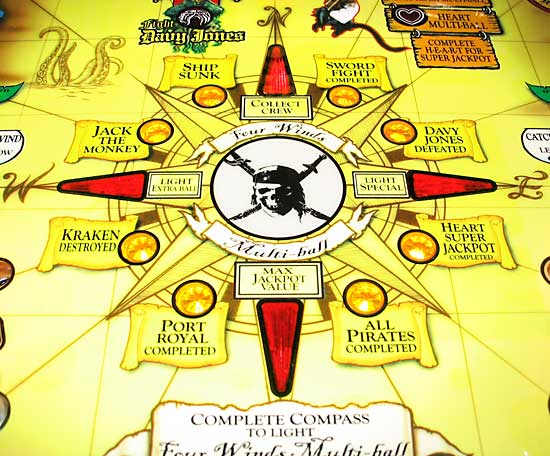
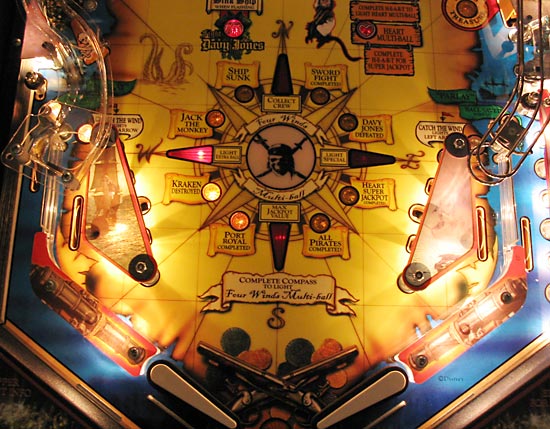
Completing all three green lamps scores 500K, increasing 250K for each subsequent completion. The lamps can be rotated with the flipper buttons (lane change) so even if a switch is broken or is very tricky to make, you can still complete the lanes and get the award. Whichever path you choose, the ball eventually ends up down at the flippers which is where you'll find the main game indicator - the compass.
This shows you the features available, those you have completed and those you have not and thus your progress towards the wizard mode of Four Winds Multiball. The compass is divided up into four zones - North, East, South and West - corresponding to the four winds. Each zone consists of two tasks to complete and a reward for completing them both.
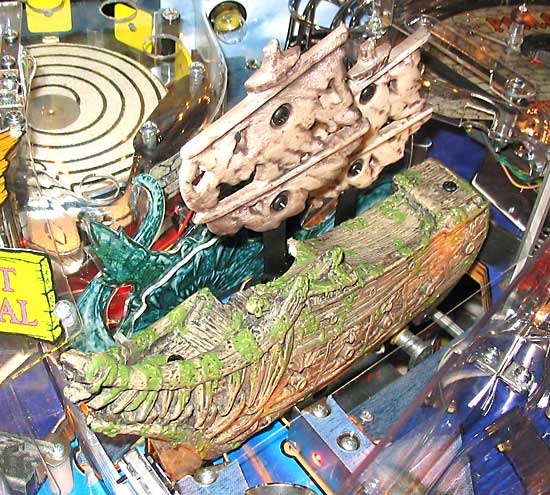
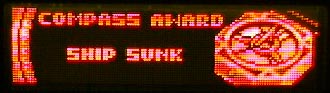
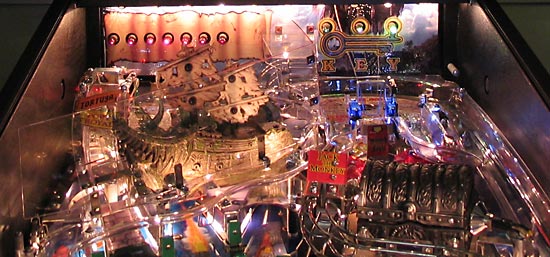
We'll start with North which is probably the easiest zone to complete. The two tasks are to sink a ship and to complete Sword Fight. The ship, being the main toy in the game is pretty hard to avoid, especially with the large protective plastic panels around it.
You have to sink the ship to achieve the first task. You do that by shooting the ball up the lane and bashing the ship. If you do this with Broadside lit, the ship will be destroyed immediately, otherwise you will score one hit. The ball is held temporarily in the ship lane after each hit but only for the first ship. Thereafter it is not held.
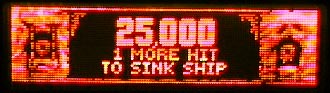
There are four ships to sink, each one requiring progressively more hits to sink, but for the first ship you need two hits to destroy the sails. Intermediate hits score 25K (increasing 15K per ship) while destroying the sails nets you 150K points.
At that point the sails collapse and you need another two hits to sink the ship.
Make the first hit and the ship starts rocking back and forth in a rather noisy way but make the second and the ship sinks into the playfield.
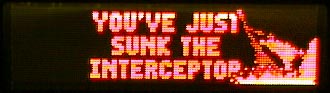
After the final hit, the ball is held in the ship lane by a combination of a one way gate and an up post.
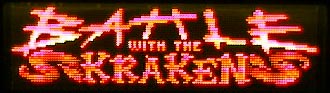
When the ship has finally sunk, a ball saver begins, the ball is released and another is autolaunched and the 2 ball Battle The Kraken multiball begins.
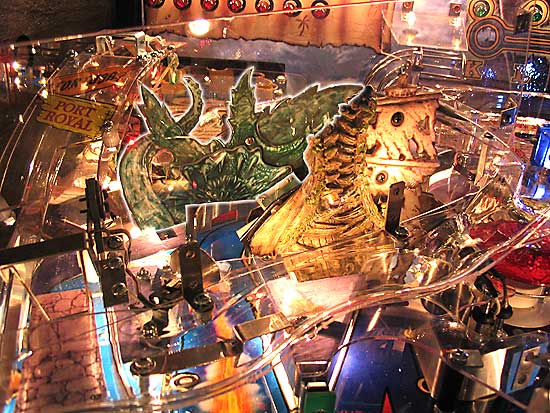
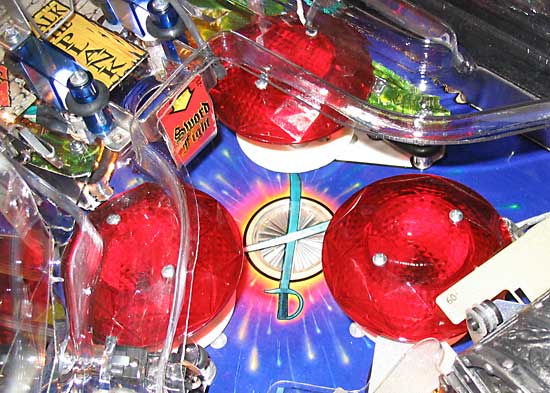
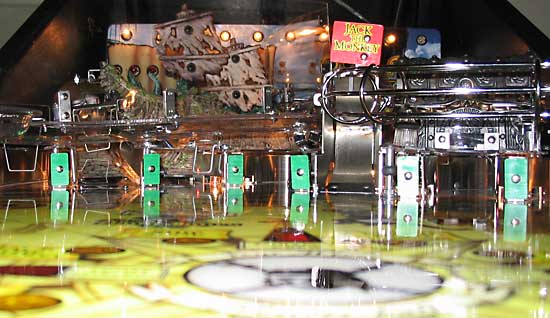
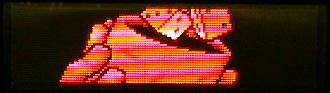
The Kraken is the multi-limbed creature hidden behind the ship highlighted below.
With the ship out of the way, you are now supposed to shoot up the ship lane, under the creature and round the back of the submerged vessel to score hits on the Kraken. In fact, the sensor to register hits is the same one used for the ship, so you only really need to get the ball that far up the lane to score a hit.
This game had the cutout for a second switch but it wasn't fitted and apparently neither the switch nor the cutout will not be there on most production games. Anyway, you need a minimum of three hits to defeat the Kraken.
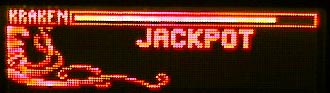
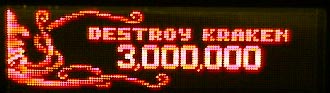
I say minimum because the display shows the creature's life bar and all the time you are not hitting it, the life bar creeps up, strengthening the Kraken and so requiring more hits to defeat it. The battle ends if you lose one or both of the balls but make the enough hits to reduce its life bar to zero and you start a 3M hurry up on the same shot, plus you light the Destroy Kraken compass task.
Collect it before it counts down to 1M and Victory Jig frenzy mode starts, accompanied by a much more robust "Yo ho, Yo ho, a pirate's life for me" theme than the one at the start of the game. If you didn't complete the battle, there is a small window to collect an additional Kraken hit if you can sneak the ball up the lane while the ship is resetting. It's one of the very few grace periods in the game. As Battle The Kraken resumes after every ship sinking, if you don't defeat it the first time you've got several more attempts through the game.
Sinking one ship completes the first North task - Ship Sunk. The other is to finish the Sword Fight.
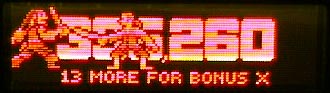
The Sword Fight takes place in the pop bumpers. You need 20 hits to complete Sword Fight after which subsequent hits build up towards increasing the bonus multiplier.
The bumper hits are accompanied by two swordsmen fighting it out across the display in front of the score(s) while the number of hits needed to increase the multiplier is shown underneath.
There are three ways to advance the bonus multiplier. Getting the ball in the Parlay hole on the upper playfield increases the multiplier by 1. To advance the bonus multiplier from the bumpers takes 20 hits initially, increasing for each subsequent time. Completing the bumpers adds 2 to the bonus multiplier while completing all three top lanes adds 3 to the multiplier. Interestingly, the animation looks more than a little similar to the Whitewater multiball start. See for yourself:
Sword Fight is a relatively easy task to complete and often happens without any conscious effort at all although a shot up the right lane is a good way to help it along.
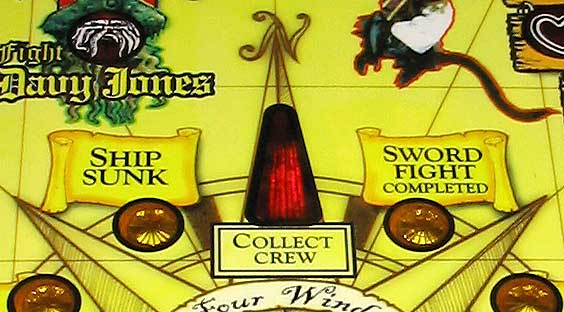
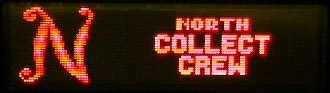
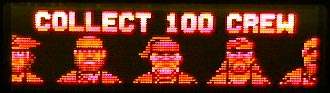
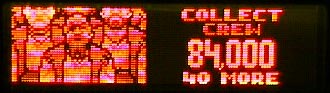
So with both North tasks completed, the North arrow award is lit at the centre lane. When it's not lit for any award the centre lane saucer just increases the base jackpot value but with North completed, when you get the ball in the saucer you start the North mode and that means Collect Crew.
Collect crew is a Frenzy-type mode where all switches score to add crew members. You need to collect 100 hits to gather a full crew and complete the mode.
Each crew member scores points starting at 24K and increasing by 1K. Collect them all to complete and end the mode. Moving round the compass, we'll look at West next.
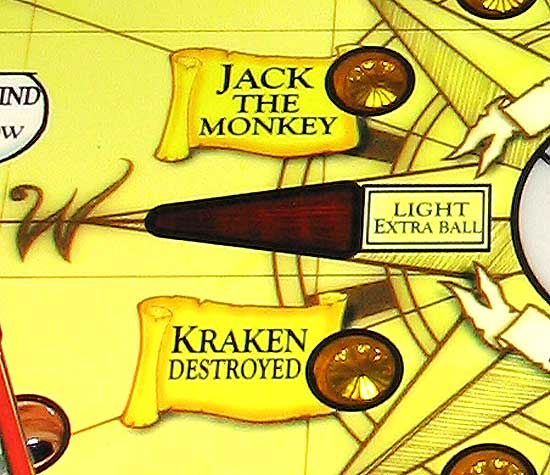
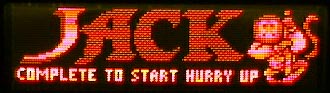
Destroying the Kraken is covered in the Sink Ship section above so to complete the zone you need to start Jack The Monkey. Plenty of opportunities for jokes there, but we'll ignore them and move on to the rules for this feature.
Jack The Monkey is played out on the right ramp. Shooting it advances the J-A-C-K letters so you need four shots to complete.
When all four letters have been collected a hurry up starts on the same ramp. The initial value is 2M points and it quickly counts down to 250K at which point there is a brief hold at that value before the hurry up times out and the feature ends.
Collecting the award ends the feature while starting it gives the appropriate compass award.
With both West features lit, the centre shot is lit for the zone award, an extra ball which, I should add, has a very nice animation to go with it when collected.
So nice in fact, you can view it for yourself below.
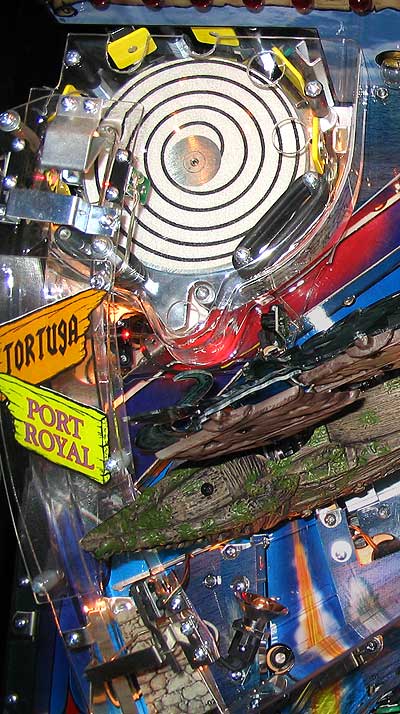
Port Royal is one of the two features at the spinning disk along with Tortuga. Note that this disk pattern is due to change in later production machines.
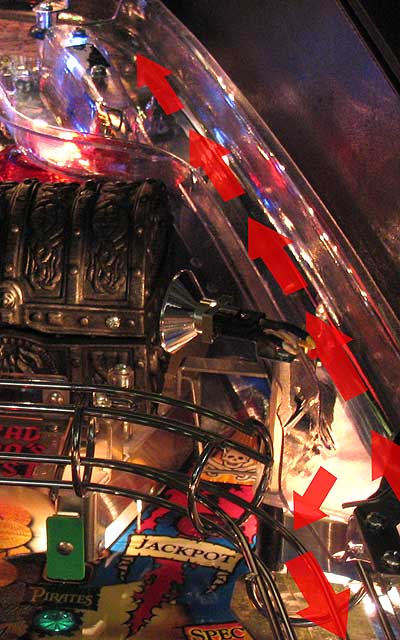
The left ramp sends the ball into the spinning disk which starts spinning as the ball enters the ramp. When the ball enters, an up post at the front of the disk raises, preventing the ball from escaping. The ball then spins round and round the disk hitting the yellow standup targets as it goes.
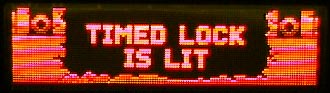
These hits count up towards completing the Port Royal timed lock feature until a short timer expires and the up post is dropped allowing the ball to escape into the left lane.
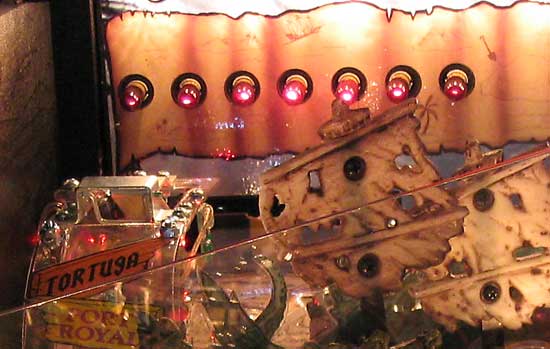
Your progress towards completion is shown on the bank of 7 red lamps on the backboard. Initially they are all turned off but they illuminate from left to right as the number of hits increases turning to blinking and then solidly lit.
In earlier versions of the game this took several visits to Port Royal but from version 1.08 it has become much easier, making it just possible to complete in just one visit. When the requisite number of hits have been achieved the ball is released from the spinning disk and the timed lock feature is now available at the left ramp. This lights the Port Royal feature lamp on the compass.
Shoot the ball into the spinning disk again and it is held there for 10 seconds while another ball is launched. You now need to shoot up the left ramp so it can join its companion in the spinning disk within the 10 second time limit.
You can do this once more to get up to three balls in there.
If you do this, or fail to put a ball in there within the allocated 10 seconds, all the balls are released and Tortuga Multiball begins.
Tortuga Multiball isn't so much a feature in its own right but more something to run alongside whatever else you're doing to boost scoring quite dramatically. You can just play it as a multiball but that's missing the point somewhat. Tortuga doesn't light the jackpots shots but instead lights the left ramp for you to shoot the balls back up onto the disk for another timed lock sequence to increase your scoring multiplier. Get one ball in there for double playfield scoring, two for triple and three for quadruple scoring while the balls are on the disk. As they hit the targets they light the red lamps on the backboard and when they are all lit the balls are released. You can run this alongside other features to really build your score.
As you lose balls the multiplier possibilities reduce and Tortuga Multiball ends when you're down to one ball or fewer.
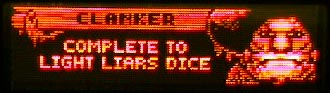
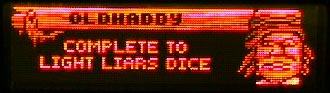
With Port Royal completed, to complete South you need to collect all the pirates. The pirates are the six green standup targets dotted around the playfield. Be careful with them as direct hits have a tendency to rebound straight down the middle and because of their relative proximity to the flippers, they send the ball back at a blistering speed.
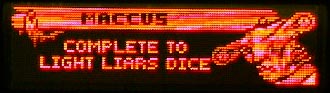
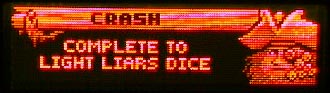
Each target equates to a specific pirate from the movie - Clanker, Oldhaddy, Kolenkio, Maccus, Patch and Crash.
Shooting any of the green standups awards a pirate (if not already awarded) and lights the insert in front of the target.
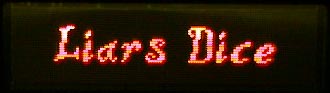
The aim is to collect all six to score 200K (increasing by 10K each time they are completed), light the Liar's Dice random award feature at the centre shot and the All Pirates Collected compass feature.
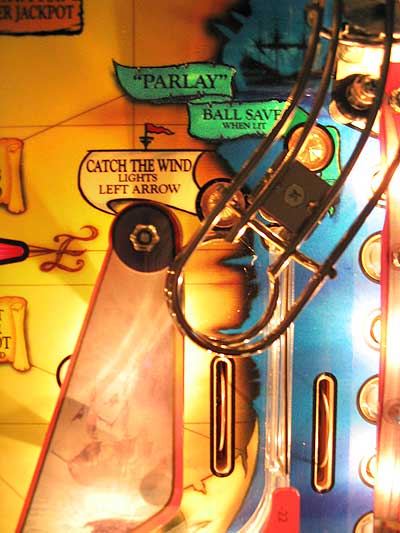
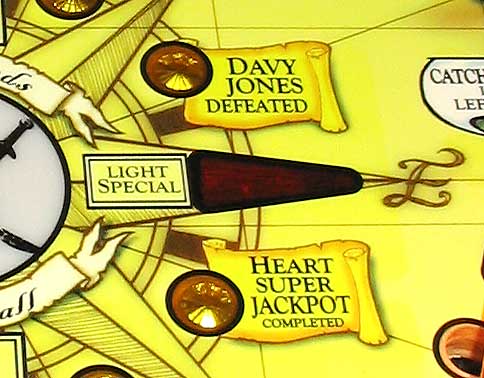
Liar's Dice (note the missing apostrophe in the displays above) gives a range of awards such as small points, big points, bonus multiplier advance (+5x), complete Parlay and light extra ball. With both compass features lit, the South award is given which is to maximise the jackpot value for the rest of the ball. The jackpot value starts are 350K and is built throughout the game by shooting either the left loop up kicker or the centre saucer but this award instantly maxes it out at 2M. It makes sense to try for this award early on rather than after you've sunk all your ships and played Tortuga. As it's only maxed for the duration of the current ball, when you lose the ball the jackpots return to the value you were building or 1M - whichever is the lesser value - but the lamp remains lit. The final zone of the compass, and the hardest to complete is East.
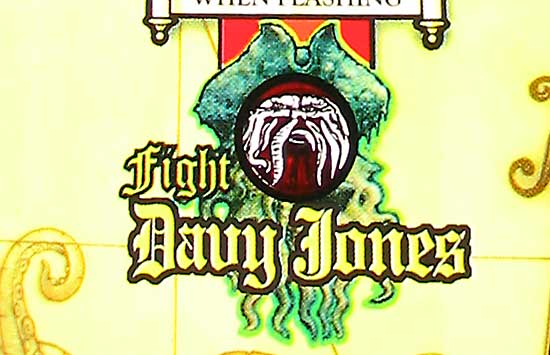
The first of these is to defeat Davy Jones. This requires you to sink all four ships as described above which starts Battle Davy Jones which is a three ball multiball.
This feature is somewhat different to the ship-sinking volley of shots you usually fire up the ship lane because timing as well as direction is important. When the feature starts, the ship begins rocking but in a more exaggerated way than when you're about to sink it. It rocks so much that shots under the ship towards the Kraken are possible. Your task is to shoot the ship enough times to sink it and defeat Davy Jones. Miss the ship and hit the Kraken and you get a Kraken Jackpot instead. Like your battle with the Kraken, Davy Jones has a life bar which reduces with every hit but recovers over time. The ship inserts mirror the life bar, starting out fully lit and extinguishing one by one as Jones' life diminishes. Defeat him by reducing his life bar to zero and you get the elusive compass feature light.
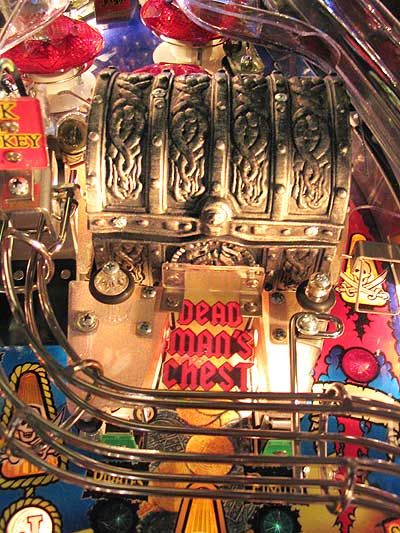
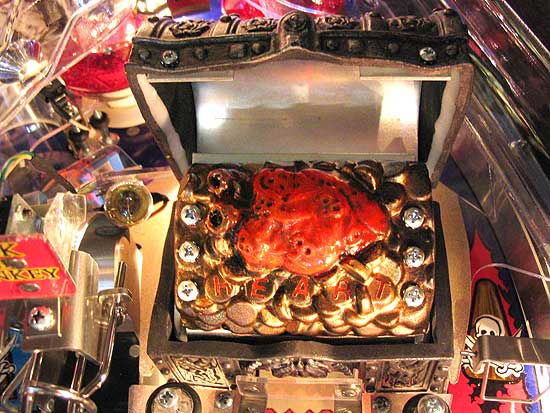
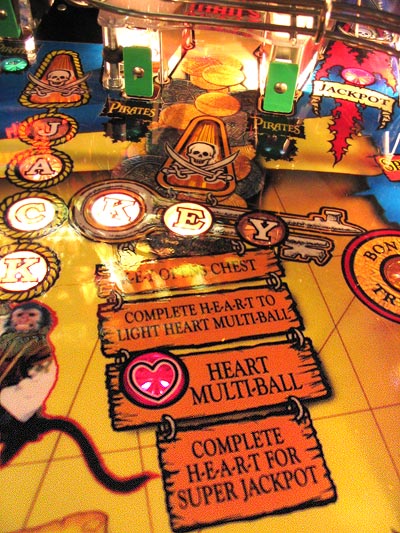
The other half of the East zone is the Heart Super Jackpot and that involves the final toy in the game, the Dead Man's Chest.
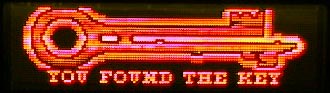
To open the chest you need to spell K-E-Y either by shooting under the chest to add one letter at a time, or by collecting letters from the upper playfield or from a Liar's Dice award.
Once you have spelled K-E-Y and shoot the chest, it opens to reveal Davy Jones' heart on a bed of gold doubloons some of which spell out H-E-A-R-T, the first letter of which is flashing.
The heart contains two pairs of LEDs which flash in time with the heartbeat sound effect for a short time but then the chest closes and the ball is ejected.
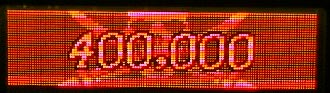
You have to shoot the chest five more times to spell out H-E-A-R-T. When the ball is ejected, all the major shots are lit for jackpots. Jackpots start at 400K rising 25K each time and once lit they remain lit, even between balls.
Collect all, any or none of them and shoot the chest again to add another H-E-A-R-T letter and relight all the jackpot shots. You can just keep shooting the chest but you're missing out on some valuable jackpots on the ramps and lanes.
When you have completed all the H-E-A-R-T letters the chest is now lit for Heart Multiball.
This is a three ball multiball, so two more balls are autolaunched.
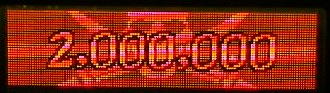
Again all the major shots are flashing for jackpots. You need to keep shooting the chest to collect the Super Jackpot but its value is increased by collecting the lit jackpot shots. When you shoot a flashing shot it becomes solidly lit and no longer scores jackpots. When all jackpots are collected, the shots return to flashing and can be collected again. When you have shot the chest enough times to spell out H-E-A-R-T again the chest then scores the Super Jackpot.
This is worth 2M points or more and relights all the shots but perhaps most importantly gives you your compass feature light for Heart Super Jackpot. You can continue scoring jackpot and super jackpot scores until you are down to only one ball or fewer and of course you can combine them with the Tortuga Multiball for multiplied scores.
Completing both of the East compass awards lights special at the side lanes which is fairly easy to collect, especially in multiball and thankfully isn't one of those special awards you need to drain down an outlane to collect.
So those are all the features on the compass that you need to complete to get to the finale or wizard mode.
When they are all complete you shoot the centre lane to the saucer to start the compass wizard more (or the first part of it anyway), Four Winds Multiball. This is a full blown (get it?) multiball with all four balls in play but it's no breeze to complete. One of the major shots is flashing and a hurry up jackpot value starts to count down representing one of the four winds. You need to make that shot to freeze the jackpot value before it reaches the base level, then shoot all the remaining shots to score that value. If you don't make it in time, the jackpot value hits the base level and that is your jackpot score. Once you collect all the shots, you gain your second wind. Literally, as a second shot is flashing and another countdown jackpot value begins just like the first to represent wind number two of four. You repeat this for all four winds and if you manage this while keeping two or more balls in play, you progress to the second part of the wizard mode. If you don't manage to get all the shots on all four winds, the next time you play Four Winds Multiball you'll resume on the last wind you were playing instead of having to start from scratch. So assuming you've made all the shots on all four winds, you start part two of the wizard mode, Gauntlet of Pirates multiball. This starts at the spinning disk so shoot the ball up here and one of the major shots is lit for one gauntlet point. Any lost balls are relaunched at the start of the mode, so you start with four balls again and the aim is to build up the number of gauntlet points by shooting the spinning disk and then collecting the lit shot.
Completing all six pirates during the mode adds another ball (if you've drained any) and the mode ends when you are down to one ball or fewer. There is a separate high score table for the number of gauntlet points awarded in a single game.
The total of gauntlet points holds over, so if you manage to start it a second time you have your first round's points to start from. That is the wizard mode but there are some additional features in the game not based around the compass. One of those is collecting treasure.
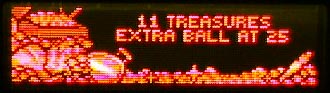
Throughout the game, getting the ball into one of the two side lanes above the slingshots awards treasure and lights the standup target in front for bonus treasure which seemed to add 5 to the haul. By default there is an extra ball awarded at 25 and 125 and bonus held awarded at 75. As elsewhere in the game, extra balls are collected at the centre shot saucer. There is also an award on each of the inlanes. When the ball rolls down an inlane either directly or off a ramp or wireform, the lane on the opposite side is lit for Catch The Wind.
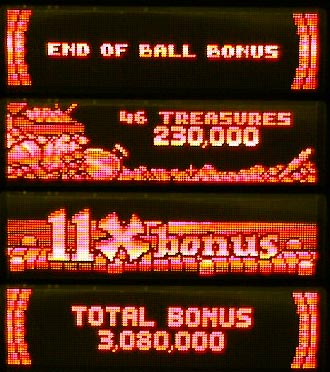
So rolling down the right inlane lights the left lane and vice versa. Catch the wind starts at 450K and advances with each award collected. It's the last thing you want to see but the bonus count comes to us all. In Pirates Of The Caribbean the bonus consists of an amount of treasure collected times the bonus multiplier.
At least that what the display shows but in fact there's another uncredited element added before the multiplier to make sure you still get some bonus points even if you don't collect any treasure. For ball one you get 25,000, ball two gives you 50,000 while the third ball is worth 100,000. However, if seeing the bonus count gets you down, you still have the match sequence to look forward to.
It's probably the best animation in the game making great use of the increased number of intensity levels and the accompanying sounds fit perfectly too. So you'll want to see it for yourself, won't you? Well, OK, and we've added a little of the game over display and music for you too.
Interestingly, in the period immediately after the end of the game, only a small selection of the usual display frames are shown - just the scores and high scores - for about 30 seconds, after which the full range (including the title, Stern logo etc) are shown. And that concludes our look at the rules for Pirates Of The Caribbean. As we said before this wasn't a final production game but these rules should be the most up-to-date at the time of writing so if you find there's anything missing or incorrect please let us know and we'll fix it as soon as possible. Now we come to our verdict on the game and all the individual elements that create the full pinball experience we so look forward to when we drop our coins in the slot or uncrate that new home game.
The first sight of the game give you a sense of class. The cabinet and backbox artwork is detailed, bold and well balanced giving a classy feel to contrast with the brightly lit interior. It's almost like a treasure chest itself.
The playfield is certainly a game of two halves. The lower area is open with the warmly lit yellows and reds emanating a rich glow in contrast to the azure sea around the outer edge.
Up at the top though things couldn't be more different. Everything's tightly packed in and it's all about clear plastic picking up reflections from the variety of differently coloured lamps. There are blues, green, reds, a big row of white lamps at the top of the backboard and some well positioned flasher lamps at the base.
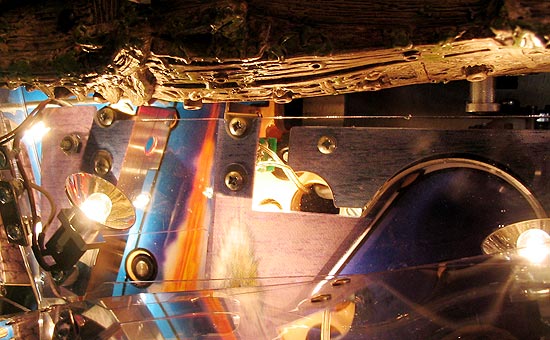
The good use of spotlights brings plenty of contrast to enhance the depth of the ship and the chest and to prevent them looking tacky. Both show great detail and work very effectively in the game. They are solidly built - the chest especially so - so should hold up on site. There's no avoiding the fact that the big "sneeze guard" around the ship looks ugly and like a cheap, rushed solution to an engineering problem. It might not be noticeable after a while but that's when the game is new. After it's been on site for some time, the plastics start picking up dirt and dust, and before long it's going to become hazy and much more noticeable. Also, the washed-out quality and the low-resolution of the printing on the playfield plastics slightly diminishes the overall look further. Looking at the shots, there is a good variety of places to send the ball - nine in total - but only the two outer lanes and the right ramp allow the ball to continue its path. The remainder all stop the ball one way or another making this more of a shooters game than one for people who look for fast ball action. One big criticism of the game has to be the lack of information given to the player about what to shoot and what the various features do. The problem crops up rights from the very start. What's the skill shot? Is there one? There's a short plunge option but what's that for? Is that the skill shot?
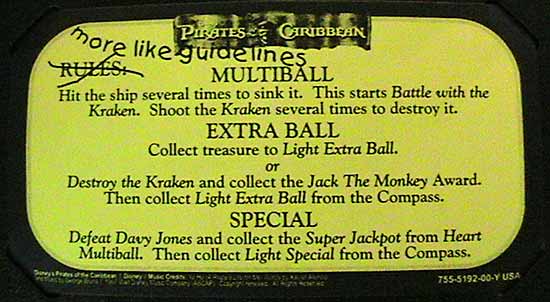
In time of uncertainty we look for guidance and that means the instruction card, but in this instance the brevity makes it largely useless. It tells you to collect treasure but doesn't tell you how, and it doesn't even mention the key aim of completing the compass point tasks to get to Four Winds Multiball. And nothing about a skill shot. So what about the dot matrix display? Well, again it's not a huge help in understanding what's going on through the game, what to shoot for or why.
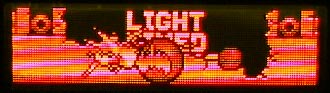
For instance, the Collect Crew mode just says "collect 100 crew" but doesn't say how - all switches score - or why. What's the payoff I should expect for achieving it? Actually, there are some very nice dot matrix animations in the game - some of which we've shown you here - which are starting to make better use of the wider range of shades available in the new hardware. Smoke and flames are ideal to demonstrate this and it is the cannon fire and flaming torches which shine here. There are very few "standard" display frames. All large type is rendered in a custom font with individual backgrounds or foregrounds which shows the amount of effort put in, although there is a slight feeling that different people designed the different sections. They're all good, but just lacking that totally cohesive feel to the overall display package you might hope for. Down on the playfield, the inserts and text help guide the player through many of the major game features and there's plenty of text to read, especially around the Dead Man's Chest which ironically is one of the better explained dot matrix displays.
The playfield is unusual in not making the jackpot inserts the most prominent. That award goes to the feature inserts - the skull and crossed swords arrows - which can also be confusing at times. At the start of the game, for instance, the left ramp and ship lane arrows are solidly lit. What does that tell you as the player? That they are already completed? If you are meant to shoot for them, shouldn't they be flashing? I don't want to overstress the confusion factor because home owners and seasoned players will want to discover all these features and shots for themselves but for the novice or casual player they need a little hand-holding and it's not there yet. The fact that help is needed demonstrates that this is a fairly complex game. It's not fantastically deep - certainly not to the extent of The Simpsons Pinball Party or The Lord Of The Rings - but it is what I would call a "broad" game. There is a good spread of features, many of which can run simultaneously or at least be set up in parallel and then interact with each other. So starting Heart Multiball doesn't stop you advancing and completing other features. Light the Timed Lock and get a ball or two in there and you can still destroy ships if you're feeling lucky. It requires good software to keep track of everything going on and happily it all worked perfectly with no undetected shots or bugs noticed. Good work. The sound is more of a mixed bag though. It begins well with the eerie strains of "Yo Ho, Yo Ho..." leading into the main theme - a pleasing ditty which never becomes tedious or repetitive no matter how many times you hear it. In fact, the music is another highlight of the game for me. It always seems to set the right tone for the current state of play. It's not pushy or overly forward but does just what you'd want at the time. But despite some amusing quotes (mainly when you lose the ball or sink a ship), the voices are lacking in variety, expression and information. For a game which is based so strongly on Johnny Depp's Jack Sparrow character, it's surprising how little you hear from him and when you do, how irrelevant the quotes are. You want to hear Depp cajoling you, teasing you, urging you on and celebrating your achievements but he's just not there. And often, nobody else is either. There's nobody to scream "JACKPOT!" at you, alert you that lock is lit or to count down the timer on any of the features. All the great custom effects you enjoy so much on The Lord Of The Rings - Gimli's booming announcements of "Double Jackpot One" and Frodo's imploring voice as he counts down the time left, they're all lacking here.
So what about the game play and is it any fun? Well, the layout is a nice departure from a regular fan. The two side lanes are especially interesting, harking back to an earlier era when these types of short lane were a much more common sight and vital to get that all important Special. The lack of any long loop shot is a slight disappointment but that's not what this game is about. It's about making tight, accurate shots and planning your progress through the features, choosing what to combine with what else. For a quick, fairly mindless knockabout game you can shoot at the ship and destroy it fairly easily for a Kraken two ball multiball, and stick a ball or two in the spinning disk and perhaps unlock the chest. That means you get to see all three toys in action and light a couple of compass insert lamps even if you're new to the game. You may not have much of a clue what's going on, but you can still have fun. Taking it to the next level is when you need to start thinking about the shots - to get those harder compass lamps and the bigger payoffs that come with them. Pirates Of The Caribbean is going to appeal to those players who like the stop-and-go approach of machines like The Simpsons Pinball Party but perhaps don't want the same level of commitment a game on that entails. If you only like a game with lots of flow where the ball is almost constantly in motion, you might find the play style frustratingly disjointed though. That's always going to be a matter of personal preference.
The layout's good, the toys all work well and have a certain wow factor, the cabinet art and backglass image are excellent as is the music and the dot matrix effects are consistently good. The voice work is definitely lacking, relying on sound effects instead of quotes, and the guidance given to the play is also below par. But, if you like the game play style and can live with the few negatives detailed in this review, you'll find Pirates Of The Caribbean is a classy and stylish game which should please home owners and operators alike. Before we reach the end of this review, we had numerous requests to give numeric ratings to our in-depth reviews. In the past we've always rejected this as being far too subjective but it seems many readers would still like to see the numbers, so here they are:
All scores are out of 10 and this isn't one of those rating systems where anything less than 8 is just plain old rubbish. A 10 would be given to the game which is best in that category and ratings are then given relative to that. Finally, here's an added bonus for Pinball News readers. The game contains a secret credits sequence accessed by a special flipper button combination. You can activate it during attract mode with the following flipper button code where 7L means hit the left flipper button 7 times, 1R means hit the right flipper button once and B means hit both flipper buttons together: B, 7L, 1R, 1L, 1R, 13L, 1R, 1R
All of which just goes to show how the best of us make the occasional spelling mistake!
Thanks go to John, Jonathan and Bob at Electrocoin for their hospitality and assistance with making this review possible and to Dwight, TheKorn, Nico and Gary for their checking and clarification of the rules. © Pinball News 2006 |