|
| THE WIZARD OF OZ: IN-DEPTH REVIEW PART 1 |
|
Date: 25th December, 2013 Hello and welcome to this first part of the In-Depth Review of The Wizard of Oz - the first game from Jersey Jack Pinball. We've waited to write this review until approximately half the Emerald City Limited Edition models have been produced, since there have been a number of changes made to the build of the playfield and the electronics since production began back in April 2013. So our review machine should be representative of the majority of Limited Edition games out there, but we will not be reviewing the software and rules until the second part of this review. The code is still changing frequently - there have been two updates since we began to write this review - so we want to have a reasonably complete version in front of us before passing judgment.
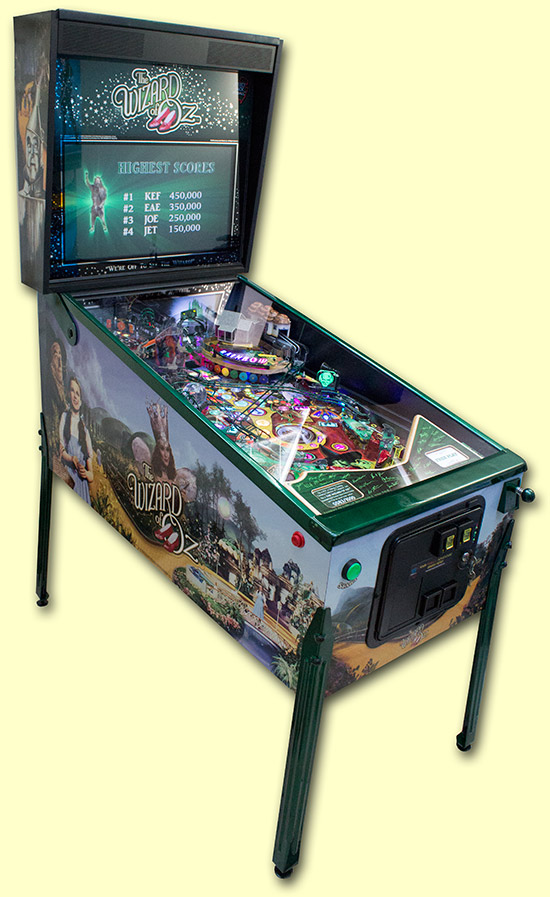
As usual with our In-Depth Reviews, we'll begin by looking at the machine's exterior - the cabinet and backbox artwork, the construction and the finish - before looking under the glass at what's on the playfield. So let's begin with that cabinet and its artwork.
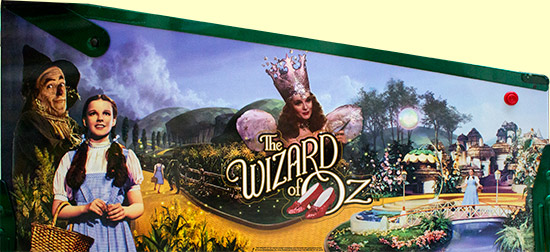
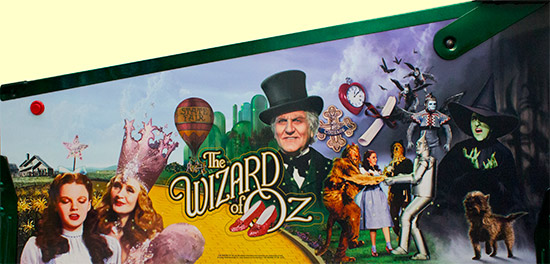
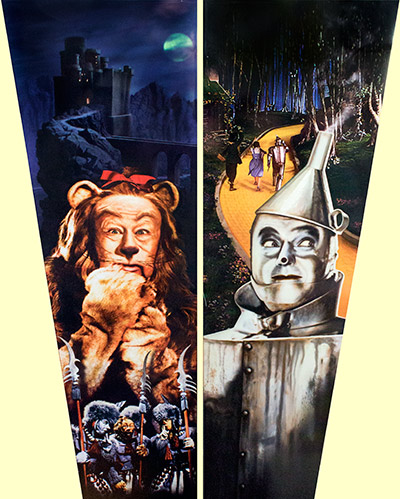
The two sides depict all the main characters from the movie and include several of the key scenes such as Munchkinland, the Yellow Brick Road, Emerald City and the Wicked Witch's castle. Broadly speaking, the left shows the brighter side of the story with the start of the journey along the Yellow Brick Road, while the right depicts the darker elements encountered on that journey, with the montage forming a single scene which wraps around the cabinet.
The left side certainly has the better composition, allowing the characters breathing space, while the right tries to squeeze in as many movie references as possible and as a result ends up looking cramped and forced. Jerry Vanderstelt's cabinet artwork design is often overlooked for the simple reason that the quality of the printing and the clearcoat finish is so far ahead of anything we've seen on a pinball before. The ink is applied directly onto the wood rather than using decals, and the resulting vibrant colours and glossy sheen really have to be seen in person to be fully appreciated. With this being an Emerald City Limited Edition, all the metal trim has a metallic emerald-green finish with a protective clearcoat. When this was first announced in July 2011 it was a unique feature, but since then Stern have applied a similar finish to several of their Limited Edition models, starting with Transformers which was released in late 2011. Nevertheless, despite the exclusivity and novelty of the finish having been diminished, it still looks impressive and complements the cabinet and playfield artwork. While the cabinet finish is groundbreaking, the actual mechanical design of the hardware is much more conventional. The cabinet is a widebody design to accommodate the wider playfield, has a regular backbox hinge mechanism, sports a single flipper button on each side, one start button, a mechanical shooter mechanism, and a normal-sized coin door.
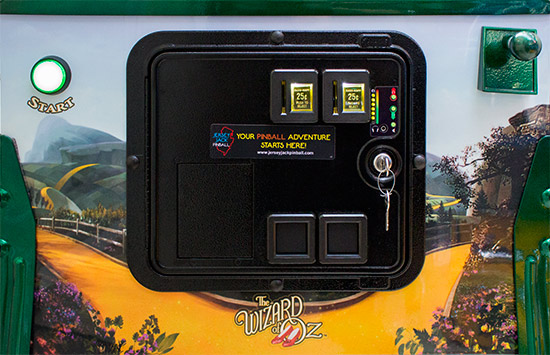
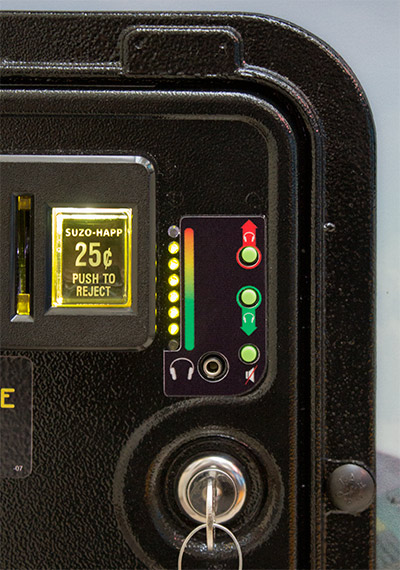
The start button protrudes out of the cabinet rather than being recessed. That, combined with its larger size, makes it more prominent and obvious for new players. It also makes it easy to accidentally press when leaning against the machine, or when lifting the cabinet move it. The ball shooter mechanism is also powder coated in green to match the rest of the game, while the shooter rod has a colour-coordinated green grip. On this particular machine the shooter mechanism had not been installed straight. It was a simple adjustment to straighten it, and it had thankfully not left an indent on the clearcoat. The coin door is mostly conventional, but the controls to the right of the coin slots are certainly not.
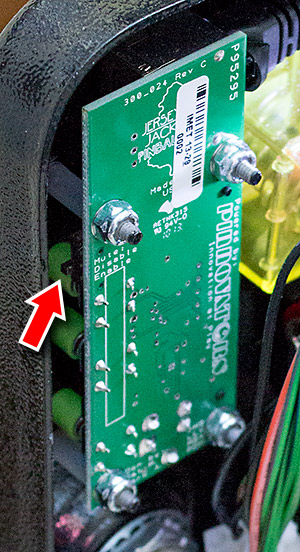
The three bright green buttons on the right increase or decrease the volume for any headphones plugged into the adjacent 3.5mm (or 1/8th inch) stereo jack socket. The column of LEDs show the current volume level. The audio control system is designed by Pinnovators, and the coin door controls mount on a small circuit board fitted behind the door. The bottom button mutes the headphones' audio, and can optionally also mute the game's backbox speakers depending on the setting of a switch on the board.
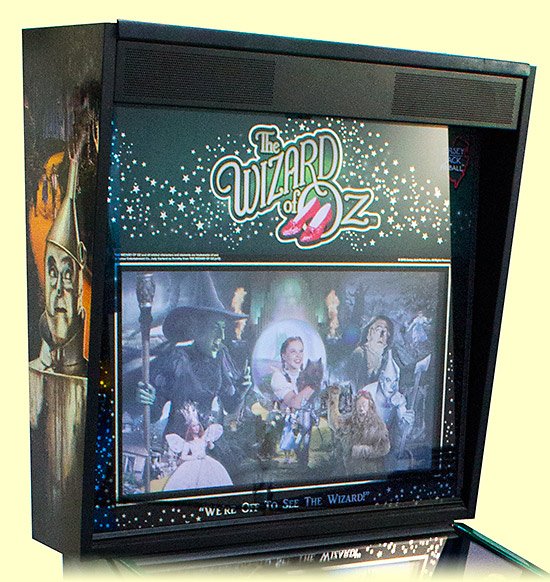
Talking of the backbox, the artwork depicts two more scenes from the movie - the journey along the Yellow Brick Road and the Wicked Witch's castle - along with the Cowardly Lion, Tin Man and the Winkie Guards.
As with the cabinet, the backbox imagery is bright and colourful, with a glossy layer of clearcoat to enhance the finish. Although the tapered shape is familiar, the design and contents of the backbox are unique.
Before we look inside, let's head round the back of the machine.
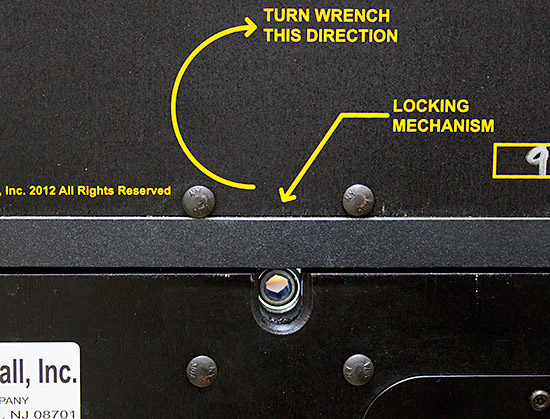
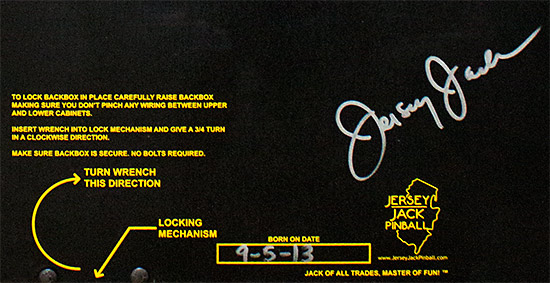
The backbox is secured to the main cabinet using the familiar latch system used on Data East, Sega and Stern games up until Star Trek, which operates with a large hex/allen key.
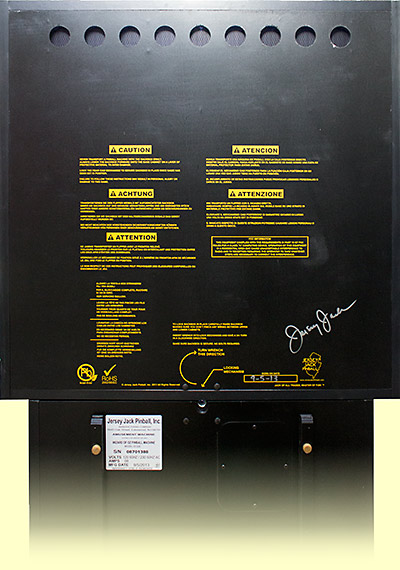
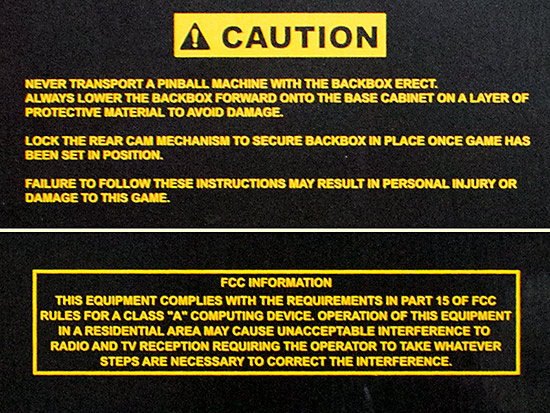
Suitable warnings are printed on the rear of the backbox about the danger of not securing it correctly, along with information about transporting the game and its potential to cause electrical interference.
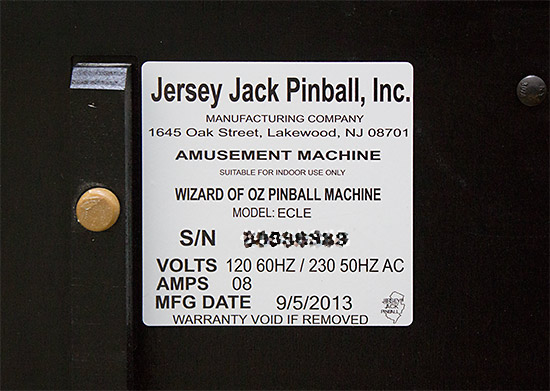
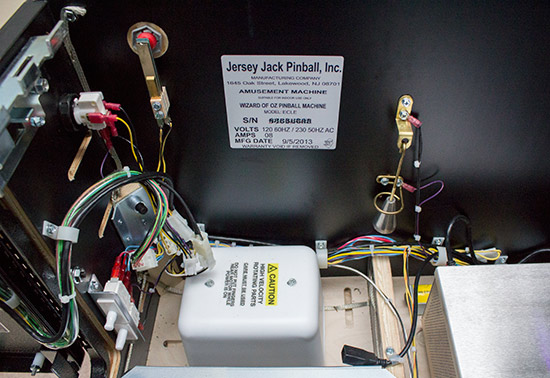
The warning messages are repeated in German, French, Spanish and Italian. The final notice is a sticker detailing the machine's manufacturer, serial number and electrical requirements.
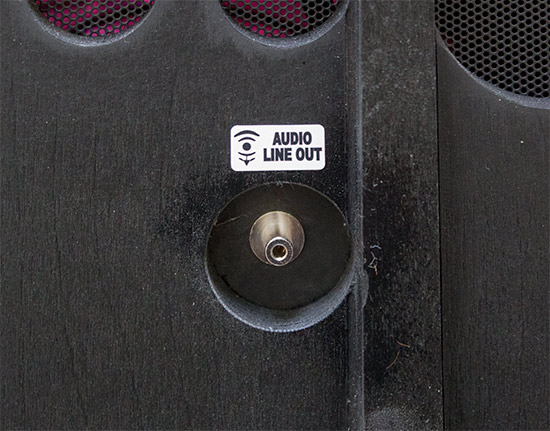
Down at the bottom of the cabinet's rear is another 3.5mm (1/8th inch) jack.
This one is designed to feed the machine's audio to an external amplifier and speakers, such as a home entertainment system or a powered subwoofer. Above the socket are a number of ventilation holes. These are in addition to the ones at the top of the backbox and are needed to provide airflow for the PC motherboard, power supply and the various circuit boards mounted in the base of the cabinet. Quite why there are ventilation holes at the top of the backbox we can see next, as we go inside. The keys to the backbox are supplied on a hook inside the coin door.
The backglass in The Wizard of Oz removes just like any other game, with a key-operated lock at the top. In this particular machine the backglass was very reluctant to move, but some repeated gentle persuasion got it to budge eventually.
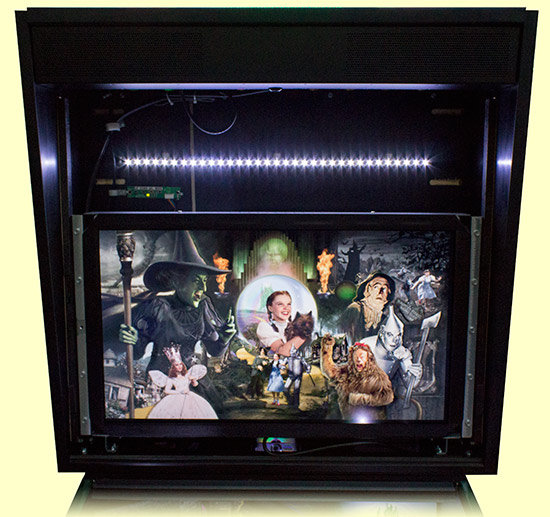
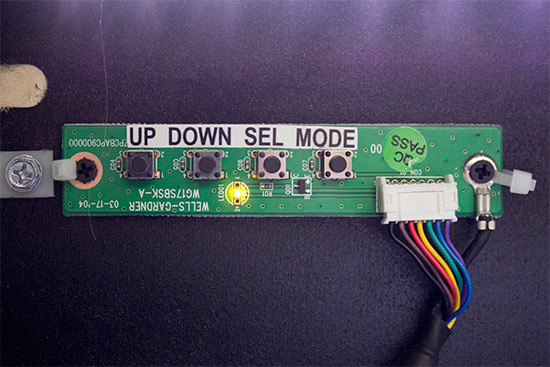
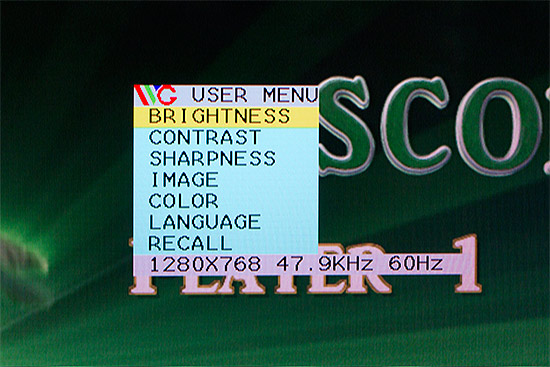
The main component in the backbox - and the reason for the ventilation holes - is the 26-inch Wells-Gardner monitor. This industrial-grade monitor is designed for just this kind of application and includes a remote control panel which is mounted on the back wall of the backbox, just above the monitor.
These allow you to set the monitor's brightness, contrast, colour balance and all the other normal picture adjustments.
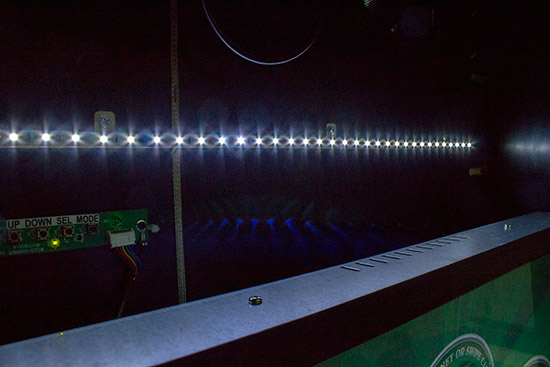
Above the monitor controls is a strip of 33 white LEDs which illuminate the backglass behind the title text.
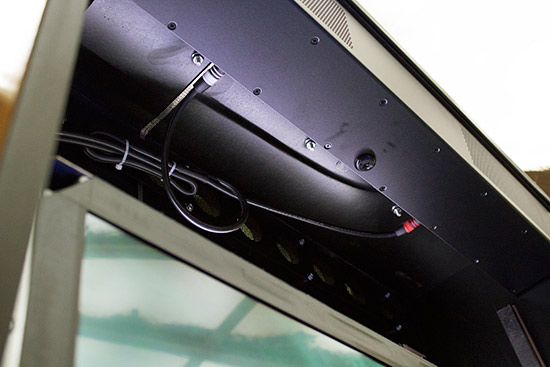
Their distance to the glass helps spread the light and avoids any hotspots. The final items in the backbox sit at the very top - the speakers. These are fed by two RCA/phono cables which connect to the stereo audio amplifier in the base of the cabinet.
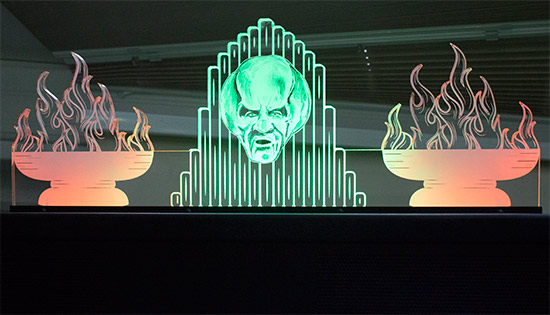
That covers everything IN the backbox, but there's one more feature which sits ON the backbox, and that's the topper.
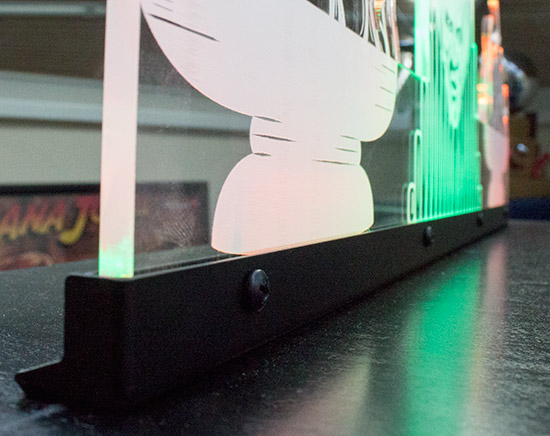
The original list of features included an 'interactive topper', but plans for that didn't work out so this is the replacement. It is a laser etched and cut clear acrylic sheet which is illuminated by a set of coloured LEDs. The acrylic piece is held in a mount by four screws, with the LEDs positioned inside the mount so they shine up through the bottom edge.
The LEDs don't animate in any way although, curiously, there is a test in the game's menu system to fire a topper flasher. At the time of this review the test didn't appear to do anything. Along the front edge of the backbox we find a rubber strip.
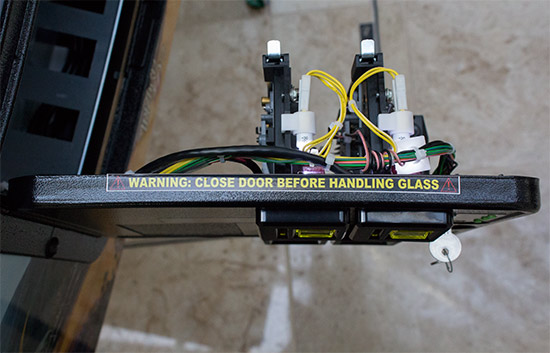
This provides some protection against damage when the backbox is folded down and resting on the siderails. Owners would want to provide better protection than this strip provides on its own. but at least it's something. That's the backbox. Now let's dive inside the cabinet to see what we find there. As we open the coin door to remove the lock bar and glass, we see this useful reminder.
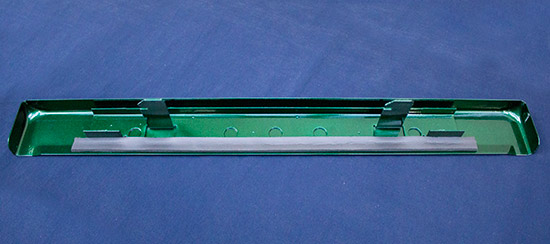
Getting that tell-tale long scratch on the glass from rubbing on the coin door is annoying enough on plain tempered glass, but when the game uses $300-a-sheet Invisiglass you really don't want to scratch it. The lock bar uses a traditional latch mechanism - none of those unpopular clips - and like the side rails, the lock bar is powder coated and clearcoated.
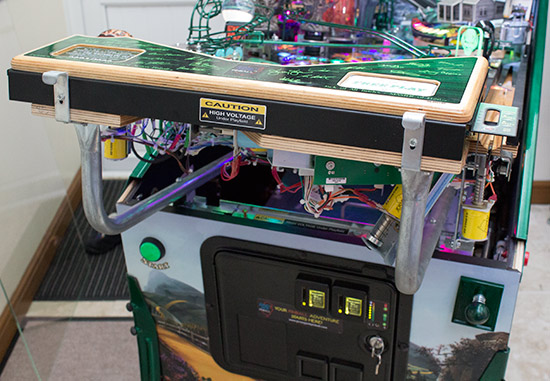
With the glass removed and safely stored, the playfield can be lifted out. The game uses Pinball 2000-style full length slide rails to support the playfield for maintenance and protect the underside if it needs to be removed.
The slide rails have two sets of rubber feet along their length which rest on the lock bar latch to provide two maintenance positions in addition to the fully vertical one. Looking inside the cabinet we find a mix of the familiar and the new.
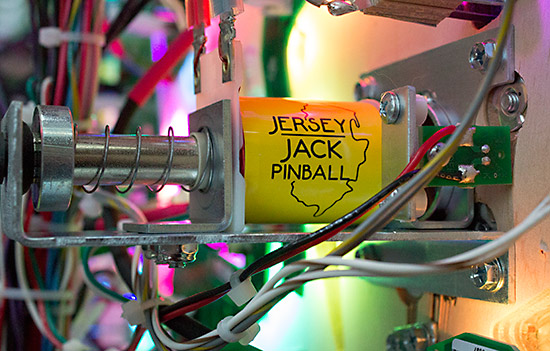
On the bottom left and housed in a white plastic case is the game's shaker motor. In the centre is the cash box, while the switch box on the right includes a power socket and the game's main fuse. Also at the front of the cabinet is a black USB extension cable which allows a USB flash memory stick with updated software to be plugged in without having to reach deep inside the game.
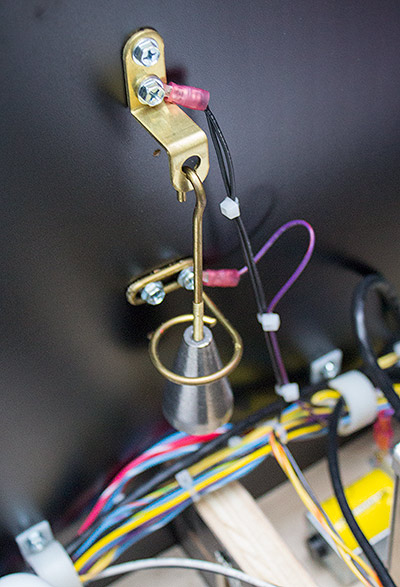
The game uses the same design of plumb bob used on Stern games, and a simple single-layer leaf switch for the flipper buttons.
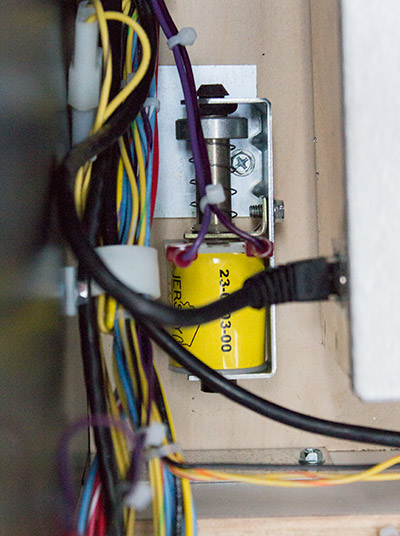
A feature normally found in the backbox has also found its way to the font left of the cabinet and sits close to the shaker motor - the knocker.
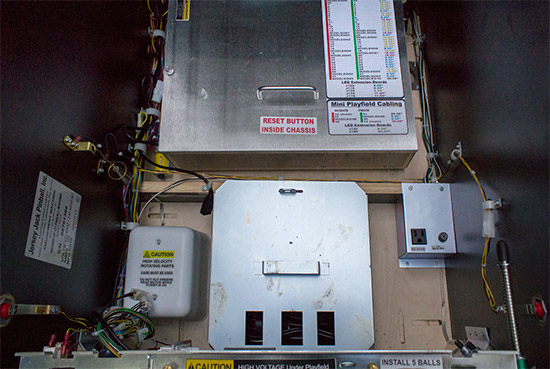
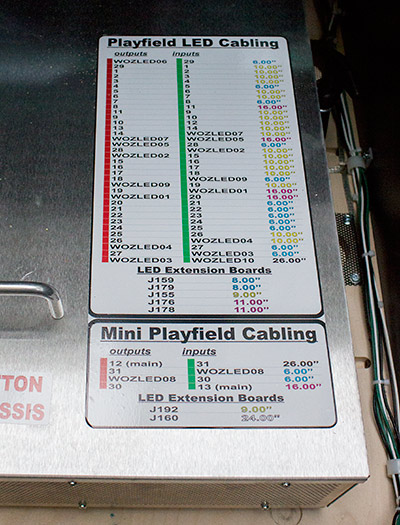
The knocker plunger strikes a metal plate attached to the crossbeam. The Wizard of Oz is not the first game to put the knocker in the cabinet, but some owners have relocated it to its more tradition home at the top left corner of the backbox. There's certainly plenty of space there, after all. So far, so relatively normal. But as we move further up towards the back of the cabinet we find the shielded metal box containing the game's electronics. Inside the box are the PC motherboard, the driver board and the audio amplifier, while attached to the lid are two informational stickers. The first of these details the connections to the numerous RGB LED boards on the underside of the playfield and the game's two mini-playfields.
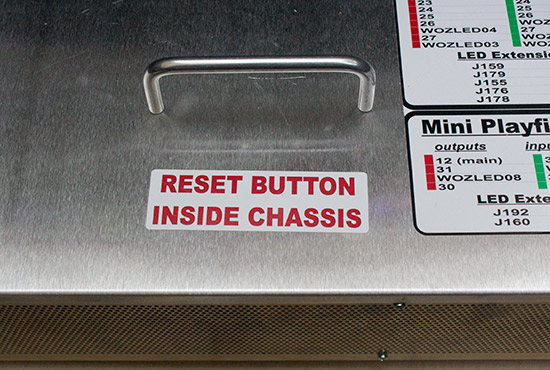
The second sticker is a rather more straightforward reminder that a button to reset the motherboard is located inside the metal box.
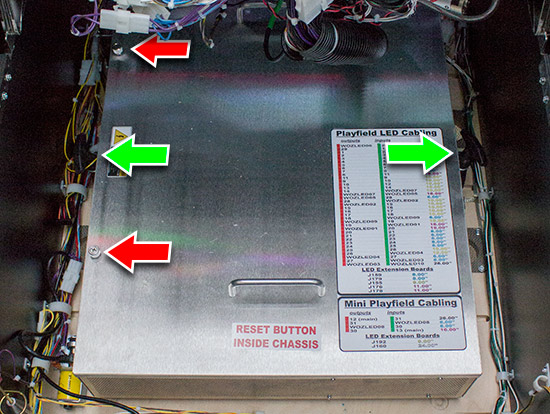
Because The Wizard of Oz uses a regular PC motherboard for the main processor, sound and graphics, it incorporates a standard protection circuit which - in the event of a short loss of power - waits for the front power switch on the PC to be pressed before restarting. Short power interruptions like this are bad for computer components such as hard disks, so the motherboard protects them by not repowering until the user manually turns the power back on. Of course, a pinball machine doesn't have this kind of power switch. In addition, it is not uncommon to restart a pinball machine by turning off the main power briefly and then turning it back on again - exactly the situation which causes the problem. Because doing this could permanently disable the game, a reset switch is provided to repower it. And that switch is located inside the metal box. Removing the lid involves unscrewing two bolts on the left (shown by red arrows below) and then releasing two rubber tie-downs (green arrows) on either side.
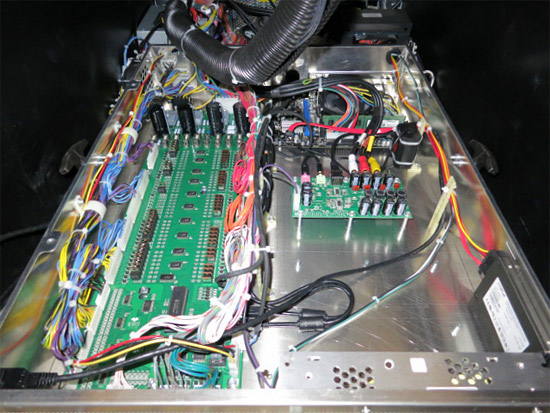
Once the lid is removed, we can see in content of the metal box
On the left side is the Input/Output (I/O) board. This reads all the switches (input) and drives the solenoids, motors and LEDs (output). The top part of the board deals with the power rectification and smoothing, the central area is populated with the drivers, while the bottom part deals with the switch logic and LEDs. The design uses a mix of matrixed and dedicated switches. A 16x8 matrix takes care of most playfield switches, but there is provision for up to 32 dedicated switch inputs as well for things like coin mechanisms, coin door buttons, flipper switches and the tilt bob.
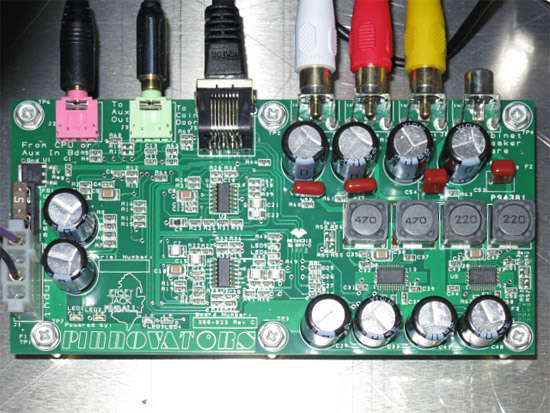
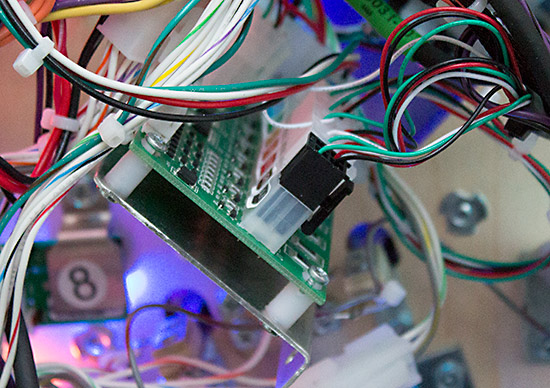
To the right of the I/O board is the sound board. This is made by Pinnovators and takes the stereo audio output from the PC motherboard, amplifies it according to the game's software and the coin door volume controls, and sends the audio signals to the game's speakers in the backbox and the cabinet, and also to the two audio jacks (one on the coin door, one at the rear of the game).
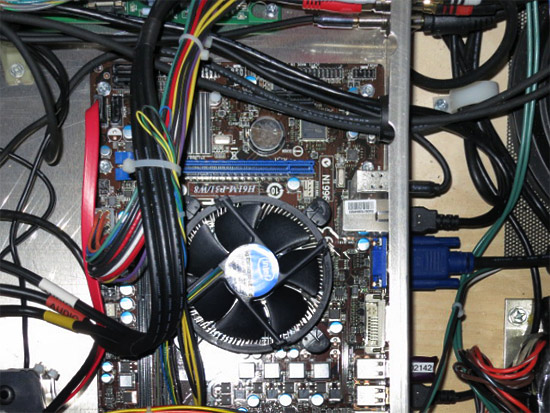
The type of motherboard used has changed since the first prototype machines which used an Intel Atom-based board. Our review game uses a H61M-P31/W8 mini-ATX board from MSI instead. The fan and heatsink cover the processor, but the board supports Intel i3, i5 and i7 socket-1155 processors, so it probably has an i3 fitted. Newer machines also have the reset button mentioned on the cover fitted to restart the game in the event of a brief loss of power. Older machines can have this retrofitted. The motherboard talks to the I/O board through one of the six USB ports, while another is occupied by a dongle which identifies the machine to the operating system and is needed for the game to run.
This machine uses the older VGA connection for the monitor. Newer models use the fully digital DVI-D interface which should help to eliminate mains frequency hum seen on many machines operating in countries with a 50Hz supply. The operating system itself, along with all the game's graphical and sonic assets are stored on a solid-state drive (SSD) which is mounted at the front right of the metal box. On the rear of the box's front face is one of the machine's power supply modules which provides 24V DC for the sound board. While the backbox may be mercifully free of cabling looms, the Jersey Jack Pinball control system moves all those bundles of wire into the back of the cabinet.
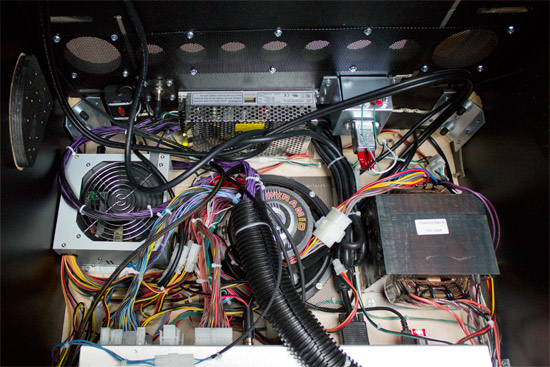
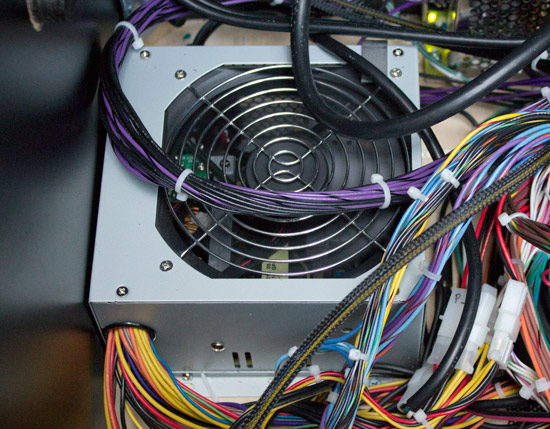
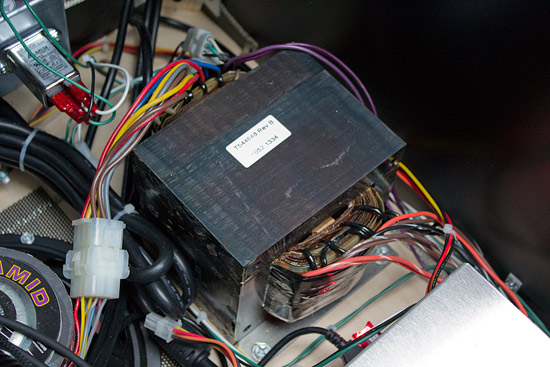
On the left is the PC's power supply which is a standard ATX model as found in millions of desktop computers, in the centre is the 8 inch, 4 Ohm cabinet speaker, while a regular-looking pinball transformer sits on the right to provide high power for the solenoids.
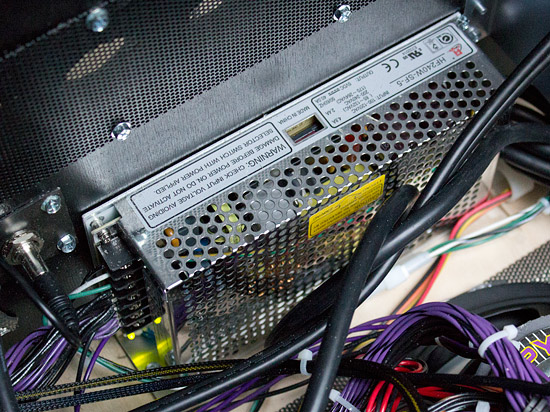
As though three power supplies isn't enough, a fourth is mounted on the back wall of the cabinet. This one provides the power for the many RGB LEDs used on the playfield.
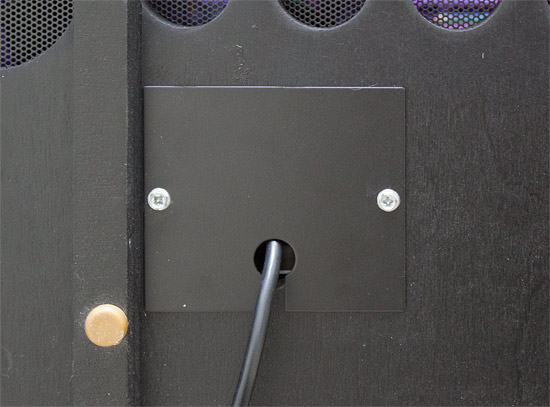
This power supply is another component of the game which has changed since production began. Many earlier games used the type shown in the picture above which feed the RGB LED boards under the playfield with 5V. After some of these boards failed, newer more-robust boards were built which were designed to work with a 7.5V supply, but were also backwardly-compatible with the 5V supply. So newer games have a 7.5V power supply, while older ones have this 5V unit. Two other devices are located on the cabinet's back wall. The first is the main power inlet, which happily uses the standard IEC C-13 connector.
On the outside of the cabinet, the connector is hidden behind a metal blanking plate to prevent tampering or removal.
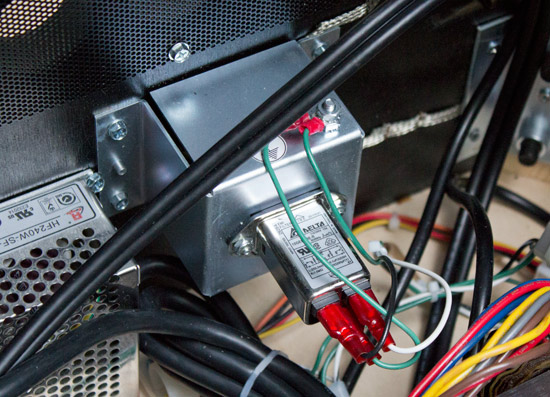
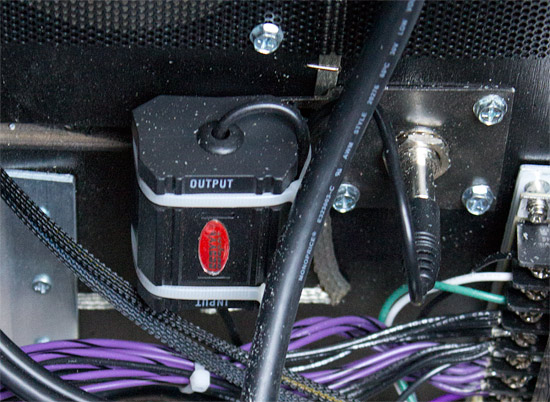
The other device is the line out socket which is fed through an Axxess AGL3.5 ground loop isolator/noise filter unit. With so many power and signal cables winding their way around the back of the cabinet, this should clean up the line output for anyone wanting to plug their game into an external amplifier.
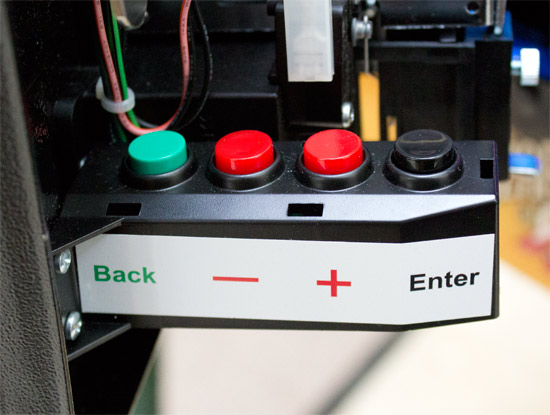
Before we move on to the playfield, let's quickly jump back of the coin door and take a look at how the game's features are configured and diagnostic tests are run. The game's menu system operates very much like the Williams Pinball 2000 one, using four buttons behind the door while the monitor shows detailed information. The four buttons are Back, Down, Up and Enter, and the operation will be familiar to anyone who has used the menus in a WPC machine.
Pressing 'Enter' starts navigation of the menu system, showing the current time, date and software version in the bottom right corner of the screen, and the list of top-level menu options on the left.
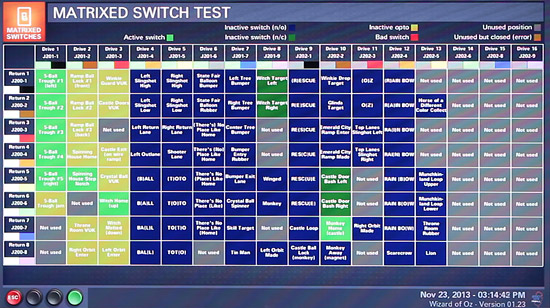
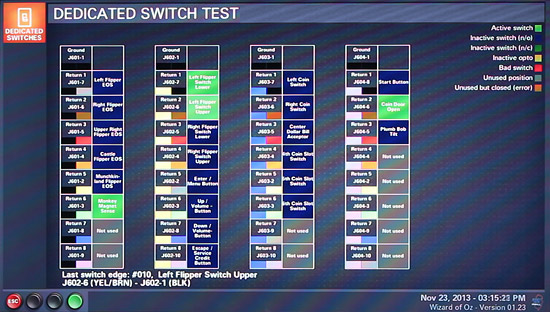
The 'Up' and 'Down' buttons then select from Tests, Settings, Audits, Utilities, Install Presets, Reports and Presets, with Enter choosing that option. The most common is probably going to be Tests, so here's what the test for the switch matrix looks like.
As the switch states are changed a highlight glint runs through their corresponding box on the display, while the bottom of the screen shows the connector pin numbers and the cable colours. Suspected bad switches are highlighted in red, dark blue and dark green boxes represent switches in their normal state, yellow boxes are optos, light green shows when a switch is in its activated state, while grey boxes indicate an unused position in the matrix. The same colour code is used for the dedicated switch test.
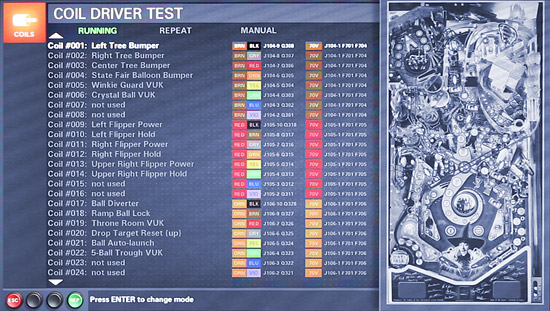
The solenoid test page shows the layout of the playfield and presumably at some point in a future update the coil position on the playfield will be indicated as it is fired. Three test modes replicate those in the WPC system, allowing the game to either cycle through all the coils, fire individual coils repeatedly, or allow a specific coil to be manually triggered with the menu buttons.
The cable colours, driver transistor, connector pin numbers and fuse number are all shown for each coil to aid troubleshooting, and throughout all the tests the functions of the four coin door switches are shown in the bottom-left corner of the monitor. So that's what you'll find inside The Wizard of Oz's cabinet and backbox. Now it's time to take a look at the playfield.
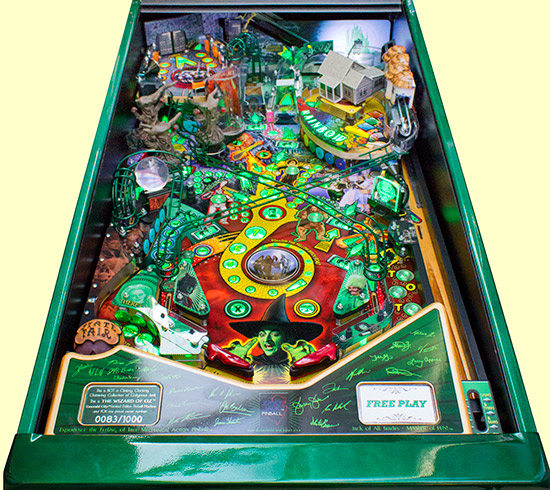
We'll begin on the top surface by taking a tour of all the game's features, starting at the flippers.
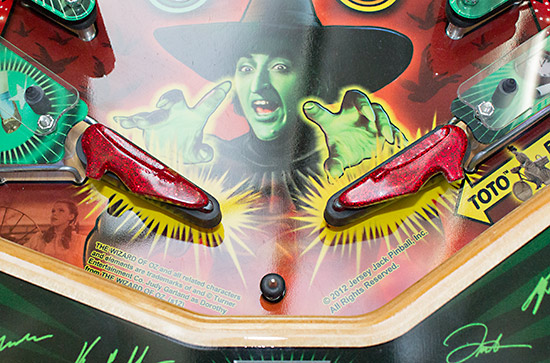
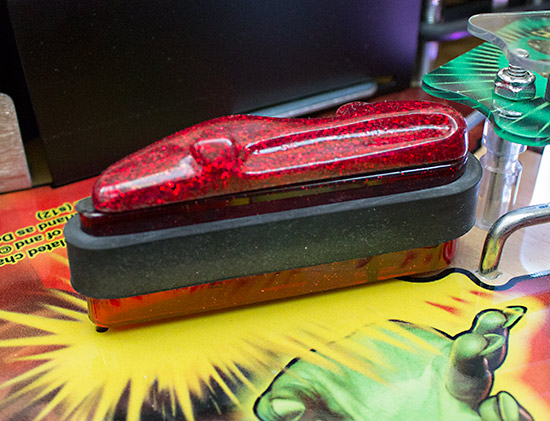
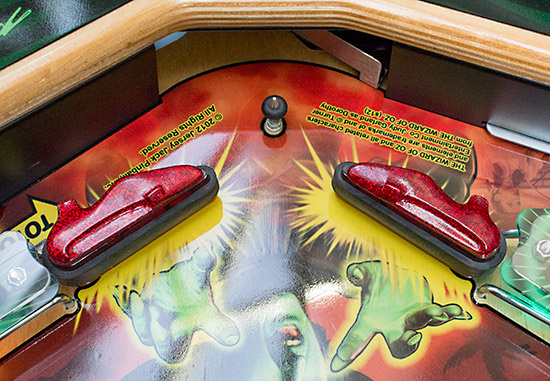
The Wicked Witch is reaching for those elusive red slippers which have a pearlescent flecked finish and are mounted atop the dark red main flippers. Despite the violent movement of the flippers, they do seem to adhere quite well and are not so large they inhibit removal or replacement of the flipper rubbers.
Like nearly all (but not quite all) the rest of the game, the flippers are fitted with black rubbers which provide a slightly less bouncy experience than most brighter alternatives, but don't show the dirt as much. A centre post is fitted to the game, which is usually a mixed blessing but provides the hope of saving a straight centre drain.
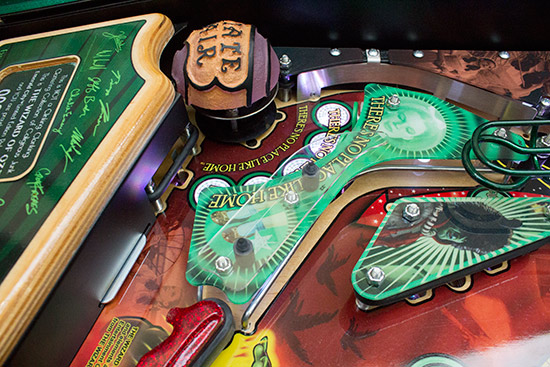
If the ball does escape, the entrance to the trough is a standard arrangement, with a metal apron and flat rail guiding the ball. The apron on the Limited Edition models has a wooden top featuring the signatures of the design team and the number of the machine, but this can be unscrewed if it is not wanted. Normally when reviewing games, the left inlane/outlane is one of the lest exciting parts with just a couple of guides to return the ball either to the left flipper or the trough. With The Wizard of Oz though, things are a little different thanks to the State Fair balloon bumper and the There's-No-Place-Like-Home standup targets.
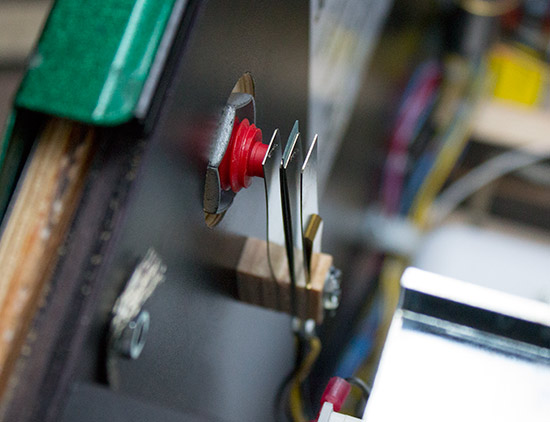
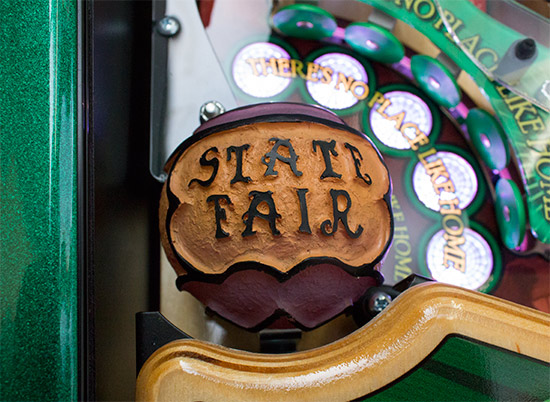
As the ball rolls down the outlane, it is guided towards the State Fair pop bumper which is recessed so only about 40% is actually visible. It features a special molded bumper cap designed to look like the balloon in the movie.
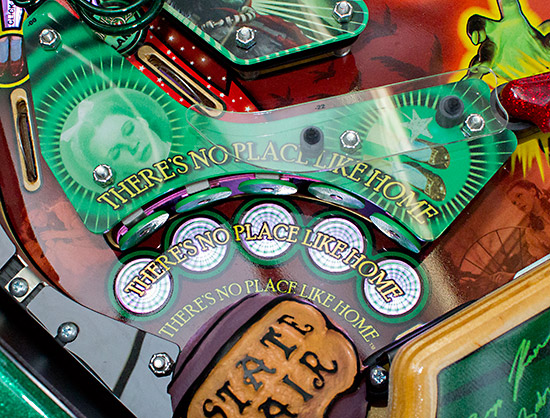
The pop bumper beneath the cap kicks the ball against a set of five standup targets arranged in an arc which spell out There's-No-Place-Like-Home.
In case you missed the "There's no place like home" message the first time, the phrase is repeated twice more, although only one of those has the trademark symbol which appears numerous times throughout The Wizard of Oz. As each target is hit its corresponding insert lights up white, and completing all five starts a ball saver mode where a new ball is launched and various tasks need to be completed in order to resume normal gameplay.
The entrance to the outlane is surprisingly wide and often provides little opportunity to save the ball once it starts heading that way.
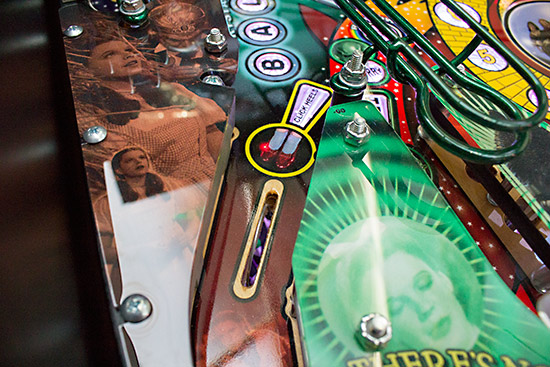
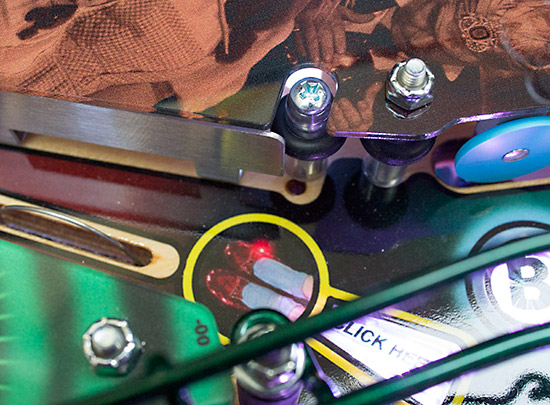
There is a single rollover switch and a Click Heels insert at the top of the outlane before the ball is directed at the pop bumper. It is theoretically possible for that bumper to send the ball back up the outlane and return it to play, but so far we haven't seen this happen. The left outlane entrance does have a modicum of adjustment available to slightly reduce the width. There are only two settings, and changing between them involves moving both the post and the adjacent flat rail which also has a second set of mounting holes.
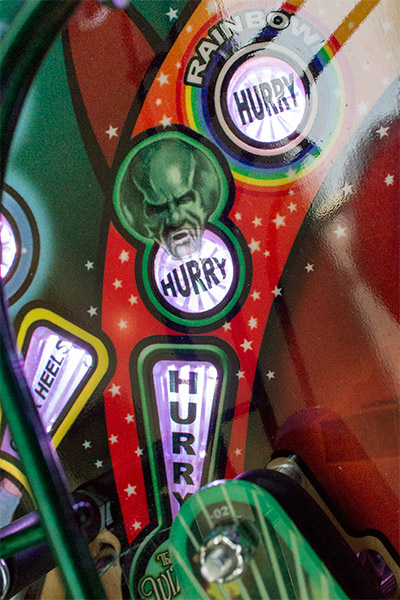
Although the post can be moved without removing the sepia plastic which sits above it, the plastic does have to come off to adjust the flat rail. To the right of the left outlane is the left inlane and like it's neighbour, it too has a rollover switch and associated inserts.
In this case though, there are three inserts, all indicating a hurry-up shot which becomes available once the ball rolls over the switch.
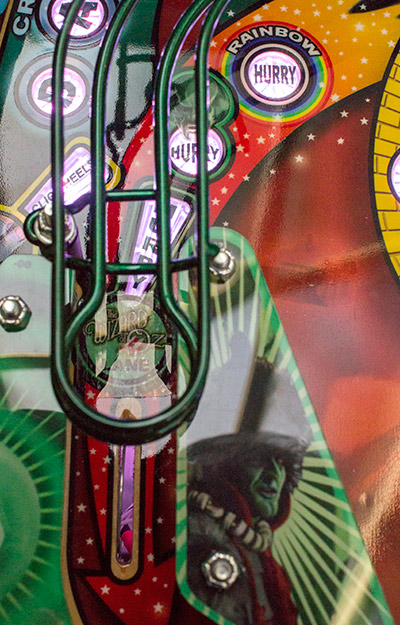
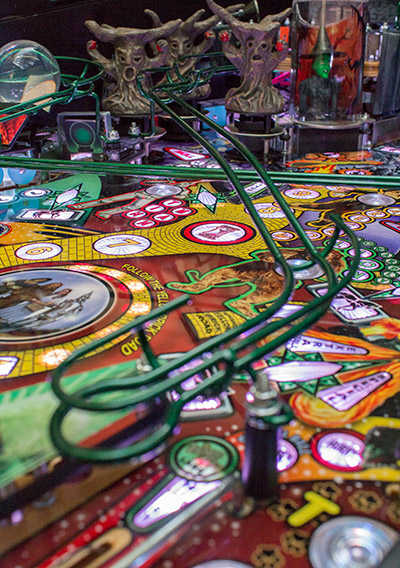
As you can also see, the left inlane is also the dropping-off point for one of the game's wireform ramps - in this case it is the ramp from the Munchkinland mini-playfield and also from the Crystal Ball upkicker.
The curved clear plastic on top of the There's No Place Like Home standups helps deal with any balls which fly off the end of the wireform, and there is a similar plastic on the right side too. To the right of the left inlane is the left slingshot which is pretty conventional design, consisting of two leaf switches, one kicker arm, a single layer plastic covering it and a single light source.
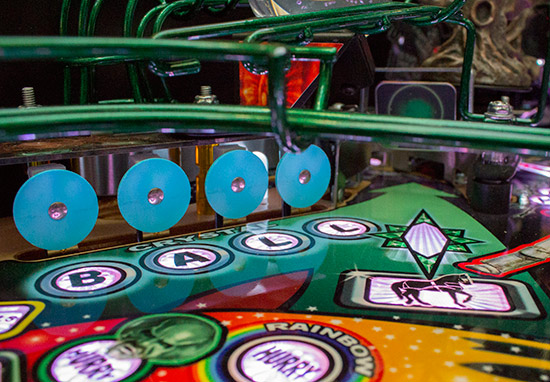
The main difference here is that light source, which instead of being a lamp or lamp-shaped LED is one of many frosted acrylic posts which provide - with varying degrees of success - the game's general illumination. As before, black is the rubber of choice, while the metal posts on all three corners rule out the use of star post LED lights to boost the illumination unless you change the posts too, as some owners have done. Moving on up the playfield, the next feature we find is positioned just above the left outlane and is a 4-bank of standup targets.
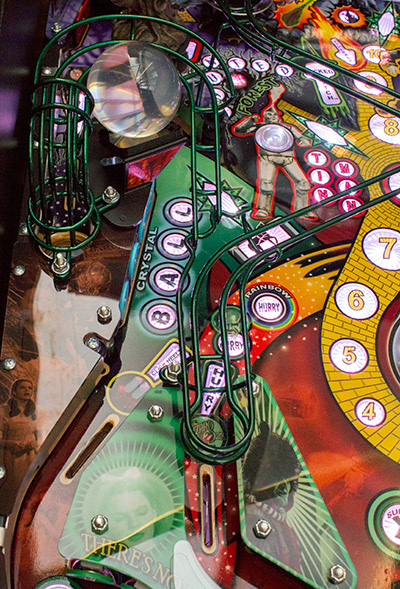
Each standup target corresponds to a letter in B-A-L-L, lighting it when hit. Completing all four qualifies the Crystal Ball feature, the entrance to which is located just above the B-A-L-L targets.
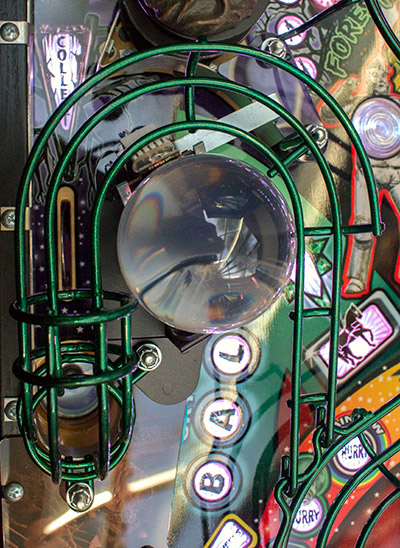
A spinner marks the entrance to the Crystal Ball lane, which turns quickly to the left and sends the ball down the playfield to an upkicker.
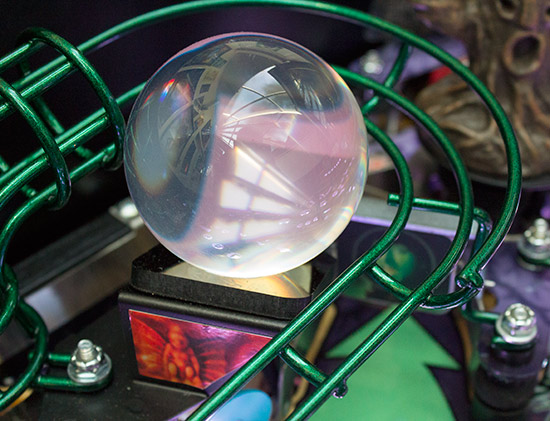
Dominating the area is the Crystal Ball itself, around which the upkicker's wireform bends on its way to the left inlane.
If the upkicker is shot when the Crystal Ball is qualified, one of a number of Crystal Ball 2-ball modes begins. These help your scoring at the cost of making it hard to see what's happening or control the ball. The modes include Lights Out where all playfield inserts go out, Lights On where everything lights and Flipper Frenzy where the flipper controls are swapped over.
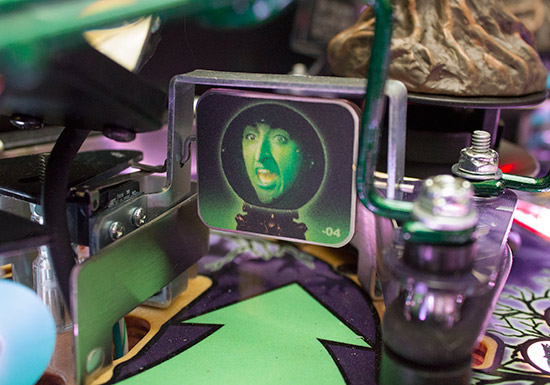
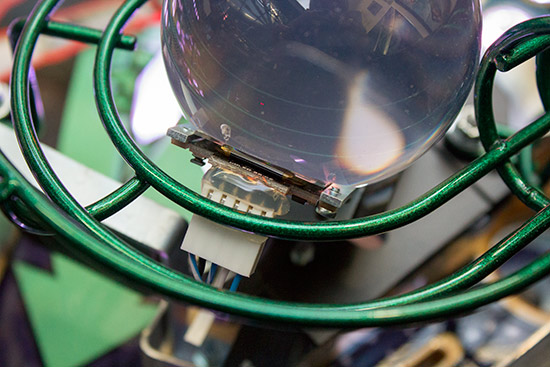
The Crystal Ball itself is more than just a pretty face though, as mounted on the flattened base is a small LCD monitor, the image from which can be seen through the ball.
The low resolution of the tiny monitor and the distortions introduced by the ball mean the image is not always clear, but then that's often the problem with crystal balls.
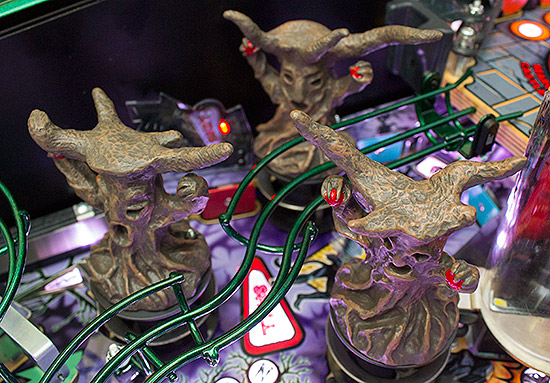
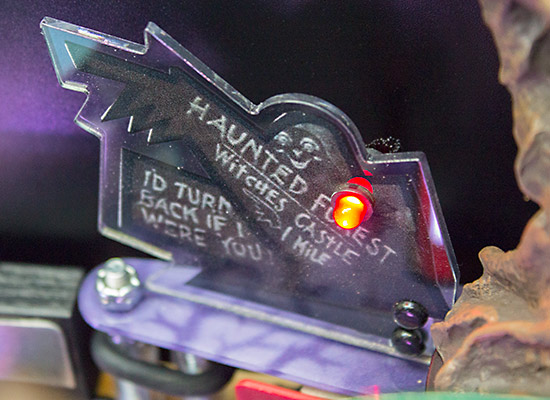
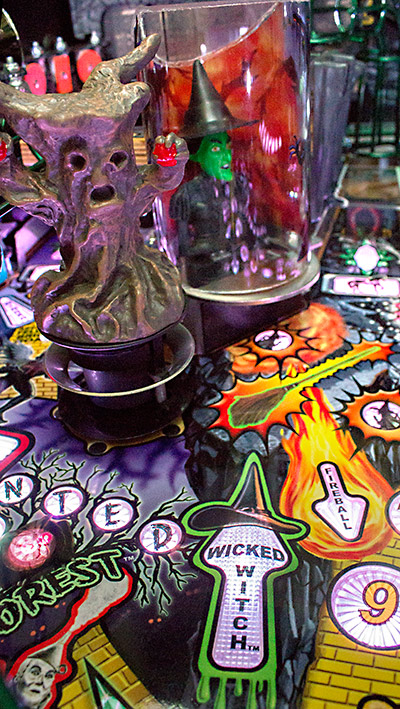
Located above the Crystal Ball is the Haunted Forest, consisting of three pop bumpers and three standup targets.
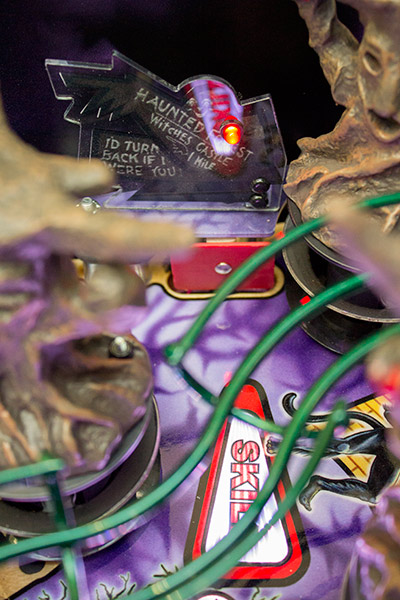
The tree pop bumpers (or Trumper Bumpers) feature specially sculpted tree models holding apples. There was a suggestion these would be lit, but that feature has been left to the aftermarket as a mod for those who want it. They are otherwise fairly standard skinny-type pop bumpers with two different shots through them. The first is one of the game's skill shots and is made by the upper right flipper. It is registered with a red rectangular standup target, very much like the 'More Time' target in The Simspons Pinball Party.
The second shot is more Lawlor-esque and passes straight through the Trumper Bumpers to become the left orbit lane.
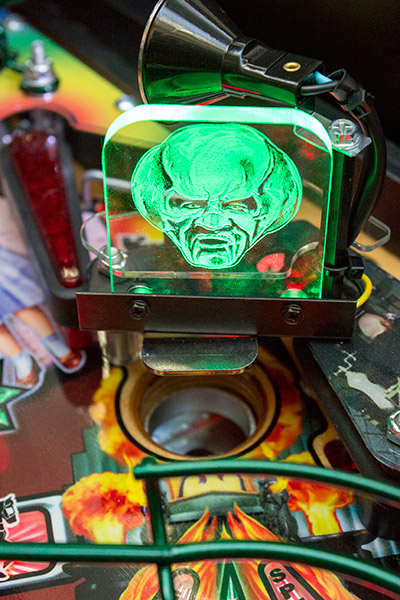
The orbit lane is flanked by two blue standups which need to be hit to activate the Winged Monkey feature. The orbit lane advances along the Yellow Brick Road, feeds the Winged Monkey when available, is one of the Horse of a Different Colour shots, and if nothing else, sends the ball round the orbit lane to the upper right flipper. At the top-right corner of the Haunted Forest is where the game's antagonist spends her time spouting insults and doing all in her power to thwart you.
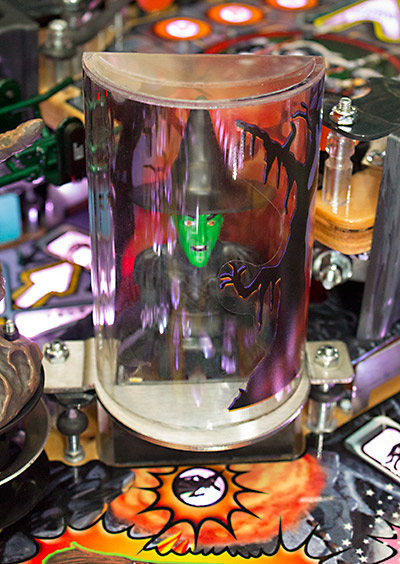
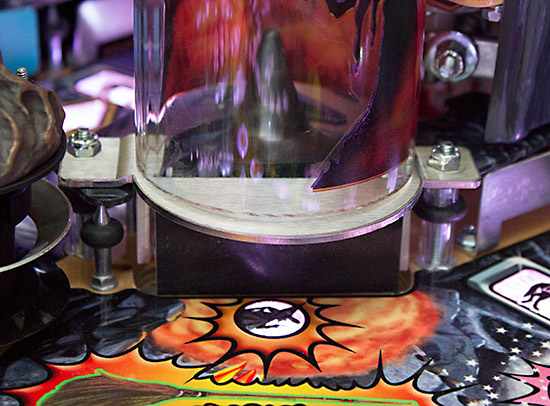
The Wicked Witch is entombed inside a clear acrylic half-tube which somewhat diminishes her impact, but does allow for some attractive lighting effects to be performed.
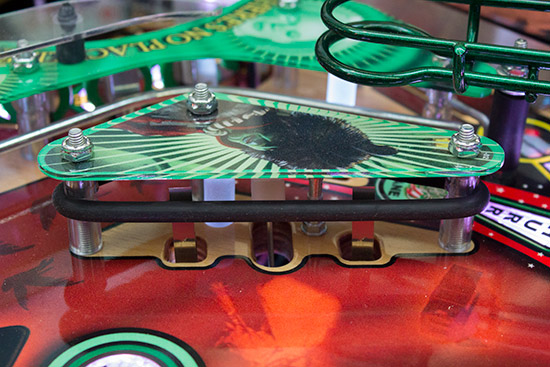
Battling the Wicked Witch is achieved by hitting the black plate at the base of her tube. The Witch is designed to melt when attacked, which in this game means she sinks down into the playfield, leaving only her hat visible when she is finally defeated.
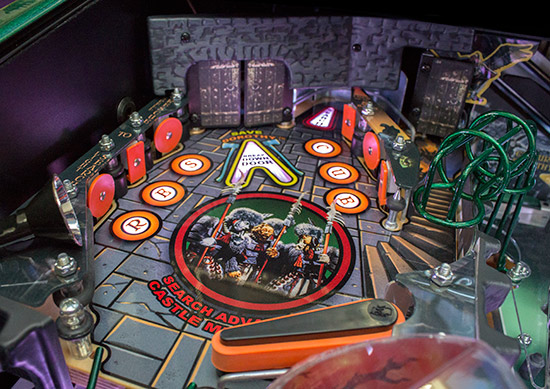
The Witch has more than barbed words with which to attack you, because directly in front of her are two magnets which can disrupt the ball's path or throw it in unexpected directions. Positioned behind the Witch is her castle, where Dorothy is taken after being captured by the Winged Monkeys in the movie. In The Wizard of Oz pinball, the castle is the first of the game's two mini-playfields.
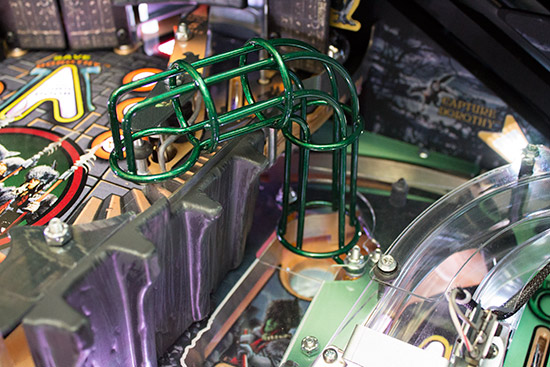
The Witch's Castle comprises six standup targets to spell R-E-S-C-U-E, a single full-size flipper to hit the targets, a pair of doors which can open to reveal a saucer behind, a small orbit lane to the right of the doors, and an exit lane just below the tip of the flipper. There are two ways for the ball to enter the Witch's Castle. Just above the flipper is a green wireform which has an upkicker at its base. If the ball is shot into the upkicker it is launched up to the mini-playfield and onto the flipper.
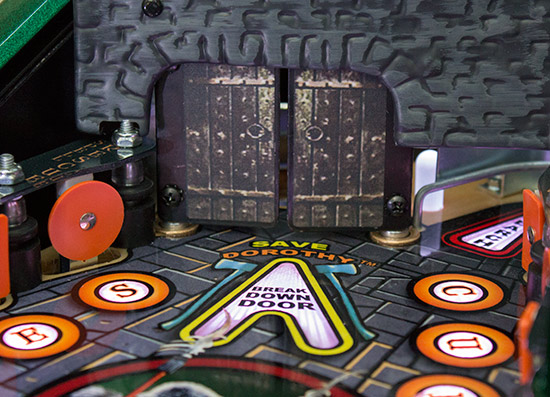
The other way is from the Winged Monkey mechanism which lifts the ball and drops it behind a third door at the top right of the Witch's Castle. It can either be locked here, or the door can open to release it onto the mini-playfield.
When the R-E-S-C-U-E targets have been completed and a number of virtual locks made by shooting the Search orbit, the castle doors open to reveal the saucer which starts multiball.
Returning to the main playfield we come to the first feature which sends the ball up to the Witch's Castle - the upkicker.
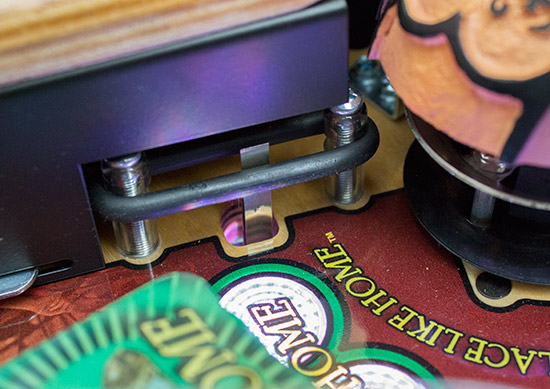
To get into the castle you first need to get past the guards, so the upkicker is at the end of a lane which is blocked by a Winkie Guard drop target. This needs to be hit multiple times until all the guards are defeated and access to the castle's upkicker is granted.
The drop target is black, with a dark decal of a guard, in a dimly-lit part of the playfield, and covered with a clear plastic. So it's not the easiest thing to see from the player's perspective.
Once the target stays down, the next shot will pass over it and into the upkicker, from where it will be ejected to the Witch's Castle as we have seen. The clear plastic covering the lane is needed because the game has no way to manually drop the Winkie Guard target. If an airball should land behind the drop target it would be stuck, so the clear plastic prevents this happening. The castle upkicker is another of those major shots lit for Horse of a Different Colour mode and to collect a jewel. On the right of the entrance to the castle upkicker is the bright pink Glinda target.
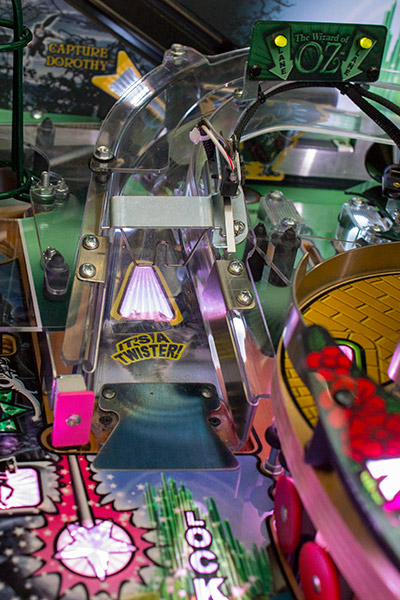
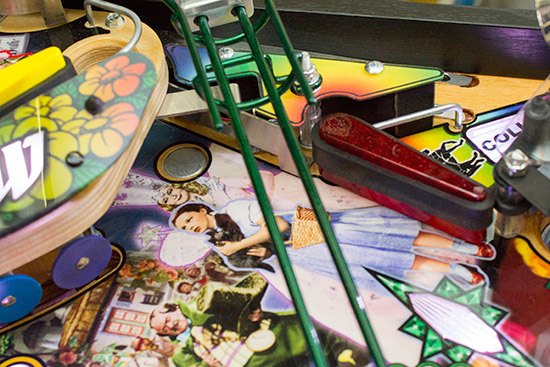
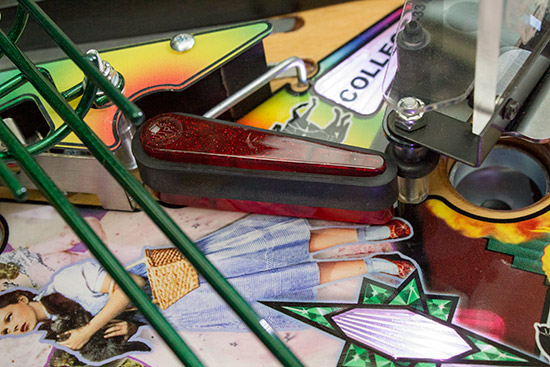
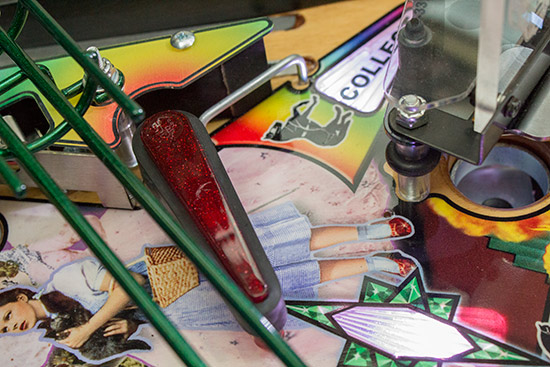
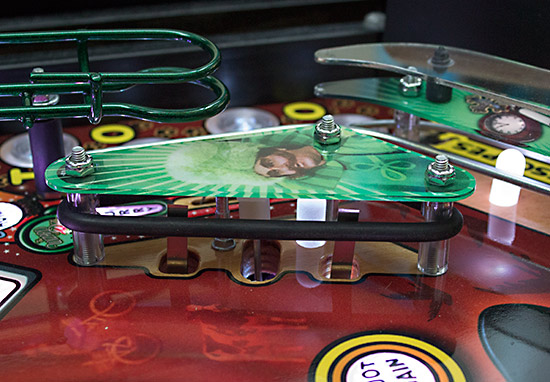
Glinda - a.k.a. The Good Witch of the North - is your helper in the game, countering some of the Wicked Witch's moves and giving you helper awards along the journey. Next to Glinda is the next major shot and one which leads us to the second mini-playfield - the game's only ramp.
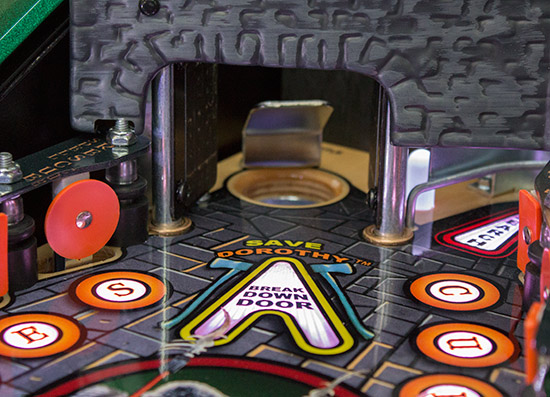
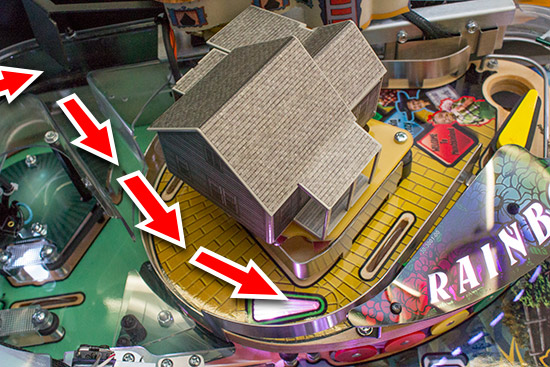
It seems strange that a game as wide and complex as The Wizard of Oz should have only one ramp, but that's certainly the case. However the one ramp it does have can lead to two different places. When the ramp is shot, a diverter arm either allows the ball to enter Munchkinland, or the arm activates to send it to the twister.
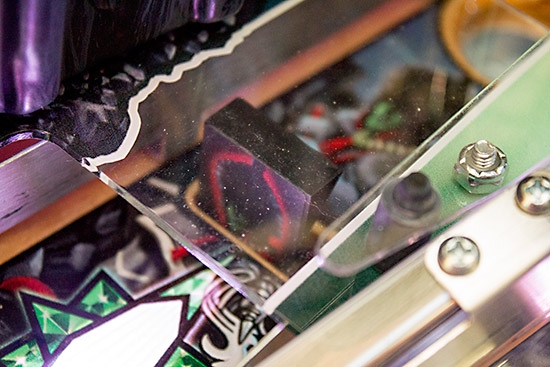
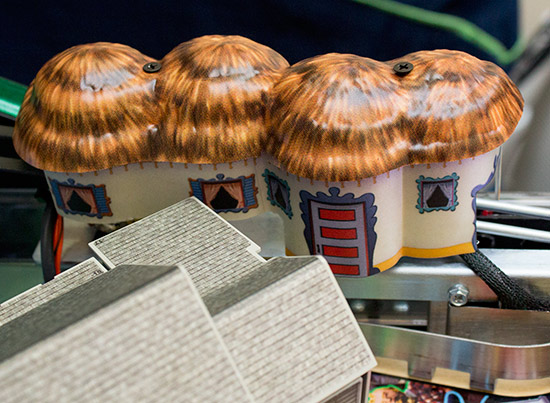
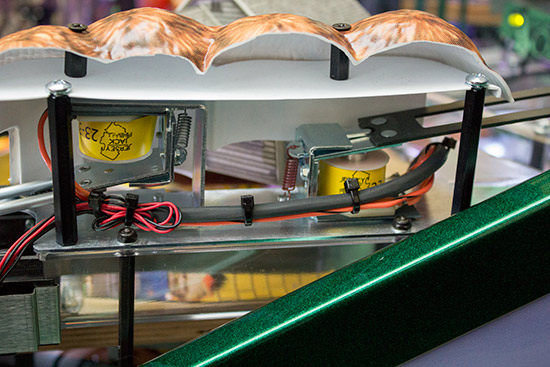
Munchkinland is the place to physically lock balls for Emerald City Multiball, so when lock is lit, the ball is held by a lock mechanism positioned under a plastic depicting some of the Munchkins' huts.
Inside the huts are solenoids to control the diverter arm and the ball lock arm.
When lock is not lit, the locking arm lifts up to allow the ball to pass through unhindered. If there is currently one or more balls locked, the arriving ball joins the lock and the front locked ball is released, just like the sword lock in The Lord of the Rings. If lock is lit, then the ball is held while the animation on the display takes place, at which point a new ball is auto-launched from the trough.
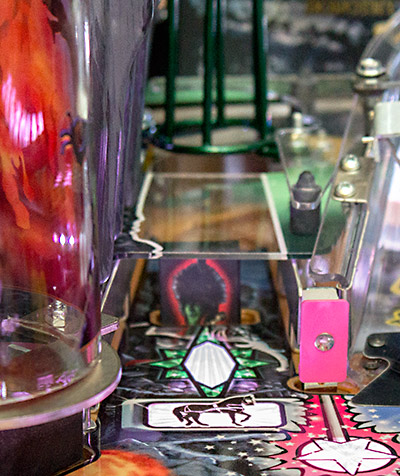
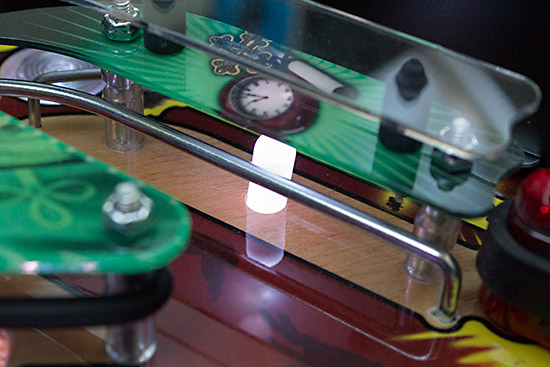
When the Twister is qualified, the It's A Twister insert under the ramp lights and when the next ball is shot up the ramp the diverter arm activates to send it away from the Munchkinland lock and into the twister.
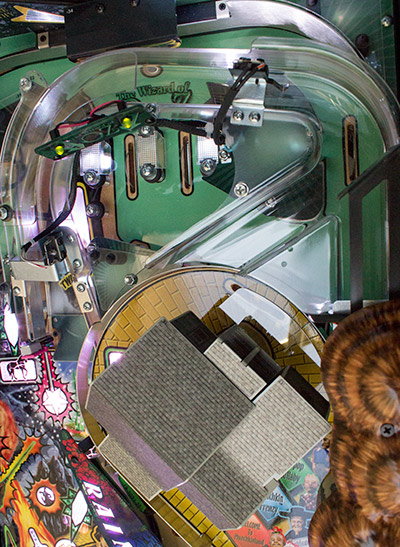
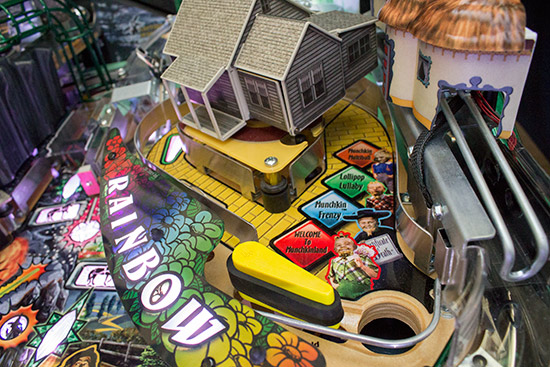
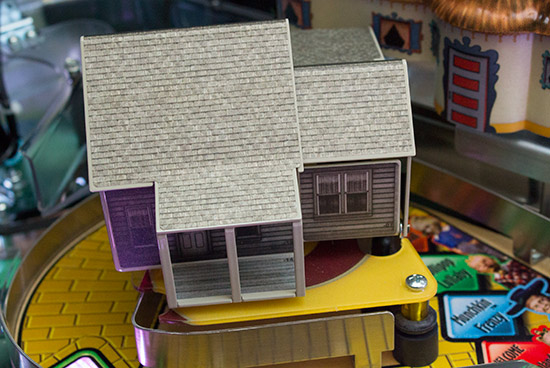
The ball then goes to the Twister part of the mini-playfield where it needs to be shot round and round the orbit until enough loops have been made to allow the house to land in Munchkinland and so start one of the Munchkinland modes.
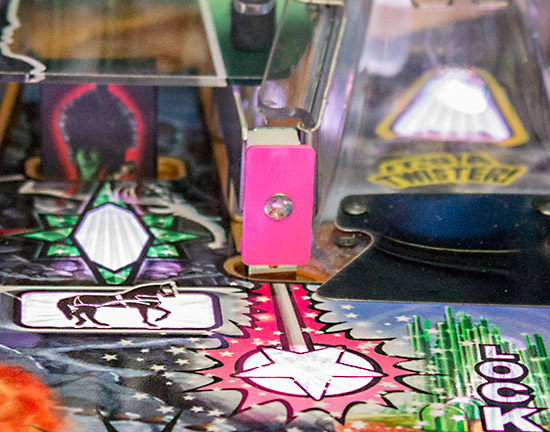
As the orbit is made, the house spins in the same direction. If the orbit shot is missed or the player loses the will to flip, the ball drops through the hole next to the flipper and down onto the main playfield, and the house stops spinning.
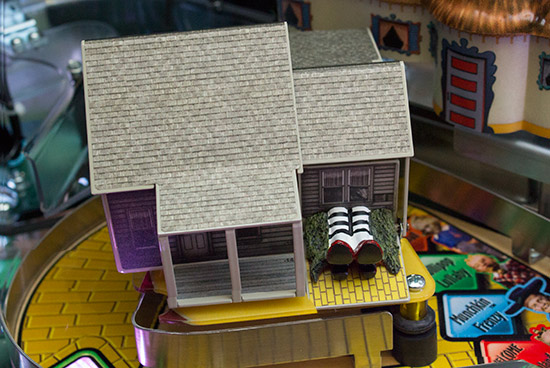
If enough orbits have been made, the ball is held on a magnet next to the flipper, the Witch's legs appear from under the house, and a Munchkinland mode begins.
The upper flipper is a full-size dark-red bat, the same type used as the main flippers but without the ruby slipper attached.
It does have a trick up it's sleeve though, because when it is raised, the ball can be shot under it and into the shooter lane to collect bonus points.
The upper flipper is positioned at the entrance to the right orbit lane, so let's take a look at that now.
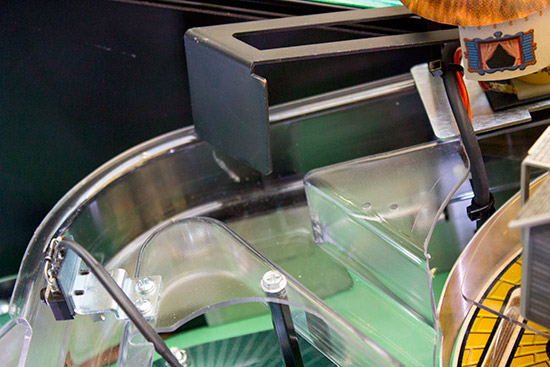
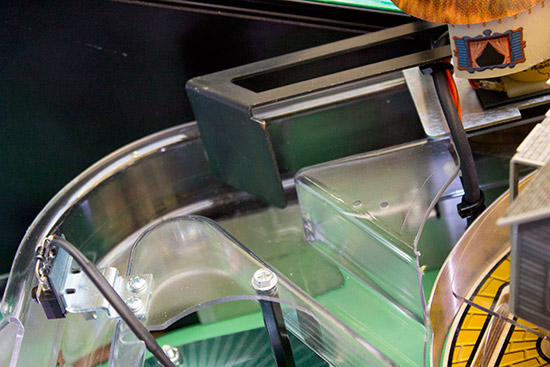
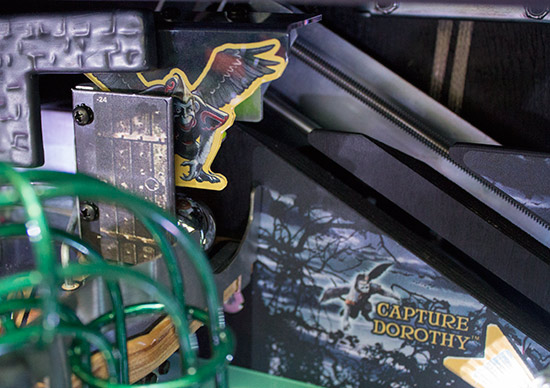
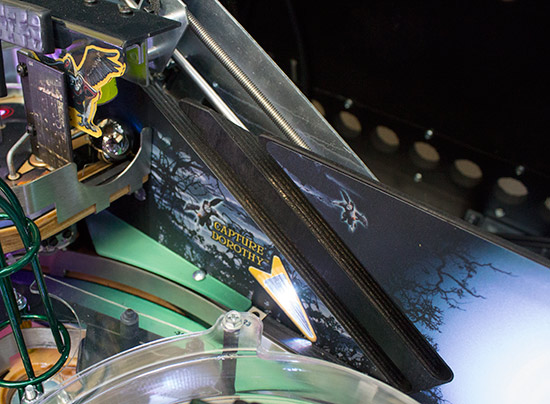
Most of the right orbit lane is hidden either beneath or behind the Munchkinland mini-playfield, so it's hard to see whether a shot had been successful or not until it either emerges at the top of the playfield, or rolls back to the upper flipper. Like the left orbit, it advances the Yellow Brick Road feature, is one of the Horse of a Different Colour shots, and collects jewels. It also sends the ball to the Winged Monkey when that feature is enabled, and - if the orbit shot is not too hard - can feed the top rollover lanes. When the Winged Monkey is qualified, another magnet above the top rollover lanes grabs it while the monkey descends from the Witch's Castle.
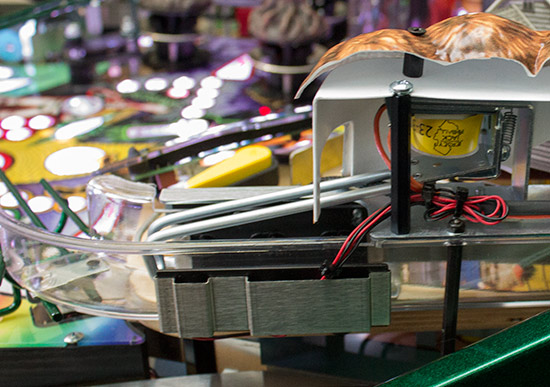
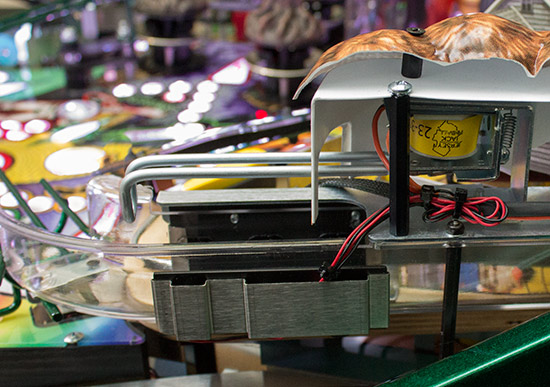
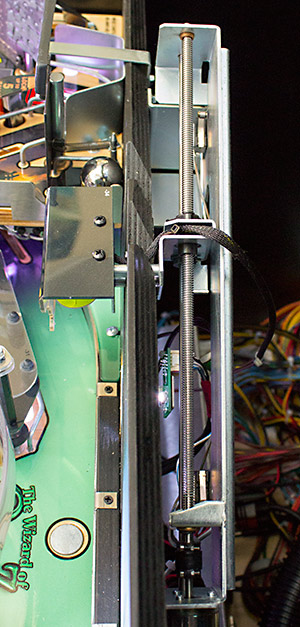
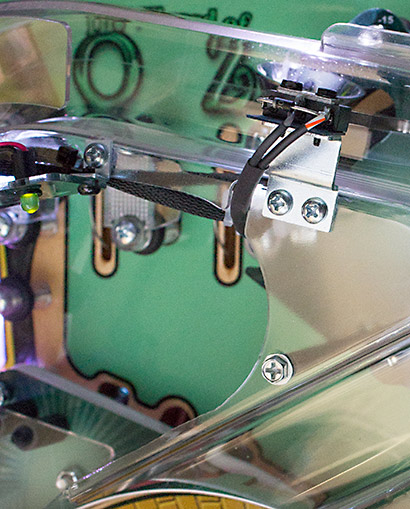
The monkey consists of an electromagnet on a carriage which moves diagonally from its home in the castle to the magnet above the lock lanes, where it picks up a stopped ball and transports it up to the castle.
The carriage moves on a threaded rod which is turned by a motor at the bottom end.
To make sure the carriage stops at either end of travel, there are microswitches at both ends to tell the game when the Winged Monkey has arrived.
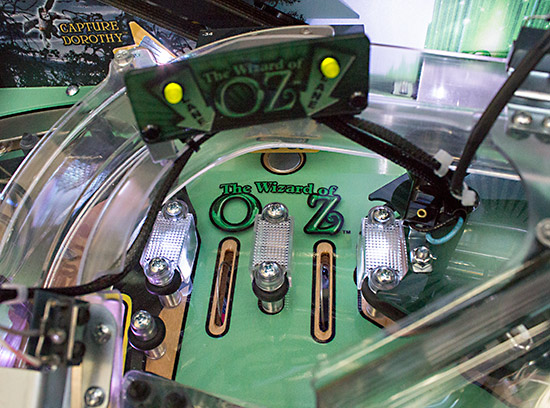
If the shot or plunge up the right orbit isn't strong enough to complete the lane, the ball will fall into the rollover lanes. There are just two rollover lanes with their status indicated by green LEDs on the sign above. Rolling through a lane lights its respective LED, and completing both advances the bonus multiplier. The two outer lane guides both have multicolour LEDs, but strangely the centre guide is not illuminated.
Rather than trying to squeeze in more pop bumpers below the rollover lanes, The Wizard of Oz instead has another slingshot which kicks the ball back up towards the lanes and provides plenty of opportunities to increase your bonus multiplier. The drawback to this approach is the amount of wear suffered by the slingshot rubber which is white for extra bounciness, but which some owners have already had to replace after it perished.
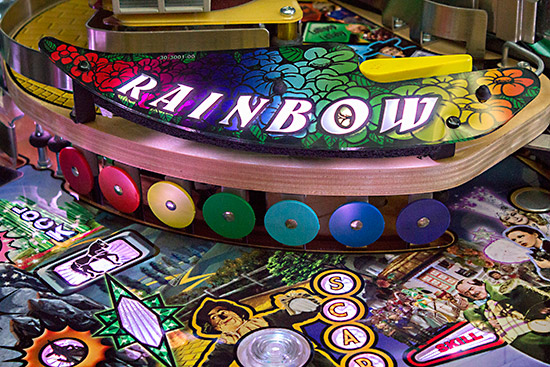
When the ball has been kicked around enough, it exits to the right into the right orbit lane, and rolls down to the upper flipper. Just above the upper flipper and directly below the Munchkinland mini-playfield are more standup targets. These seven are arranged in an arc and spell out R-A-I-N-B-O-W.
Each target lights a letter in R-A-I-N-B-O-W, and completing them is the key to sending the ball to the twister to spin the house and start a mode. Hitting all the targets is also the first stage of trying to recover your ball in the There's No Place Like Home feature. Continuing around the playfield, directly below the upper flipper is the Throne Room saucer.
The etching of The Wizard works just like the topper, with some green LEDs at the base which shine up into the acrylic block. The Throne Room is where mystery awards are given, and also where extra balls, jewels and special can be collected.
The ball is kicked out with relatively little power from the Throne Room saucer, which initially seems disappointing but on reflection seems in keeping with the story. Below the Throne room are the right inlane and outlane which have similar but different features to their left-side counterparts.
The inlane again starts one or more hurry-up shots for an ever-decreasing number of points, and is the end of the wireform leading from the Witch's Castle exit.
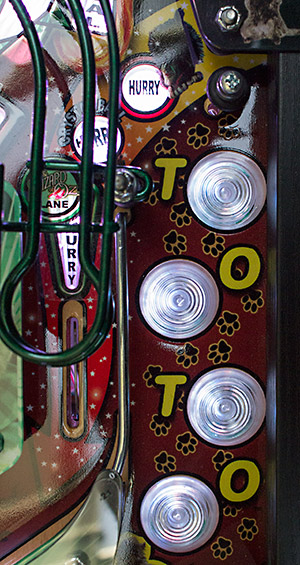
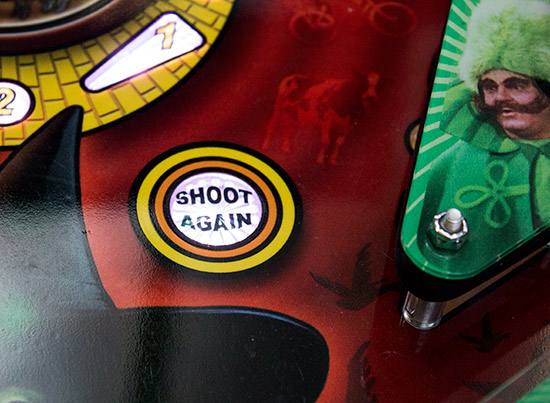
Meanwhile, the right outlane has a different kind of ball save feature. Four button rollovers are located in the outlane and the aim is to get the ball to pass over all four to spell the name of Dorothy's dog, T-O-T-O. Given the speed the ball travels, it is rare you actually get the opportunity to control it as it heads for the drain, but if you light all four buttons then a ball is re-launched and you have a very short time to make an indicated shot to keep playing. Otherwise the flippers die and the ball drains as usual. The right slingshot features the same arrangement as the left side, with the same minimal lighting used there and in the inlane/outlane diverter.
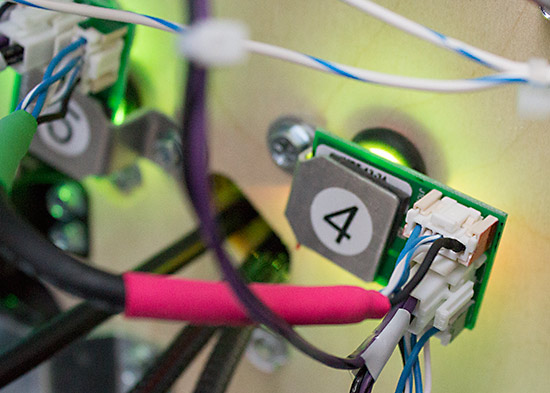
In some cases the GI lighting can be improved by checking to make sure the LED board below the tube is correctly aligned, as some have been known to slip and so reduce the mount of light appearing above the playfield.
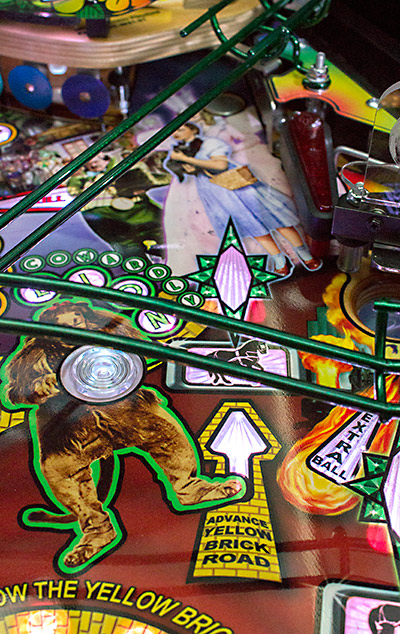
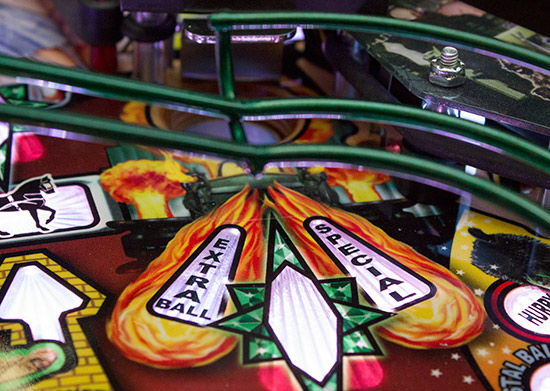
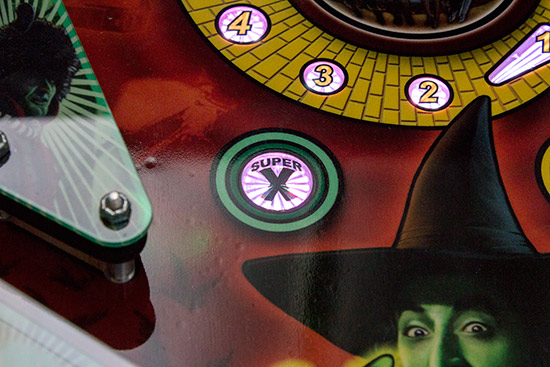
Which brings us back to the flippers. But there are a couple more playfield features to show you. Either side of the picture of the Wicked Witch are larger inserts. One of these, at the time of writing, hadn't been implemented in the rules but the Super X scoring feature sounds interesting. The second insert is interesting not so much for what it shows, but what the artwork above it shows.
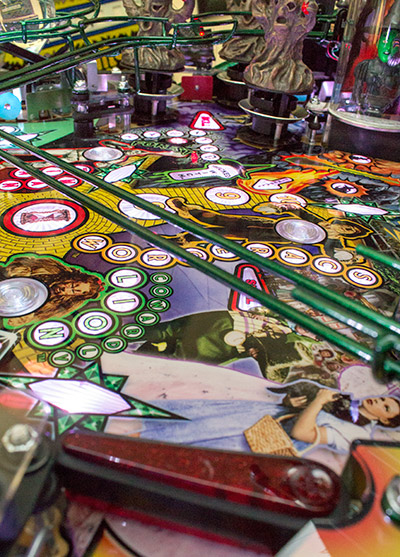
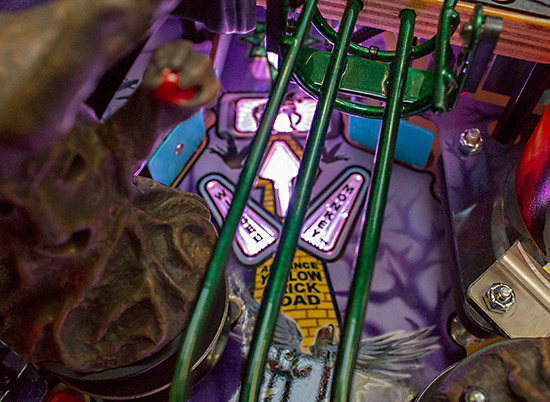
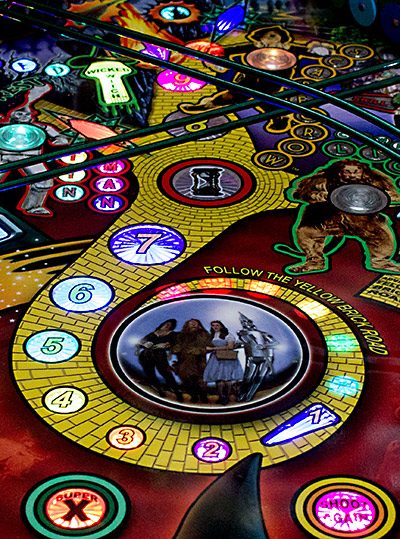
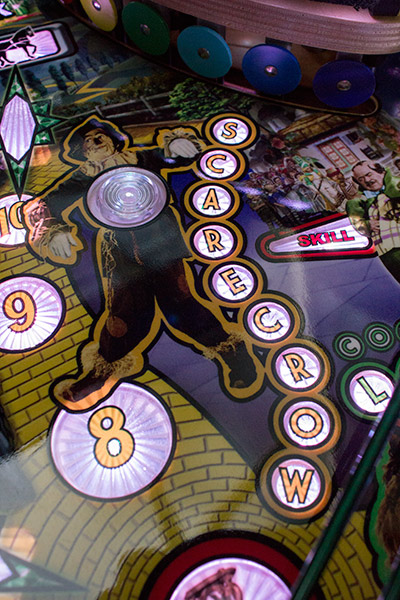
In the centre of the playfield is an array of LEDs which make up the Yellow Brick Road and show your progress along it towards extra balls and other rewards.
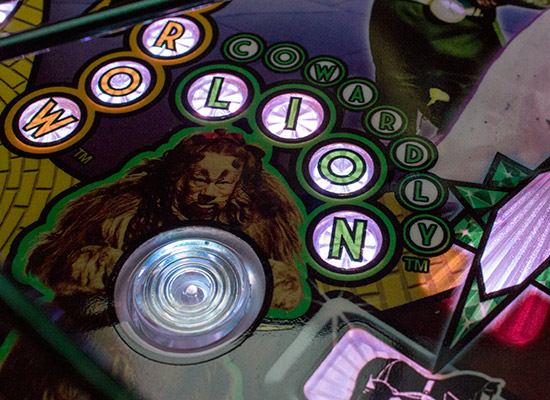
Positioned around it are three more button rollover switches which advance the three companions - Cowardly Lion, Tin Man and Scarecrow towards Emerald City Multiball.
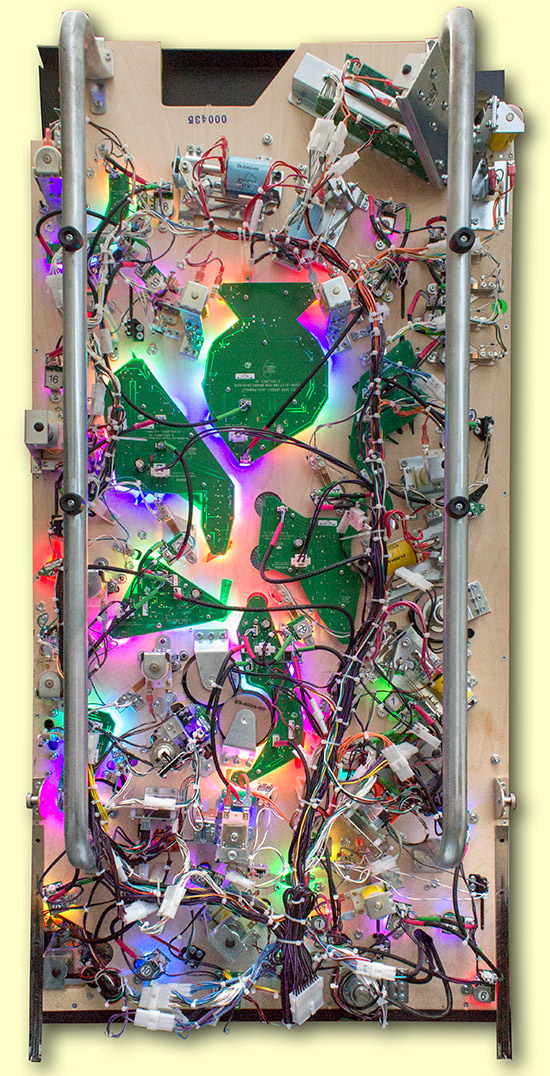
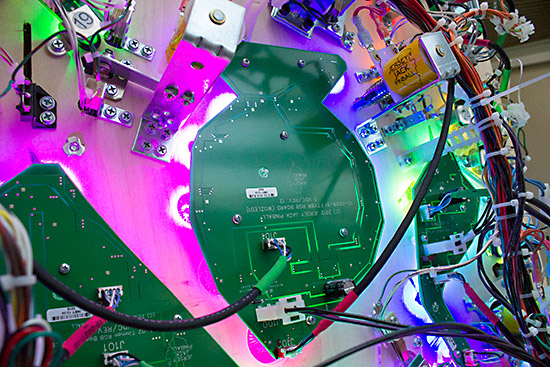
Those bring us to the end of our look at the top of the playfield, so let's now dive underneath to see how it all fits together.
As you can see, there are seven large lighting boards which are daisy-chained together and control multiple RGB LEDs, and these are supplemented by multiple individual LED boards connected to separate controller boards.
That brings us to the end of this first part of the In-Depth Review of Jersey Jack Pinball's The Wizard of Oz. Many thanks to John Gilbody and Lloyd Olson for their assistance in the making of this article. We'll be back with a look at the rules when they are nearer completion, and we'll then give you our conclusions and ratings. In the meantime keep checking Pinball News for all the latest updates on The Wizard of Oz and Jersey Jack Pinball's other games. We asked you to share your thoughts about The Wizard of Oz, and we have reproduced them below: Your comments:
© Pinball News 2013 |