|
|

|
CLEARLY BETTER
|
| Date: 2005, Updated 2006, Re-updated July 2012 Thanks to Dave Roberts for his assistance and the use of his machine. Important updates at the end of this article or click here and here. Stern's Lord of the Rings is an excellent game and with the latest rules it plays even better than ever. But there are some hardware problems which need to be addressed if the game is to continue working perfectly. One of these is the wear caused by balls exiting the Paths of the Dead upper playfield.
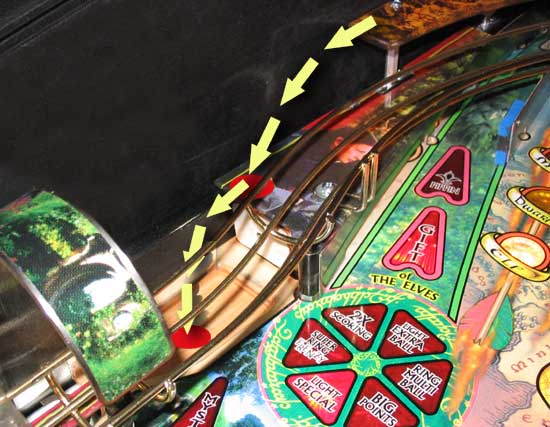
Here's the problem. Balls can leave the Paths of the Dead in one of three ways: onto the main playfield, onto the left wire ramp or into the Hobbiton area as shown below.
When the ball falls from the upper playfield, it can hit the Arwen plastic below before bouncing onto the plain wood of Hobbiton and it's at these two spots (shown with red dots above) where damage can occur. The solution? A new clear plastic ramp from David Eisner.
Made from polyester terephthalate modified with glycol, the ramp protects both these areas by providing a path for the ball to roll down from the Paths of the Dead and a clear cover to protect the plain wood in Hobbiton. The ramp is shipped in a cardboard box protected with expanded foam chips and is supplied with a single mounting screw. When first removing the ramp it seems very fragile due to the thin plastic strip connecting the two parts of the ramp but in practice it seems much sturdier than it looks. The top end of the ramp has an adhesive strip to keep it in place and prevent horizontal movement. The white part is just a paper strip which peels off to reveal the clear adhesive.
Placing the ramp in position revealed the first problem with installation. With the protector in place, the rest of the ramp doesn't sit properly. Whether this game has the side rail in a strange place I don't know but out came the micrometer to check where the problem lay.
Readings showed how the bend in the connecting piece is a little wider than the space available. But being made of a plastic that is still quite flexible at room temperature, this didn't prevent the ramp being installed but did mean a little bit of bending was required to get the best fit, resulting in the angled section being bowed slightly. I expect in time the plastic will mould itself to the correct shape anyway. So we put it in position and got ready to secure it with the supplied gold coloured screw.
Finally, realising we probably should have done this before, we peeled off the white cover from the adhesive strip and pressed the ramp into place. The adhesive is barely noticeable as you can see below.
And that was it. The ramp/protector was fitted so the only thing left to do was give it a test game to see how it performed.
It looks very smart and could easily be mistaken for a factory installed part. The ball rolled down the ramp correctly and did not affect the behaviour of the ball in the Hobbiton area nor did it cause any obstructions. Initially we were a little skeptical of the need for this ramp but having seen how quickly damage can occur and how David's product protects these areas and looks great at the same time, we're convinced. The ramp costs $25 + $5 shipping to anywhere in North America. Other shipping options and destinations are available so see David's website for details. The first run of these ramps sold out very quickly and a second run has been produced taking into account the criticisms made in the article above.
For starters, the tolerances have been tightened up making the ramp a much better fit with little or no bending required to position in place correctly. Secondly, the adhesive strip has been replaced with a longer back section containing a second mounting hole. This doesn't require a second screw hole to be made as there is already a screw installed (as you can see below), so it just fits under this. Next, all the angled joints have been scored and formed correctly, reducing stress on the side pieces and the right-angled arm linking the upper and lower sections.
The scoring produced some plastic swarf along the joints, but this can be easily removed with a small brush so should pose no problem, although it can look a little alarming at first. Finally, the Robertson square-headed gold screw has been supplemented by a silver coloured standard crosshead screw just like the one we used above. So now the choice of colour and screw style is yours. You've probably got a crosshead screwdriver but just in case, there's a small right-angled variety included in the box to get you going. The second run of these ramps is just about perfect and has addressed the relatively minor issues we raised to make a good product even better and a must-have for all LOTR owners. David has since stopped making these ramps, but Scott Milgate in Australia obtained the rights to make them and has produced a new, sturdier version. He was originally selling these himself through Ebay, but has now sold out of the initial run. They are, however, currently available from RTBB in Australia, priced at AU$55.00. They can be a bit hard to find, so you can get to the product with this link.
|