|
|
|
|
Hello and welcome to the first part of our in-depth review of Stern's latest game; 24. We will stick to our regular format for the in-depth review, with this first part looking at the game's playfield layout and artwork. Then in the second part we'll break down the rules, examine the display, sound and lighting effects and give our overall verdict.
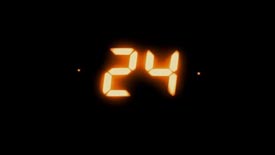
The 24 TV series is produced for Fox and first aired in the US in November 2001. Starring Kiefer Sutherland as special agent Jack Bauer, it has the unusual feature of running each season's storyline across a 24-hour period in pseudo-real time, with an iconic digital clock ticking away the seconds throughout each one hour episode.
The split-screen montage using different camera angles of the same scene, or different concurrent scenes also characterises the unique look of the show.
The creation of the 24 game has been an equally unique affair. Originally intended for release to tie in with the start of the seventh season at the start of 2008, development and production was deferred as a result of the WGA writers' strike and the consequential postponement of the TV show for twelve months. The seventh season eventually aired in January 2009 and the game began shipping in March. In the time between the originally intended and the actual release dates, much has changed both in the game and at Stern itself. Steve Ritchie delivered the original design to Stern but as with the previous game CSI, there were a number of changes made to that design before it reached the production line. Steve is no longer designing games for Stern and 24's software designer Dwight Sullivan was among several staff laid-off from the company at the end of October 2008, so the remaining staff at Stern took over both playfield and software development. What we see here is an amalgam of design talent across an extended development period. Has the extra creative input and time been used wisely?
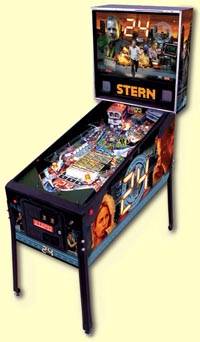
The overall look of the game is a reasonably attractive mixture of blue background elements and sepia foreground logos, faces and sky. The darker shades of blue contrast with the lighter yellow shades to create a sense of depth on the cabinet sides.
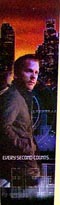
The cabinet front features two images of Jack looking suitably resolute and heroic. It's a tight squeeze to get them between the coin door surround and the legs and they're not well matched in terms of colour balance, but there's very limited real estate to do much and the band of 24s around the base provides some continuity with the sides.
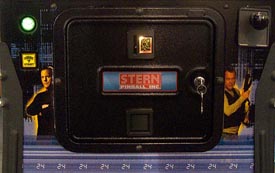
The promotional mockup of the whole game shown five pictures up shows a larger 24 logo beneath the coin door but that seems to have been removed for the production version. For the first time in a while, the coin door sticker doesn't feature the game's name or characters from the licence. Unlike the translite image which includes just about all the main elements from the playfield.
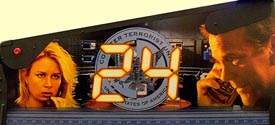
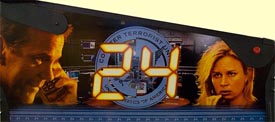
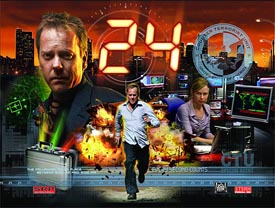
We get two representations of Jack, one of Chloe sitting in the CTU Ops Room, an unidentified sniper, the suitcase bomb, the CTU and 24 logos, the LA skyline, Air Force One on a radar screen, the "every second counts" tag line again and a big exploding safe house. Externally there are no changes to the regular Stern design as seen on the last few games. The only difference which may stand out is the use of a red LED display instead of the orange plasma displays seen in the past. European buyers have become used to these ever since Pirates of the Caribbean due to the RoHS laws but this is the first time Stern's North American machines have used red LEDs (and not just the orange plasma displays with a red filter). So let's move onto the playfield and see what we have to play with.
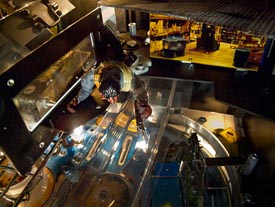
This is a two-flippered four ball game and as might be guessed from a Steve Ritchie design, all the toys are pushed up to the top of the playfield. The nearest target you really need to hit face-on is two-thirds of the way up the playfield, so fast, accurate shooting is definitely the order of the day, as you would expect from the licence. We'll start our tour of the playfield at the flippers and move around in the usual clockwise direction examining all the features as we go.
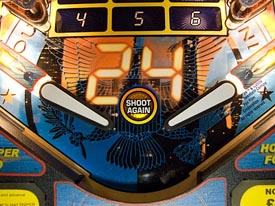
Everything looks comfortably familiar with the regular flipper spacing and the extra ball/ball saver insert in the customary spot, framed by the CTU and 24 logos. The playfield may look like it has specks of dust below the flippers but they're actually lit windows in the background buildings in the artwork. The flipper bats use black rubber just like the rest of the game which blends into the dark background a little, and there are the usual alignment holes in the playfield at the end of each bat. There's no centre post nor any other ball saving aids. It's the same story in the left outlane with no kickback or free ball award to get you back in the game.
What we do have though is a regular inland and outlane combination, both with rollover switches to advance towards completing C-E-L-L. The familiar flipper button lane change rotates the lit and unlit letters while the left inlane is the return point for the left ramp. Unusually for a Steve Ritchie design, the ramp is not a metal one, but the clear plastic variety instead with a black rubber end stop. It's a rather chunky ramp and the top layer of the left slingshot has an indentation to accommodate it.
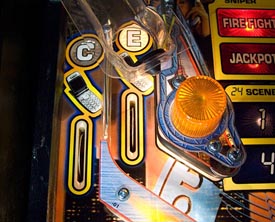
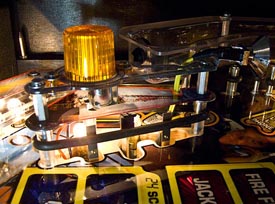
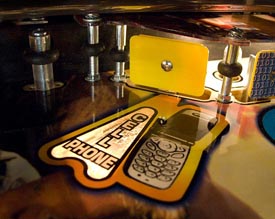
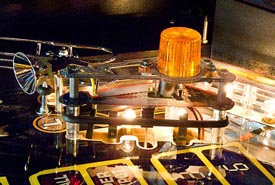
The slingshot is another familiar design of two upper layers and a yellow flasher dome topped off with a spot lamp at the top corner. With all the game's toys way up at the top of the playfield, the spot lamp can only hope to provide more general illumination to the central playfield area but it's still quite effective. The outlane adjuster has three positions to vary the width of the ball drain and is shipped in the central hole. This allowed the ball to escape quite easily, something which was encouraged by the rubber on the adjuster post and the slingshot side, making most attempts to save the ball ultimately futile. You need to keep the ball away from this area whenever possible. Completing those C-E-L-L letters in the inlane and outlane activates the next feature on our playfield tour - the cell phone target.
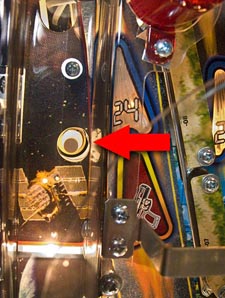
This is lit at the start of the game and relit by completing the C-E-L-L inserts. When hit it give a semi-random award but it's a very tight shot which can only be made directly from the right flipper and even then its position directly above the left outlane means its danger probably outweighs its potential benefit. In practice you're better off getting a hit from the right slingshot or a bounce off the top of the left sling. Moving up the playfield a few inches we come to the first of three standup target banks in the game.
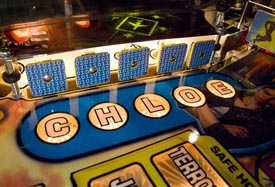
Chloe O'Brian is the brilliant analyst working at CPU whose skill is matched only by her devotion to helping Jack out in the field, whatever her superiors may tell her. She first appeared in season three of 24 and has been a regular cast member ever since. She is the chief narrator of the game and has this five-bank on the left side of the playfield dedicated to her along with a rather grumpy looking picture of her on the playfield. You could almost say she is looking a little Stern. Each target includes a decal of binary code to symbolise Chloe's computing skills and all five targets feature the same decal design. In the current version of the rules at the time of writing (v1.4), hitting any targets lights the next C-H-L-O-E insert and completing them all advances the current scene and gives additional awards too. It's possible future software or higher difficulty settings may require specific targets to be hit to light individual letters. At the top of the C-H-L-O-E target bank is the left-side entrance to the orbit otherwise know as the left orbit shot.
This is full-width orbit running from the left-hand side of the playfield under the left ramp, continuing right round the back of the toys and leading to the right-hand side of the playfield. There are two controlled gates at the top to stop the ball or allow it to flow in either direction. Unless the current mode needs the ball to be stopped and roll into the pop bumpers, the ball is usually allowed to complete the orbit unhindered.
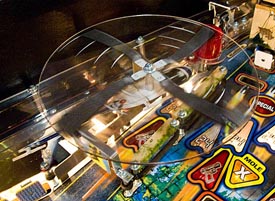
Hovering above the left orbit is a helicopter. Well, it's not exactly a helicopter, more like a cheap representation of a helicopter made from a couple of pieces of plastic.
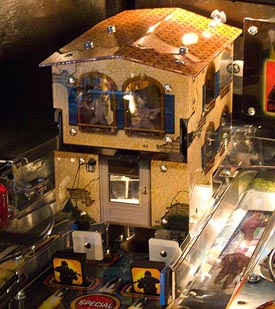
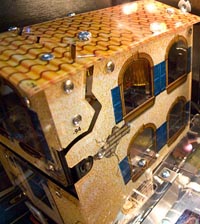
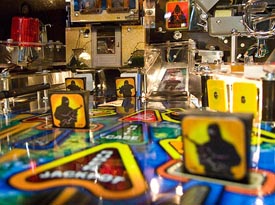
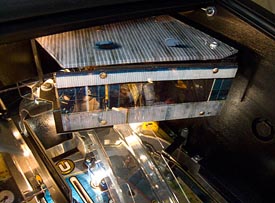
The rotor blades are printed on a clear circular plastic disc about the size of a CD and are purely cosmetic since they are not motorised and never rotate. The helicopter body is printed on a shaped plastic piece and the pair sit on an angled metal bracket attached to the left ramp. The plastic disc used for the rotors looks somewhat unattractive and will collect dust and dirt quickly if not cleaned regularly. It's understandable how individual blades might break from airballs if they weren't made in this way, but this has to be a toy which home owners would want to replace with something more realistic and perhaps even motorised. Out of interest, unless the helicopter is a French or Russian model, the rotor blades are turning in the wrong direction. Next to the left orbit is the game's biggest toy - the safe house.
Looking like a Swiss chalet, the safe house appears curiously run down, with plaster missing from the front and side walls and a large gap at the front between the building's two stories which runs up the side and over the roof.
As a house, it doesn't look all that safe but then terrorists have taken control of the safe house, as we can see from the two static bad guys cable tied to the front windows. The safe house's party piece is to "explode" on cue, but if that makes you think of Medieval Madness's castle turrets, it's time to temper those expectations. "Explosion" in 24 terms means the front of the upper storey drops down to reveal the inside of the building.
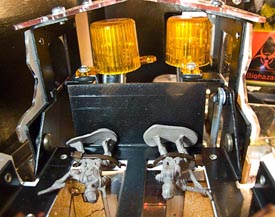
The two yellow flashers are there to blind you so you don't see how the interior of the safe house is actually quite unattractive. Blowing up the safe house is done for the effect and to start the mode that follows, not so you can see inside and discover any inner secrets.
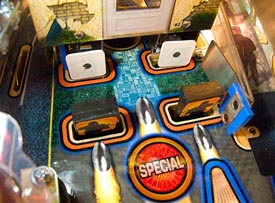
While the explosion effect is quite fun, it doesn't play any part in the actual gameplay. The important parts of the safe house are down on the playfield and consist of two drop targets, two standup targets and a saucer underneath the building.
The main shot is into the safe house saucer, but it's a narrow shot with little to guide the ball which is easy deflected by the drops and standups, so you need good accuracy to shoot it reliably. A failed saucer shot or a deliberate drop/standup target shot can either send the ball back towards the flippers or it can bounce to the left into the left orbit lane. If you're lucky you might even register a left orbit shot or two as well since the appropriate switch isn't that much further up the loop. The two terrorist drop targets are two of a group of four drop targets used during terrorist modes, the second two being further down the playfield towards the flippers.
All four targets register independently and while they can all be popped up under control of the game's software, none of them can be lowered except by hitting them with the ball. That can lead to drop targets remaining popped up when they are no longer involved in the game following a ball drain or after certain modes have been completed. The two drop targets either side of the safe house entrance are both raised by the same solenoid, so while either of the front drops can be raised by the game independently, both the safe house ones have to pop up together. They are quite prone to producing airballs if they pop up while the ball is rolling over one of them, which might account for the helicopter's rotor blades being the way they are. Knocking down the terrorist drop targets in front of the safe house reveals the white standups behind. These are always available to shoot whereas the terrorist drop targets will stay down if not part of the current gameplay.
The white standups advance the current 24 scene when they are lit, as do the drop targets if they are up. The safe house saucer does likewise but also collects weapons, jackpots, super jackpots, starts safe house countdown, safe house multiball and collects specials when lit too. In addition, its value can be increased by a mole multiplier, but more about that later. Balls which enter the safe house saucer are held briefly for the corresponding display, sound and lighting effects before being kicked out back to the flippers. On our test game, the ball was shot straight between the flippers more than once so this is something to look out for. To the right of the safe house, separated by a small blue rubber pad, is the first of the game's two ramps.
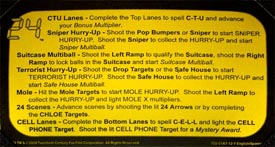
Like the left orbit and the safehouse shots, the left ramp also advances the 24 scenes when lit and in fact it is the most favoured of all shots for this. It is also the final shot to complete all the scenes. In addition it collects weapons and awards jackpots when the red arrow insert is lit, lights the suitcase ball lock and scores super jackpots when that insert is lit. The left ramp curves at the top to continue behind the safe house and then runs down the left side of the playfield, above the left orbit and the C-H-L-O-E target bank to return the ball into the left inlane as we saw earlier. There is a long metal ball guide on the right side of the entrance to the left ramp which makes shots from the left flipper that much easier. Given how the ball is also returned to that left flipper, looping this ramp over and over is not a difficult task, and it can be a highly lucrative one as well.
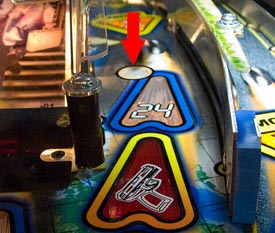
As the ball starts its journey down the left side of the playfield, it rolls under a switch which not only registers a successful ramp shot but can also cause a white stop post to pop up, trapping the ball on the ramp.
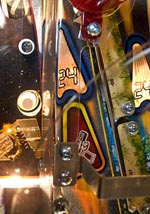
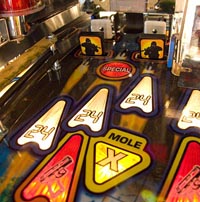
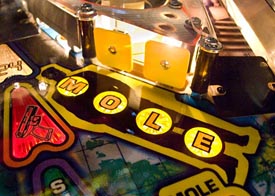
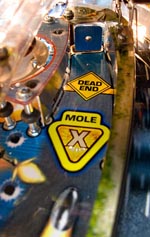
The stop post is usually activated at the end of each 24 scene when the display shows the closing animation and the scene's total score. At the moment the progression from scene to scene is rather underplayed, so when the post drops and the ball is released, there's a certain amount of wondering why the ball was stopped in the first place. Continuing our tour, to the right of the left ramp entrance we find the M-O-L-E targets.
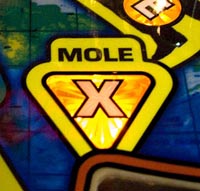
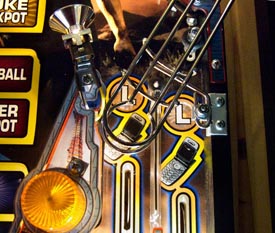
These two yellow standups light letters to complete the M-O-L-E inserts in front. When all four are lit, a hurry up countdown is started on the left ramp and if collected a mole X multiplier is lit on one of the shots, much like the mini-mine multiplier in Batman.
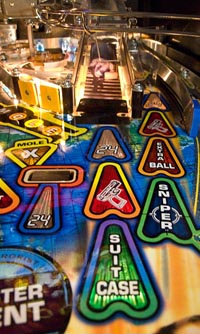
As with the C-H-L-O-E target bank, hitting either of the M-O-L-E standups lights a letter so it's not too difficult to complete the sequence. On the right of the M-O-L-E standup targets is the game's second ramp and to go with it, the second toy.
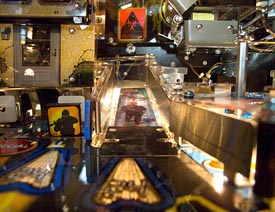
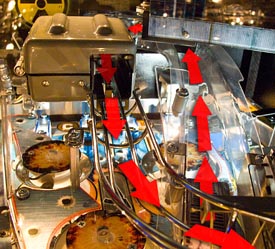
The right ramp advances 24 scenes when lit, collects more weapons and scores jackpots when the red insert is lit and locks balls to advance towards suitcase multiball. Appropriately enough, suitcase multiball ball locks take place in... a suitcase, at the top of the ramp. The ball goes up to the top of the right ramp, does a fairly sharp turn to the left and rolls into the suitcase where it can be locked.
The space to build in the 180 degree bend is so tight, the ramp curve actually extends out the back of the playfield.
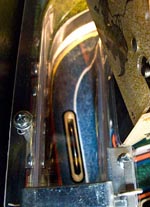
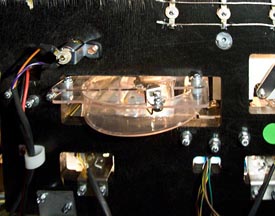
When the suitcase is closed it isn't ready to lock a ball, but shoot the left ramp enough times and the suitcase on the right ramp will open. Inside the suitcase is an image of the nuclear device Jack is trying - and failing - to prevent detonating.
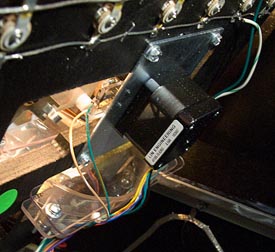
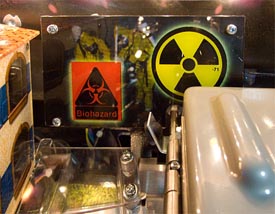
The metal pin next to the front rollover switch retracts to allow balls to roll through, or remains in place to lock a ball in the same way the sword lock operates in Lord Of The Rings. Up to three balls can be sensed although all four can be stacked on the ramp during multiball. Balls are released from the suitcase one at a time. The suitcase lid is operated by a motor mounted on the back panel and linked to the suitcase lid by a crank on the playfield side but covered by the plastic piece with the nuclear and biological symbols.
This plastic covering piece is mounted slightly forward of the back panel to give clearance for the crank. In fact, this is the only artwork on the playfield's back panel which, although understandable with the number of elements projecting through the panel, nevertheless leaves the game looking slightly unfinished. No doubt one of the aftermarket vendors will make a suitable decal to give it a more finished look.
But back to the right ramp and the suitcase lock. When balls are released from the suitcase (or if they pass straight through when lock is not lit) they head over to the right side of the playfield and down to the right inlane. Unlike the left ramp, the right ramp gets a metal wireform to take the ball back to the flipper, probably because it has to cross the playfield and a plastic one would be too obtrusive.
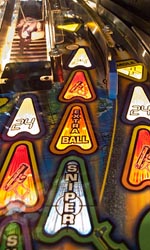
We'll come to the pop bumpers in a moment but next we'll move very slightly to the right of the right ramp where we find the sniper lane.
If you collect or start something important, the ball is trapped in the sniper lane by the game's second white plastic post positioned at the tip of the 24 insert.
This post stops the ball whenever sniper hurry-up begins, when sniper multiball starts and after collecting an extra ball. It's not vital to the gameplay but it does draw your attention to the display to see what you've collected. The sniper lane has a companion toy up above the playfield in the form of the sniper himself.
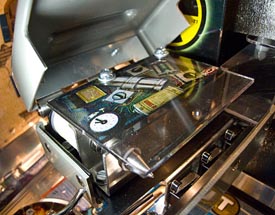
Yes, believe it or not, this large warehouse/barn/shed which takes up the back right corner of the playfield is where the sniper lives. When sniper hurry-up begins, he is revealed as the door to the building swings open and he takes pot shots at you from his sheltered, prone position. The door is operated by a solenoid which you can partly see inside the sniper's home.
OK, so he may not be the best model in the world, the scale may be all wrong and his aim is somewhat off, but at least we now know it was a warehouse all along. We also get a nice effect when he shoots at you as the solenoid is pulsed to give some physical feed back to accompany the sound effect. Like all the toys in 24, this one is functional rather than beautiful. But now we return to the playfield and right next door to the sniper lane, separated by a metal ball guide and another blue rubber pad, is the right orbit entrance.
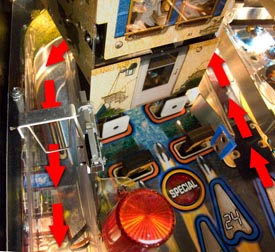
The familiar triumvirate of inserts tells us the right orbit awards weapons and jackpots, advances the current 24 scene when lit and its value can be boosted with another Mole X multiplier. The right orbit shot has a wider mouth and a longer ball guide on the right, making it easier to shoot than the sniper lane, but it's still a relatively tight shot despite those aids. As with the left orbit, shots up here normally flow round to the opposite orbit lane but can be stopped by a controlled gate at the top of the orbit if that would help with the mode currently being played. If the ball is stopped at the top of the loop though, where does it go? Well, first of all it meets the three C-T-U rollover lanes.
With all that hardware hovering over the playfield, it's hard to get a clear view of the C-T-U lanes but they're the regular lane-change variety which, when completed, increase the end-of-ball bonus multiplier. In the picture above you can also see the two controlled gates - one on either side - which can stop the ball completing the orbit and force it into the C-T-U lanes. After the rollover lanes, the ball enters the pop bumper area.
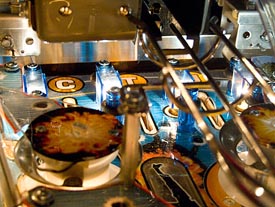
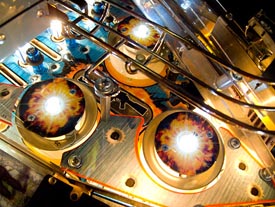
We have the familiar triad of pop bumpers although less familiar are the LEDs mounted on the caps which as you can see are particularly effective. In the middle of the bumpers is a hotdog-shaped insert which has two flashers illuminating it from under the playfield whenever the bumpers fire. There is only one exit from the pops area and that's between the right and the bottom bumpers, under the right ramp and into the sniper lane.
If the ball produced enough bumper hits to start sniper hurry-up, the white post in the sniper lane rises and the ball is held there for a while before rolling back to the flippers. We're also well on our way back to those flippers but there are still some more features to examine on the right side of the playfield starting with the target bank just below the right orbit entrance.
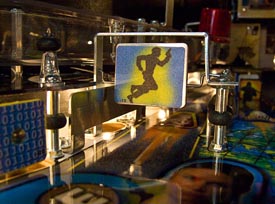
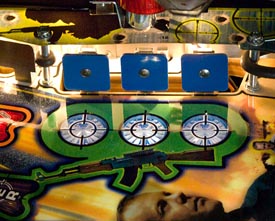
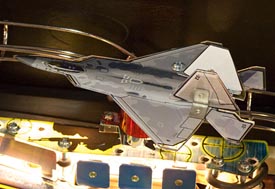
Like the other two target banks, hitting any target lights the next crosshair insert with the intention of completing all three. The crosshair targets are a fairly easy shot from the left flipper and tend to complete themselves after a few ball kicks off the left slingshot. Mounted above the crosshair targets is the game's second flat pack aerial attacker, the jet fighter.
It's hard to know where to start with this but it's probably just best to understand there is a finite budget for every game and this is all they could squeeze onto the bill of materials. What we get is a flat printed plastic with a couple of single sided tail fins attached with metal brackets. Whoever ends up selling the replacement helicopter model for home owners had better have something ready for this one too. So moving swiftly on, the final "shot" in the game is just below the crosshair target bank.
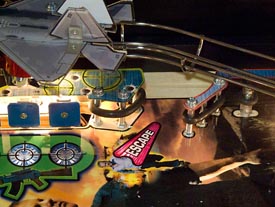
The escape lane re-uses a classic playfield feature to send the ball back to the shooter lane. This is often done to either collect the bonus or to give the player another chance to shoot for a skill shot or a particularly tricky rollover lane. We called it a "shot" because it's probably not a shot you'd try to make, but one that may end up claiming the ball anyway. In the current software, making the shot doesn't give you anything other than a chance to put the ball back in the pop bumpers, although that's not necessarily a bad thing as we will see in the rules section. It's an under-used feature at the moment, although the presence of a dedicated insert holds out the hope it may receive the attention it deserves in a future upgrade to make it more attractive. So until some more rules for the escape lane arrive, it's best considered a better option than the ball heading down the outlane. And speaking of the outlane...
These two lanes feature the third and fourth letters of C-E-L-L which when completed light the cell phone target on the left side of the playfield. The right inlane is also the destination for the right ramp while above the right outlane is the regular three-position adjuster to vary the game's difficulty.
The right slingshot is very similar to the left one although the cutout on the top layer to accommodate the ramp is much smaller due to the use of a wireform in place of the larger plastic ramp used on the left. Curiously the lamp in the spotlight mounted on the right slingshot was missing. We never did find out what happened to it. Before we get back to the flippers there's the small matter of the shooter lane.
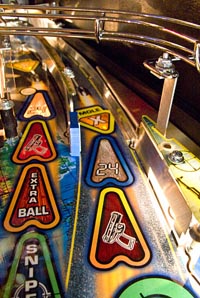
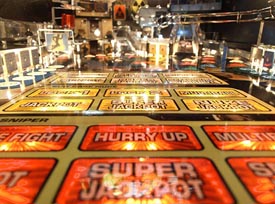
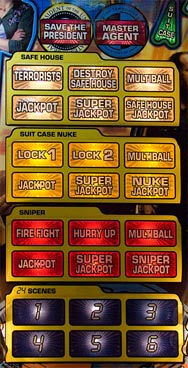
While that brings us back to our starting point at the flippers, there's no way to ignore the huge array of inserts set into the playfield to chart our progress through the game.
Rather than the more common feature wheel found on games like Spider-Man, Batman and Pirates Of The Caribbean, 24 divides its tasks into four folders of achievements entitled Safe House, Suit Case Nuke, Sniper and 24 Scenes, although it's not clear why the word "suitcase" has been split into two words. Each folder contains six same-coloured rectangular inserts detailing milestones which have to be reached in each feature. These light up as as each one is achieved with the ultimate intention of completing all six in each of the four folders - in other words, all 24. Topping them off are two inserts for the wizard modes of Save The President and Master Agent.
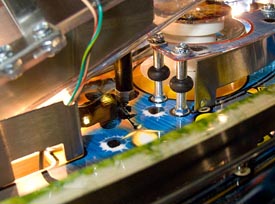
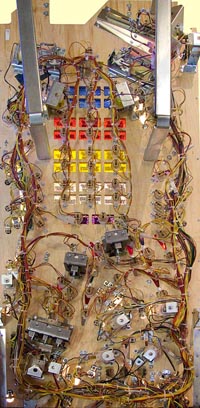
These large inserts take up the whole centre section of the playfield so home owners might like to replace the lamps beneath them with LEDs to help prevent a build up of heat causing the inserts to either sink or lift. The sheer number and size of the inserts means they dominate the playfield artwork and their position results in the very open game with the long shots to the main toys we described at the start. To see how everything fits together, here's a look at the underside of the playfield with the flippers at the top and the pop bumpers at the bottom.
All of which brings us to the end of this first part of our in-depth review of 24. We'll be back soon with the second part where we'll look at the rules, the display, lighting and sound effects and give our opinion of the game as a whole. Before we go though, have a listen to the main theme music and have a go at doing something nobody ever does when they play the actual game; read the instruction card. Get the Flash Player to hear this audio clip.
Just click here for an alternative version of this review with much larger images. © Pinball News 2009 |