|
|
IN-DEPTH REVIEW |
|
Batman pinball games have always followed the style and scope of the movies on which they are based. The original Data East Batman game was a relatively sparse and low-tech machine following Tim Burton's first movie in the series. Later came Sega's Batman Forever which was much bigger and brasher in every way, with all the extravagance, excess and clutter of the Joel Schumacher movie. Now though, Batman is reborn for the 21st century - first in the Christopher Nolan Batman Begins movie of 2005 and now with his 2008 follow-up, The Dark Knight. This is a leaner, tighter, more focused take on the DC Comics superhero, and once again, the game follows the film. Three very different movies, three equally diverse directors, three unique game designs. So here we are, giving the third of those takes on the Batman theme our in-depth review treatment.
It was widely suggested that this new Stern game would be called The Dark Knight, but simply calling it "Batman" gives it longevity beyond a single movie and greater brand recognition. That's not to say it's not clearly based on The Dark Knight as any cursory glance at the machine will indicate, but in six months' time when the publicity machine has rolled on and nobody can recall all the marketing hype currently surrounding the movie launch, Stern can be rerunning Batman without it looking too much like an old licence. The Dark Knight is a summer 2008 movie, Batman is timeless. Which brings us back to the game and this in-depth review of it. As usual we'll split the review in two with the first focusing on the game hardware, the layout and how the various mechanical devices on the playfield work. The second part will be unusual this time because we will not initially be giving our overall conclusions or our customary ratings. It will also be somewhat lacking in detail about some of the rules. This is because Batman has been released into movie theatres, distributors and some homes with incomplete software. Not the kind where perhaps the wizard mode or a couple of the deeper features are missing. The 0.7 version we are reviewing is missing large chunks of rules, dots, sounds and lighting effects. So to be fair to everyone concerned, we will review this initial release running version 0.7 software and then update it as the software becomes more complete. There will not be any major changes to the game's hardware or artwork though, so this first part of the in-depth review will remain virtually unchanged. We begin then, with the machine's exterior artwork.
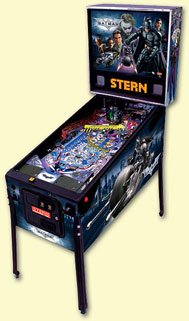
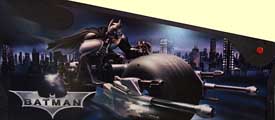
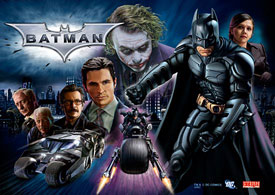
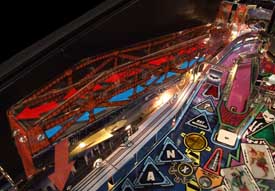
If there was ever any doubt this game is based on The Dark Knight, that doubt is dispelled with the first look at the backglass which features all the major characters from the movie. It's a tricky job to squeeze all of them on, along with the Batbike, the Batmobile and the Batman logo, so the composition is rather uncomfortable, especially on the left side. So the backglass is functional rather than inspirational but does a good job of tying the game to the movie and the rich blues and purples seep from the cabinet and backbox to provide a consistent and attractive colour gamut to carry onto the playfield. Elsewhere, the remaining external hardware is all very familiar with a manual plunger and the tournament button in its regular home down below the start button. The trim is in matte black which complements the theme and colour scheme, while the backbox is edged in chrome to match the reflective silver elements in the backglass image. These combine to give the game an attractive and suitably dark overall look without ever becoming gloomy or morose. Now it's time to look at the arena where all the action takes place as we examine the playfield, its layout and all the various toys.
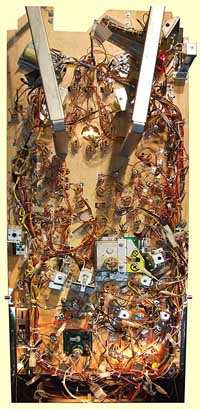
Batman is a two-flippered, four-ball game. Ever since his initial game design Corvette, George Gomez has eschewed the use of a third or fourth flipper, which means there are no cross-playfield shots, resulting in what is often called a "fan" layout where all shot paths radiate out in an arc from the two flippers. Batman provides plenty of variety with ten different fixed feature shots as well as a moveable shot, more of which later. Let's begin our playfield tour in the usual place down by those two flippers.
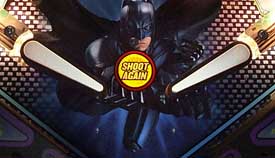
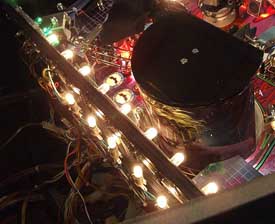
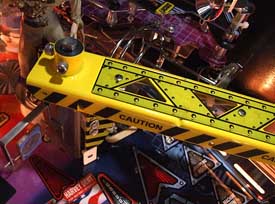
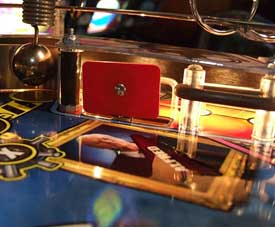
The white flipper bats provide good contrast to the background but the black flipper rubbers tend to blend into the background. In fact we've brightened the image above so you can see the flippers more clearly. The playfield was pre-drilled for biff bars to be installed behind the flippers, although they were not factory fitted and not supplied in the accessories bag. Speaking of the accessories, this was the first game in a long time that didn't come with any key ring plastics in with the spare lamps and spinner stickers, so perhaps Stern used up every last square inch of the butyrate sheet with in-game pieces. Back to the game and the shoot again insert is in the correct place, squarely between the flippers. There is no centre post or up post, nor is there any kickback, so once the ball is gone, it's gone. Moving clockwise around the playfield brings us to the left inlane and outlane.
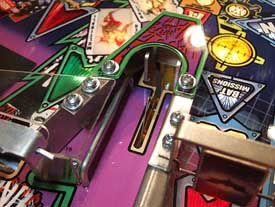
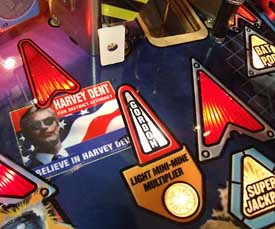
There is a single inlane which, apart from the usual playfield-level feed, can also be fed from the Batmobile teeter-totter exit wireform. Both the inlane and the outlane have a mystery insert which is lit when the ball triggers the rollover switch. The lit inserts rotate right with the flipper buttons and lighting all four extinguishes them all, enabling the mystery award at the top saucer. The left outlane, like its right hand counterpart, is labeled "Why so serious?" which may give an appropriate award in a future software update, but did nothing beyond lighting the mystery insert in this version. While we're in this area of the playfield, let's take a moment to look at the slingshots which are a little unusual.
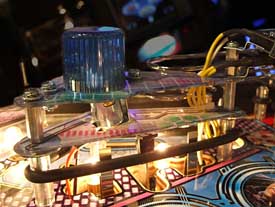
The blue flasher requires additional height, so the slingshot is a three storey affair, the middle layer having cutouts to accommodate the flasher lamp holder and wiring for the two spotlamps mounted at the top.
The wiring for these is not the neatest we've see. The two lamps are connected in parallel but rather than join them together under the playfield, one spotlamp has two sets of wires connected to each terminal and the excess wire is looped and cable tied under the centre sling plastic. This, together with the bright cable colours used, makes the wiring more visible than it needs to be. Moving up the playfield, we come to the first feature - the B-A-T-M-A-N standup targets.
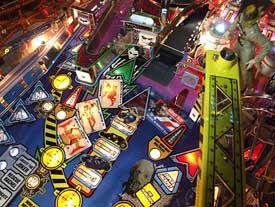
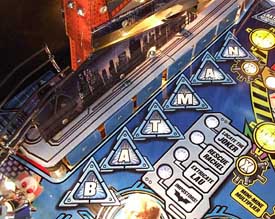
Each of the six blue targets in this bank has an associated insert which lights when the target is hit. The aim is to complete all six to spell B-A-T-M-A-N which enables one of the four Bat Mission modes shown on the panel next to the inserts on the playfield. Sitting over the B-A-T-M-A-N standups is the Batmobile teeter-totter but we'll come to that a little later on, so the next feature we'll look at is the left orbit. This is the first of the game's major shots which means it scores jackpots and features in modes when the arrow is lit or flashing. It features the first of two spinners which - as we shall see in part two of this review - can be especially rewarding.
The left loop is a slight misnomer as it doesn't loop around, but it uses the same path and is the exit for the right loop, so we'll stick with that name. It actually works in the same was as the Barad-Dur shot on Lord Of The Rings, which means it can either feed the rollover lanes and then the pop bumpers, or it can send the ball into a saucer at the top right.
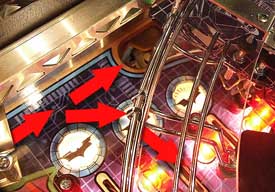
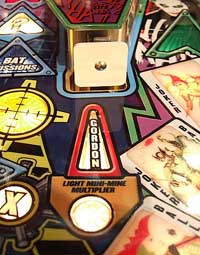
Shooting the ball into the saucer gives the mystery feature and/or starts one of the The saucer is a slightly different design from usual and on our test machine it proved to be unreliable at holding onto the ball. Strong shots would bounce out occasionally which was annoying, but it's probably something that could be easily fixed with an adhesive foam pad to dampen the ball's energy. The ball is prevented from completing an orbit by a one way gate at the end of the right orbit. There is another one way gate on the left orbit entrance but this one is game controlled, allowing the ball to pass during certain modes and hurry-ups. To the right of the left loop is an innocuous white stand-up labeled "Gordon".
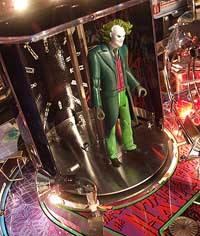
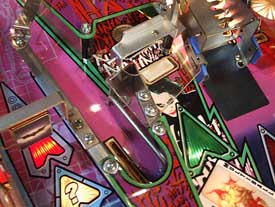
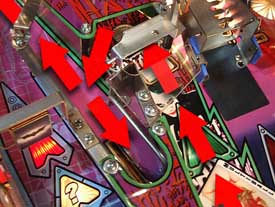
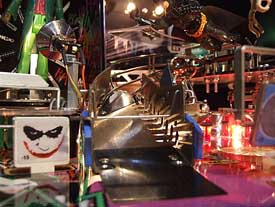
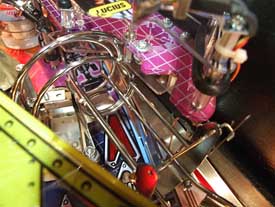
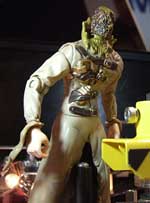
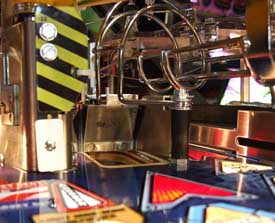
This Commissioner Gordon target is one of two on the playfield which if you hit it when lit, counts down towards a shot multiplier which increases the value of all points earned from a particular shot. Again, we'll examine this more in the rules section but suffice to say this can be an important target to hit if you want to score big points. On the right of the Gordon target is one of the two big toys on the playfield - The Joker. The Joker consists of two parts - the toy itself which is doesn't interact with the ball and the ball lock which does.
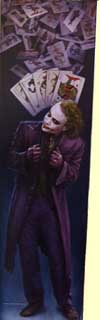
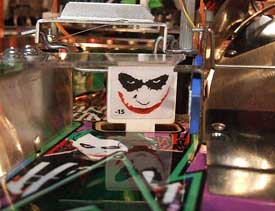
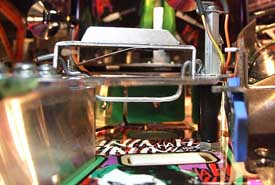
The centre of the toy is made up from a model of The Joker which is propped up on a flexible metal strip, so he wobbles around during gameplay. The model is poseable, so you could change the way he stands, where his arms point or even put things in his hands as long as the model remains within a limited area. That's because of the remainder of the toy, which is constructed from two concentric half-cylinder screens printed with artwork, which rotate around The Joker. They start the game covering the front of The Joker. Then, as you progress towards Joker Multiball, one rotates round to the back revealing the other half-cylinder which also rotates to show The Joker himself. Unfortunately the motor had burned out on our review model so the effect was somewhat lost, but fortunately it didn't affect gameplay because the second, more important part of The Joker was unaffected. That second part is the ball lock area which is the second major shot in the game and is protected by the game's only drop target.
This drop target prevents balls getting into the Joker ball lock until you have qualified it. Initially only a single hit will keep it down but later into the game you require more hits. On this early game, the drop target was made from a fairly flexible plastic which allowed it to become twisted when resetting and jam a ball on top between it, the one way gate behind and the clear plastic covering the entrance. Hopefully that will be addressed with either a more rigid target, cutting away some of the clear plastic, or a timing change for the target reset.
With the target down, the ball can pass under the one way gate and into the lock. There are three green standup targets underneath The Joker which the ball can hit on the way in if the shot is sufficiently strong and well-directed.
These targets are important since they increase the value of the Joker Multiball jackpot. Once the ball is past the gate, whether it hits the standups or not, it rolls back into the lock area and down to a kicker at the bottom.
When the ball triggers the rollover switch in the lock area, it is kicked out, up the lock lane and into the left orbit. From here it either enters the top saucer and starts any mystery or Bat Mission features, or just goes through the rollover lanes and into the pop bumpers. If the ball enters the lock lane while the drop target is up (as it occasionally does), it is simply kicked out without any undue delay or fanfare. No "dirty pool" yet. If the drop target was down though, not only is a ball lock registered but you advance the lit joker cards on the playfield towards Joker multiball.
Since there is only one switch in the lock lane, only only one ball can be sensed which means only virtual locks are possible.
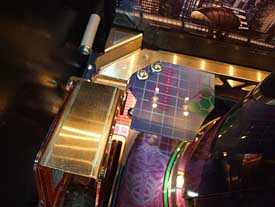
There is a certain amount of colour-coding on the playfield, much like we saw on Indiana Jones, but more subtle. The Joker's color is green, so his shot arrow is green, the lane is trimmed with green outlines, the standups are green and the Joker insert above the flipper is, well, you get the idea. Coming back to the front of the game, the next shot on our playfield tour is the centre ramp.
The ramp itself is a mixture of solid metal and illuminated cutouts which provide an attractive lighting pattern on the side wall. After that, a strange spring steel flap guides the ball onto a metal wireform and - under Batman's ever watchful eyes - up to the mini-playfield.
When the ball arrives at the top of the ramp it encounters a ball diverter. The diverter consists of a movable flap which can be lifted out of the way to allow the ball to pass underneath.
With the flap in the down position, the ball comes up the ramp, hits the flap and rebounds to the right. This takes it onto the mini-playfield which is uncannily like the Paths Of The Dead mini-playfield in Lord Of The Rings, right down to the four green lamps to indicate which switches you should roll over.
As before, the aim is to roll over the the switches corresponding to the solidly lit green lamps (good) or the flashing green lamps (better).
The switches blend into the mini-playfield artwork making them difficult to see, and there are fewer posts than the Paths Of The Dead but in this case less is more as the ball's path doesn't seem as predictable as in Lord Of The Rings. Rolling over the requisite switches will award Bat gadgets and build you towards a full collection of toys. The ball exits the mini-playfield by bouncing off a black rubber ring at the bottom and rolling to the left onto a wireform which feeds the right inlane.
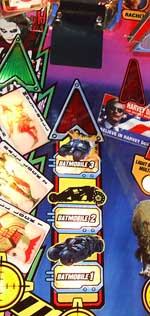
The ball will enter the mini-playfield if the Batmobile 1 or 2 insert is flashing. But if the third insert flashes, the diverter flap is lifted and the ball takes the alternate path to the left.
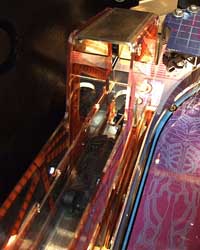
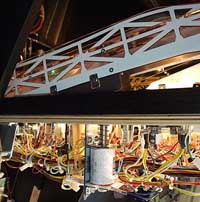
This takes it on a journey across the back of the playfield on a nice laser-cut metal ball guide which is inclined slightly so the ball rolls to the left.
The ball passes over the top of the rollover lanes and the left orbit, behind the joker and deposits itself at the entrance to the Batmobile teeter-totter in the back left corner of the playfield. While we're looking at this part of the playfield it's worth taking a look at the back panel.
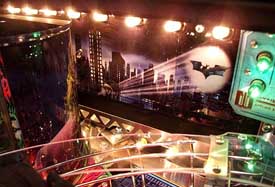
It is illuminated by eight lamps which sit hidden from view but the back panel also has some peculiarities which can only be seen by taking a peek round the back.
The panel is also backlit by a string of general illumination lamps which allow for some great lighting effect possibilities if the main playfield and frontal illumination is darkened. That effect wasn't seen in this software version but it's easy to imagine how eerie it could look at the start of a multiball or wizard mode to extinguish all other playfield lighting and just show the city skyline. But there's more because on the far left of the picture above is a flasher which illuminates the bat logo. Add that to the mix and you can see the possibilities. For now, we'll return to what actually exists and pick up the ball's journey as it arrives at the teeter-totter.
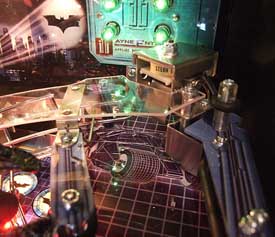
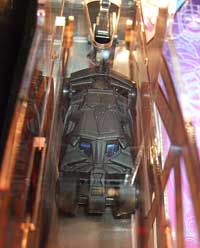
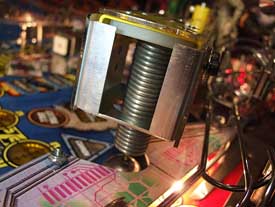
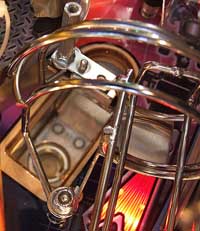
The teeter-totter is a curious device since it appears to have no specific purpose in game play other than being a novel way to send the ball to the left outlane. It is a large mechanism though and it is possible future software versions will make more extensive use of it as a ball stop or enhance it with improved display and sound effects. Here's how it works. The device is essentially a two level ball guide with a pivot point half way along. The ball enters the top and sits in a tear drop-shaped cutout on the clear plastic upper level. On the lower level is a Hot Wheels Batmobile.
When the ball sits in its cutout it triggers a switch which tells the game's software it has arrived.
The teeter-totter mechanism is then tilted forward by energising a solenoid connected to the front. In fact this solenoid is referred to as the "upper flipper" in some of the game documentation.
This causes both the ball and the Batmobile to roll forward. The ball rolls off the end, onto a small wireform and into the left inlane while the car hits the wall at the end of the lower level.
There's no player involvement in this process and the Batmobile always beats the ball to the end end of the track. Once the ball is safely in the left inlane, the solenoid de-energises and the device resets to the position shown above. The delay between the ball arriving at the top of the teeter-totter and getting it back into play is fairly minimal so it doesn't break the flow too much and running the ball through it starts a Batpod hurry-up on the right loop, so there are some points up for grabs too. So that's the second ball return path from the centre ramp. The first - via the Bat gadget mini-playfield - sends the ball to the right inlane, while the teeter-totter sends it to the left. Continuing with our tour of the playfield, the centre lane shot to the right of the centre ramp sends the ball into a spinner and then on into the pop bumpers.
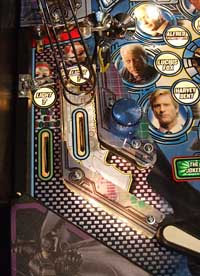
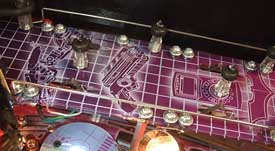
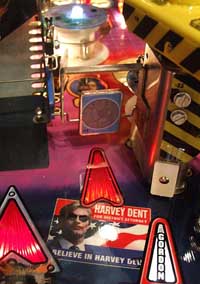
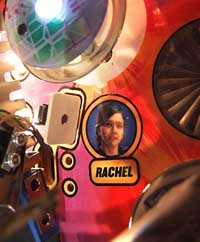
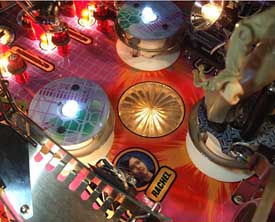
The centre lane is the Harvey Dent shot and is also one of the game's major shots to collect jackpots or advance modes when the red arrow is flashing. Just beyond the spinner is the Rachel standup target.
In the software installed on this test game the target didn't appear to do anything but it will presumably build towards lighting the Rachel segment on the feature wheel above the flippers in due course. The two additional holes drilled in the playfield and their outlines in the artwork suggest this may have had some posts or other hardware fitted which was removed prior to production. The pop bumpers are in the regular pattern and feature a round flasher playfield insert which flashes when the bumpers are fired. The bumpers themselves are of the minimalist design with small bumper caps and a white LED sitting on top. The LEDs were somewhat askew in this game but the shone brightly and the light from them is well dispersed.
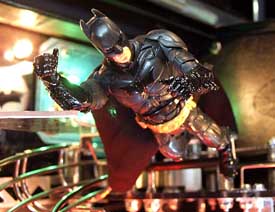
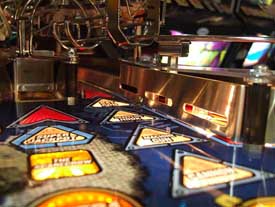
Above the bumpers are the three rollover lanes and associated bat logo inserts. These operate in the normal "lane change" way by using the flipper buttons and build up the bonus multiplier when completed. Flying high above the pop bumper area is a Batman toy model.
The model is very nicely detailed and has moveable joints so the pose can be adjusted. Batman also has a cloth cape which is initially bunched up but can be spread out a little more, although you do have to be careful not to foul the top of the centre ramp. A nice mod might be to fit a small fan somewhere discrete so his cape billows in the wind. Balls can exit the pop bumper area in one of three ways - either through the centre lane, to the right into the right orbit lane, or they can fall into the right scoop. Before we get to those latter two though, there's the small matter of the second Commissioner Gordon standup.
This is narrower than the left Gordon standup and seems to be the one lit out of the two most of the time. As before, shooting the lit Gordon target advances towards a mini-mine shot multiplier. You need quite a few shots (6 or more) to qualify it, but as mentioned earlier, it's definitely worthwhile. Next to the Gordon target is the right scoop.
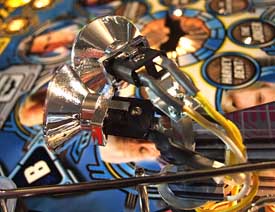
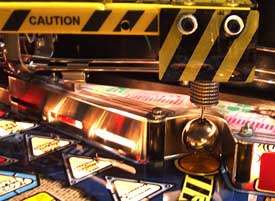
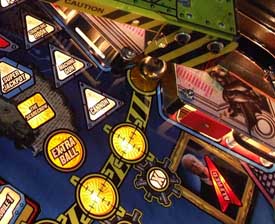
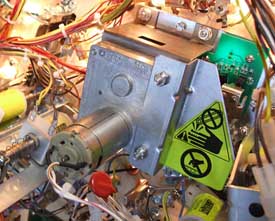
Shooting the scoop advances towards Scarecrow mode which, when started, brings the large yellow crane into play. Whereas the teeter-totter is a totally passive feature so far, the crane is one of the best interactive devices for years. It consists of a large metal arm which swings left and right around its pivot point behind the right Gordon standup.
On the top surface is a plastic with artwork of rivets and girders which is deliberately patterned to make it look dirty. You could spend hours with your Novus trying to get that looking clean, so don't bother. Hanging from the far end of the crane is a pinball, suspended on a thick metal spring.
The ball may look like it's dangling freely but in reality the spring extends all the way to the top of the crane and is quite stiff, so it keeps the ball in position.
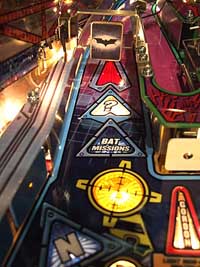
When the scarecrow mode is running, the crane swings out from its home position shown above and stops over one of the five target inserts which correspond to the five major shots in the game.
Then your task it to hit the suspended ball in each of the five positions to start Scarecrow multiball. More on that in the rules section of part two. Like the scoop in Attack From Mars or the saucer in Medieval Madness, the ball can end up in Batman's right scoop from either a direct frontal shot, or out of the pop bumpers. As with these two earlier games, there is only one sensor in the scoop so the decision on whether the ball came from the front or the back is made by seeing if there was a pop bumper hit registered just before the ball enters the saucer. If there was, it is assumed the ball arrived in the scoop from the back and lit awards are not given.
That works OK during regular play, but during Scarecrow multiball where the scoop is the super jackpot, it does end up with many perfectly valid shots being denied just because another ball is, or was recently, in the bumpers. This needs to change in a later software version. Balls are ejected vertically from the scoop just like the Gollum saucer in Lord Of The Rings. The ball lands on the same wireform that provides the exit from the mini-playfield which in turn feeds the right inlane. The solenoid used to kick the ball out of the scoop proved not to be up to the task on this test machine, frequently requiring 2, 3 or more attempts before the ball was ejected successfully. When 2 or more balls were stacked up in the scoop during multiball, things got somewhat worse and the glass needed to be taken off to remove a ball or two. Apart from advancing The Scarecrow and collecting Scarecrow super jackpots, the right scoop also awards extra balls when lit and is another of the major shots for jackpots and modes. The final major shot is the right orbit, the upper section of which is partially hidden under the mini-playfield.
This can either loop all the way round to the left orbit or it can be stopped by a controlled gate to send the ball into the rollover lanes and then the pop bumpers. Shooting the right orbit advances the bat gadgets which works in conjunction with the mini-playfield to build up a collection of toys. The orbit is also used to collect BatPod hurry-up which start when the ball exits the teeter-totter device. The right side wall gets round the common problem of solid metal ball guides blocking out light by incorporating three cutouts to allow the light to shine through. It's an effective solution and adds a classy look to what would otherwise be a boring plain metal guide. Now, as we move down the playfield, we pass the home position for the crane suspended ball. This is a potential ball trap at the end of multiball as the crane swings back to its home position since it can jam the last remaining ball behind it until a ball search frees it.
Just below the suspended ball is the final shot of the game, Batman's faithful servant Alfred.
The Alfred target will eventually give one of a number of helper awards just like the Palantir target in Lord Of The Rings but in the current software it only seems to add another ball to multiball when shot. Which brings us back to the right inlane and outlane.
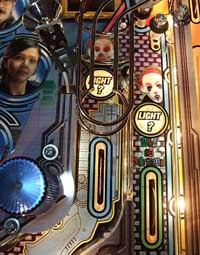
Once again there are no surprises here with single lanes and two more mystery inserts to complete the set of four. This slingshot also has a flasher although it only has a single spotlamp at the top so the wiring is much neater. A row of general illumination lamps helps separate the right outlane from the shooter lane which contains three three skill shot possibilities.
There are three choices of skill shot and as we saw in Stern's last game Indiana Jones, the only skill required is the ability to shoot the ball when the desired award is lit. Whereas Indy had the skill shot switch somewhat further up the shooter lane, Batman has its switch just below, so less time has to be allowed between shooting the ball and the award being selected.
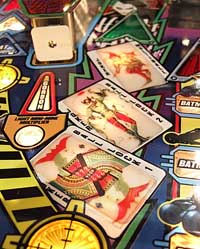
The three skill shot choices are (top to bottom) The Scarecrow, The Batmobile and The Joker. Each one of these will advance the selected feature by one, making them easier to start. All launched balls end up in the right orbit and either roll round to the rollover lanes for a flashing skill shot points award, or come back down the right orbit if the plunge was too weak. The area of the playfield above the flippers is dominated by the progress wheel.
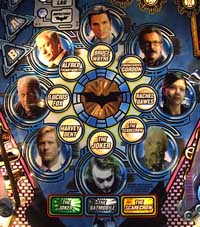
This arrangements of inserts shows how many of the tasks have been completed on the way to the final wizard mode. Each of the eight main characters have their own inserts to light, plus there are specific inserts for three major features - The Joker, The Batmobile and The Scarecrow. At present, only two of these award multiball, but perhaps the Batmobile will too and these inserts will be like the three movie multiball inserts from Lord Of The Rings. Although we can make guesses about how the wheel of characters is completed, in this version of the software none of these inserts lit except during attract mode and there was no indication on the display about how to complete them, so that's something to come in a future upgrade. As we draw to the end of this first part of the in-depth review, let's take a look under the playfield to see where all the major assemblies are.
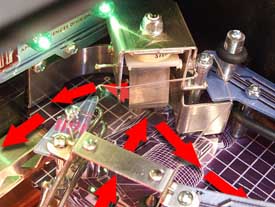
The large device in the centre is the crane motor, its gears and the opto board.
Prominent on the housing is a warning about getting your fingers chewed up and it's a genuine danger once you take a look inside.
Apart from the row of optos to determine the crane's position there is a chain drive to move the arm, so you certainly need to take care poking about here and you should heed the instructions not to move the crane arm manually. The other motor in the game is for the Joker screen mechanism and of course it was the one which had burned out on this game.
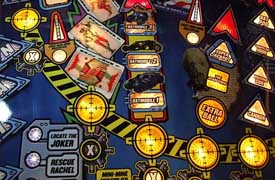
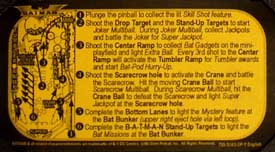
Finally we return to the top side of the playfield for a look at the instruction card for Batman:
and as a special treat, here is the main theme music for you to enjoy. Get the Flash Player to hear this audio clip.
Got problems hearing the audio? Consult our help page for assistance.
That concludes this first part of our in-depth review of Batman. We'll be back soon with part two where we look at the rules so far. Remember this was running early software, so we will include all the features incorporated into the code at the time we played it. Then we'll update it when new software is published. Finally, when it is anywhere near complete, we'll finish the second part with our conclusion and ratings.
© Pinball News 2008 |