|
| KING OF DIAMONDS IN-DEPTH REVIEW |
|
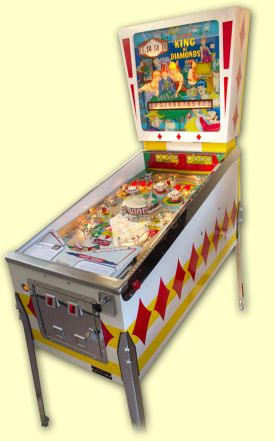
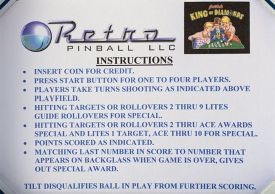
Welcome to our exclusive In-Depth Review of the King of Diamonds game from Retro Pinball LLC. As you are no doubt aware, King of Diamonds is a very different game from the ones we usually review here at Pinball News. For a start, the design is 45 years old, and while we've reviewed a few modified older playfield layouts such as NBA's revamped Space Jam design and MarsaPlay's revisit of the 1986 Canasta, the Retro Pinball product is unashamedly, and in fact quite deliberately, a reproduction of the classic 1967 Gottlieb machine. There's far more to King of Diamonds that just a re-make, but before we get to the differences, let's have a look to see what those who ordered one get for their money.
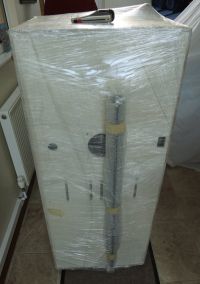
King of Diamonds is, without doubt, a professionally produced pinball machine worthy of any manufacturer. Our review machine was shipped from Retro Pinball in the US to the UK and arrived well-packed in a wooden crate.
Inside, the packaging was no less impressive.
Inside the protective foil bubble-wrap, the game was wrapped in a clear plastic wrap, then covered with a layer of cardboard, and then encased in a second layer of the clear plastic wrap. Sure enough, the game arrived without any external damage. In fact the only marks on the cabinet came from the machine's legs which were wrapped to the bottom of the game without quite so much protection, leaving the legs free to dig into the wooden base.
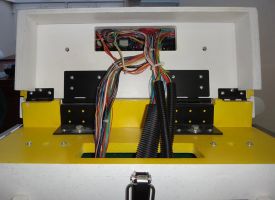
Still, nobody looks at the bottom anyway. Except us, of course, because it's here that we find the power switch, located on the right side but nearly half-way towards the back. We also see not one, but two speaker holes. This is because the game comes with two cabinet speakers installed - a woofer and a tweeter, as we shall see shortly. Setting the game up just involves bolting on the four legs and unfolding the backbox. Unfolding? Yes indeed, unlike the original, this King of Diamonds has a hinged backbox and a latch to secure it.
There are two central hinges to allow the backbox to fold down, and two outer hinges so the backbox front can be unfolded to allow access the the score-reels, lamp panel and controller board. There are also two backbox bolt holes to securely fix the backbox to the cabinet base. Fixing the legs to the game isn't quite as easy as it could be, due to the short leg bolts used. There's enough grip if you're attaching the legs alone, but if you choose to safeguard the game and fit some felt leg protectors, the bolts are barely able to reach the leg plate inside the cabinet. Some longer leg bolts would create a more resilient connection here. With the game set up, let's have a look at the game's external artwork starting with the backglass.
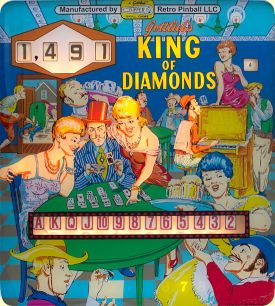
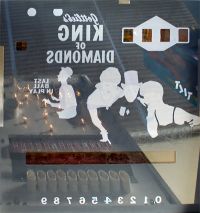
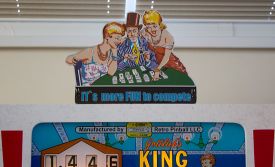
The western saloon backglass is almost identical to Art Stenholm's 1963 original, with the only noticeable difference being at the very top where the words "MFD BY D.GOTTLIEB & CO. CHICAGO, ILL, 60651" have been replaced by "Manufactured by Retro Pinball LLC". The Gottlieb Flipper Skill Game logo remains the same though. The scene itself is an odd one with the central sharp-suited male character (the real King of Diamonds) playing what appears to be the single-player solitaire game, while the two ladies on either side appear enthralled by the game, suggesting where to place the cards. Meanwhile, the waiter behind is taking a sneaky peak at the cards (or perhaps at something else), as though he also wants to join in the action. On the right it's music and dancing, with everyone having a fine time in the saloon. Well, perhaps not everyone, as one unlucky patron is being unceremoniously booted out of the establishment, suggesting there may be other, less-agreeable happenings taking place out of the picture to the left. But back to the game, and the rear of the glass shows which areas have specific lighting effects.
So the card player, the two ladies on either side and the piano player are the four characters with specific illumination. In addition, the card player's cards and diamond motif on his tie light up, along with the two lamp globes hanging from the ceiling and the surround to the score window. The digit showing the number of balls remaining also lights up along the bottom of the glass, while 'tilt' and 'last ball in play' are the other messages revealed during the game, with the latter appearing on the front of the piano.
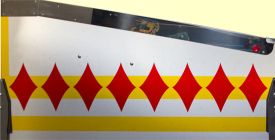
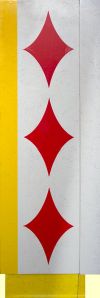
The cabinet art is much more basic than the backglass, consisting of yellow stripes with a repeated diamond motif.
The colours are bright and the edges sharp, with the usual Gottlieb 'flecking' across the white, red and yellow paintwork. Both cabinet sides use this same design which is trimmed with mirror-chromed side rails. These extend down to the flipper buttons to help prevent damage to that flecked white cabinet paint.
The backbox sides continue the red, yellow and white diamond motif. Once again, both left and right sides use the same design.
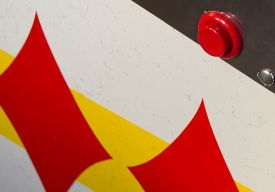
The flecking effect would be quite effective at disguising marks or light scratches in the solid colours. The cabinet or backbox may already have had some marks from the factory, but they weren't obviously visible as they would have been without the flecking effect. As you can see below, the sharp corners of the stenciled artwork on the backbox wasn't always perfectly sharp, but this is looking at it very closely and you wouldn't see any issues from normal viewing distances.
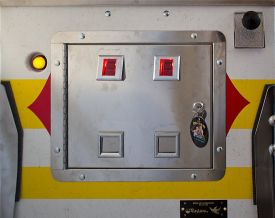
The front of the game is dominated by the large chromed coin door which is not only a magnet for fingerprints, but also tricky to photograph without either getting too many reflections or dulling the mirror effect.
The yellow stripes from the cabinet sides continue round the front, with a couple of diamond symbols peeking our from behind the door. There's a single illuminated start button and a manual plunger. The coin door and coin slots are quite different from the original design, as is the more contemporary start button which will probably be the biggest issue most purists will have with this remake. There are twin coin slots fitted, suggesting there is only a single coin door type used, no matter where the game is going to end up.
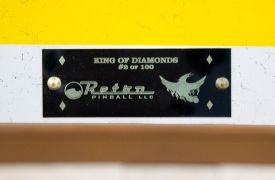
Returning to the outside, the final item on the front of the machine is a special plaque with the game's serial number. This is only fitted to the first 100 machines made.
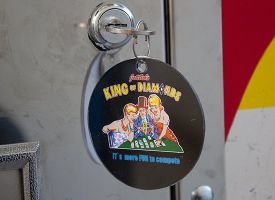
You may have noticed the King of Diamonds key fob which was hanging off the coin door key.
This comes with the game and, you might think, would make a good topper for the game. Indeed it does.
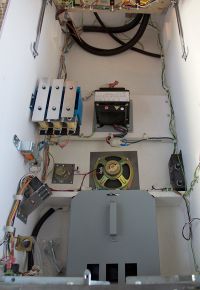
This too comes with the game and adds approximately six inches to the overall height of the machine. That concludes our look at the exterior of the King of Diamonds game, so now we move inside to see what makes this game unique and how Retro Pinball have created a modern version of the sixties classic. Inside the cabinet there are some familiar parts sitting alongside some more unusual ones.
We'll begin with the familiar which includes the metal coin box, the transformer and the cabinet speaker As we saw earlier, the main 10W cabinet speaker has been supplemented with an 8W tweeter. Tweeters are usually much more directional than their lower-frequency counterparts, so it's not clear how effective a floor-facing tweeter will be. On the left cabinet side we find the tilt bob which is much as we would expect. Alongside the tilt bob is the knocker, but in-between we discover not one, but three coin meters, although the manual never reveals what the three meters are counting and two of them were counting down rather than up, so who knows?
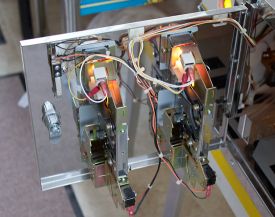
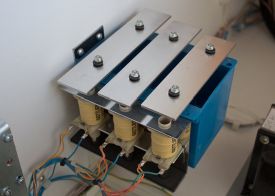
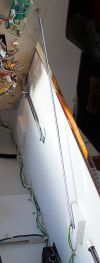
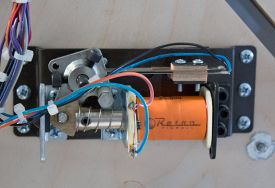
Staying with the left side, although the game his electronic sounds replayed through the speakers, these are bolstered by a chime unit located next to the transformer.
The three metal bars are struck by solenoid plungers fired upwards by the three coils, with the different length bars producing three distinct notes. The flipper switches used in King of Diamonds are simple, low-voltage, single-contact leaf switches. No optos or multi-blade switch stacks here.
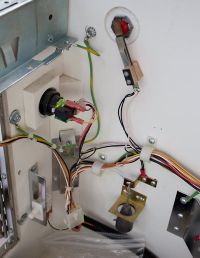
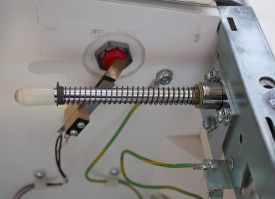
The same is true over on the right side of the cabinet, where the shooter rod also lives.
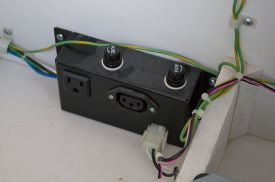
It's a conventional shooter rod, fitted with a shiny white plastic shooter tip. The earthing wire just to the right of the flipper button which appears to go nowhere is in fact connected to the chromed cabinet side rail, just like it's twin on the opposite side. Also on the right side of the cabinet are the service outlets. Yes, that's plural, since there is one US NEMA 5-15 socket and one IEC C-13 socket.
There are two fuses mounted on top of the service outlets but they are not, as you might think, one for each outlet. That's because the service outlet box sits over the main power switch, so one fuse is a 6A (@110V) slow-blow (or MDL) for the game's main power, while the other is a 1A MDL fuse for the two service outlets. Whether these sockets output 230V when the game is set to that voltage we don't know, but the NEMA 5 style outlet is only normally rated for a maximum of 125V use.
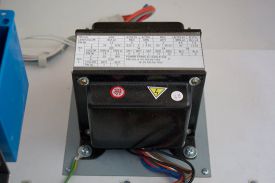
The final item of note in the cabinet base is the component which supplies power to the rest of the game - the transformer.
Despite the advances in switching power supplies and the rise in the price of copper, the wire-wound transformer remains the device of choice to supply multiple voltages and plenty of current to a pinball machine. This one kicks out multiple 6V, 9.5V, 13.5V and 25.5V feeds, all AC naturally, and was pre-configured to work on 230V without further adjustment or the need to use a step-down transformer. So now we move up and open the backbox to see what new features we find inside. Opening the backbox is a two stage process, just as it is with Williams/Bally games. There is a key lock on the top of the backbox which releases the frame holding the backglass. This then folds down onto the playfield glass.
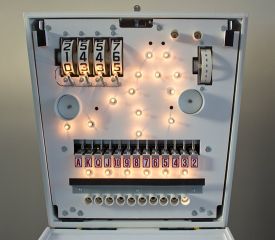
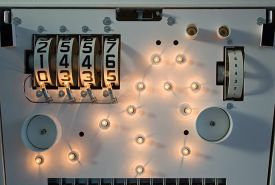
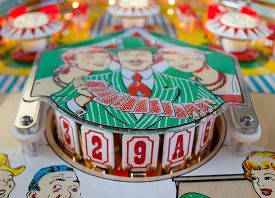
This reveals the score reels, the backglass lighting and the card indicators. It also gives you access to the lamp board latch, so you can move all these items out of the way and access the heart of the backbox.
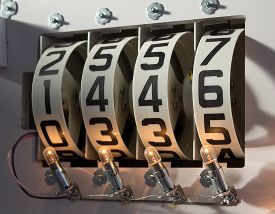
But before we delve any deeper, there are plenty of mechanisms here worthy of further investigation. We'll start with the score reels.
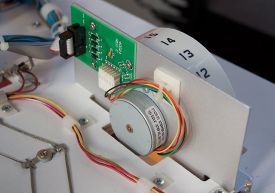
Each reel has it's own motor, front-mounted lamp, and driver/opto board at the rear.
Each board contains a set of diodes which feed the reel's motor which plugs into a connector on the board. There's also an opto pair to sense the reel's home position so the main controller can accurately position it. The motor used is a 12V stepper unit with each step moving the motor 1/100th of a turn. So the motor needs 10 pulses to change from one digit to the next. One of the major changes to the original game is the ability for up to four players to take part at once. This is done in a way which is second nature to dot-matrix game players; the current players score is shown until they end their turn, at which point the next players score is shown. Where this happens instantly with a digital display, here the score reels rotate from one player's score to the next as their turn begins. It also does this at the end of the game to show all players their final scores. The pulses for the motors come from the main controller board which is where those grey ribbon cables terminate, as we shall see shortly. The same arrangement is used for the credit reel on the right side of the lamp panel, although this has more numbers on the reel and so requires fewer pulses to change from one to the next.
The lamps which give the lamp board its name occupy the central area to illuminate the un-masked areas of the backglass. There are also four controlled lamps - two half-way down on either side and two at the top on the right.
The lower two light up the 'Last ball in play' and 'Tilt' words on the backglass, while the upper two illuminate the two ceiling lamps in the backglass artwork. We'll see what they are used for later. The general illumination backbox lamps are connected together in a very traditional way, with bare wire which is soldered to the sockets and stapled to the lamp board.
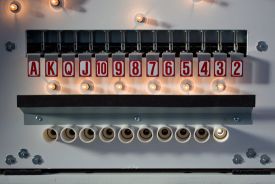
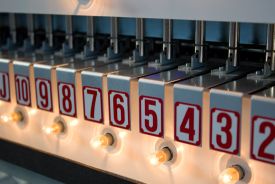
The bottom part of the lamp board is largely given over to the 13 animating drop cards.
Each drop card lifts at the start of the game and can be dropped as the associated target is hit.
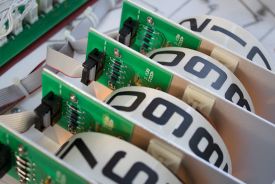
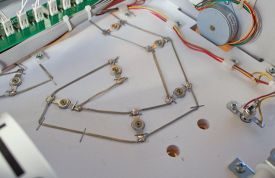
On the back of the lamp board you can see the mechanism for the drop cards.
The solenoid at the top of each card connects to a circuit board which links them with the main controller board where they appear as auxiliary solenoids 17-29 inclusive.
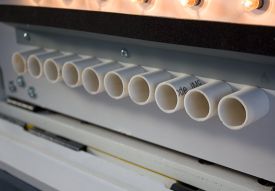
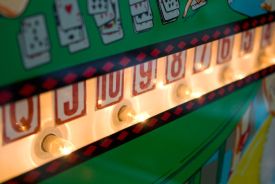
Right at the very bottom of the lamp board are ten shielded lamps which illuminate the 'number of balls to play' numerals along the bottom of the backglass.
They are shielded with plastic piping which looks a little cheap once you see it close up, but does a fine job of only illuminating the desired digit and is not visible with the backglass installed.
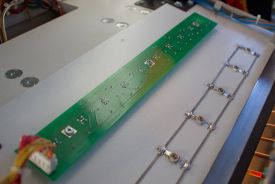
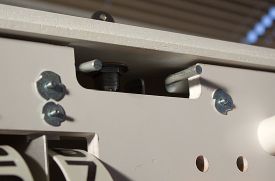
The lamps themselves are mounted on a single long circuit board which connects to the main controller board. At the very top of the lamp board are two prongs which are part of a latch mechanism.
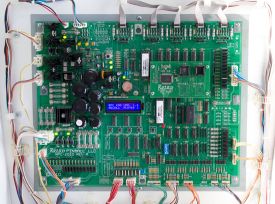
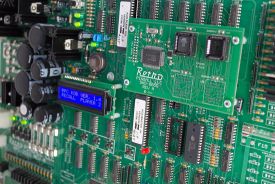
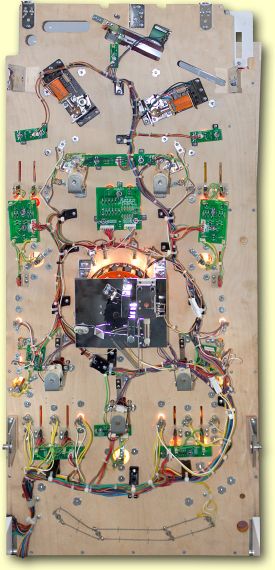
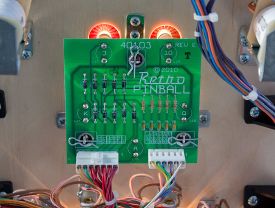
Squeezing these two prongs together allows the lamp board to pivot on the hinges at its base and fold down onto the backglass frame on the playfield glass. This gives us access to the back of the lamp board where we find the reel motors, controller boards and the drop card mechanism seen above. It also gives us our first look at the game's main RPC-2010 controller board.
The five ribbon cables at the top right go to the five reel controller boards. There is space for a sixth reel but, as it is not needed on this game, this area of the board is devoid of the necessary components. The regular solenoid drivers are to be found at the bottom left, the auxiliary solenoid drivers are on the upper right side, while the switches connect at the bottom centre and right. The lamps connect on the bottom of the right edge of the board, while power comes in from the transformer on the bottom of the left side of the board before hitting the fuses and the rectifier diodes. Top left is where the audio amplifiers live, alongside the connectors for the speakers. There is a separate SND-6650 sound processor board which contains the sound effects used in addition to the game's chime unit. Only one of the two sound ROM sockets is populated, as there aren't that many effects. There is also space on the board for another two ROMs and their sockets.
With no dot matrix display to show diagnostic information and the score reels not really cutting it, the controller needed some kind of display to allow the owner/operator to make adjustments and view audit information. Thankfully, it has one.
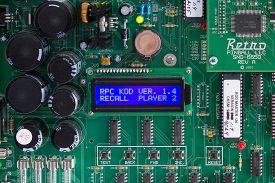
The blue backlit LCD display shows the software version and game type on the top line, and what the score reels are currently showing on the bottom line. Below the display are the four buttons used to scroll through the setting and modify them. The controls are a little different to the usual pinball ones. The left button enters test mode, the 'back' and 'fwd' ones move through the settings while the 'inc' button cycles through the available choices. You can only go through the options in one direction, so if you miss the setting you want, you have to cycle through them again to get back to it. If you don't fancy leaning over the game to make these adjustments, the left and right flipper buttons replicate the 'back' and 'fwd' buttons, and the start button acts as the 'inc' button. Memory backup is provided by the Panasonic CR2032 button cell above the display while the game's code comes on the two PROM chips shown above with the white labels indicating the game and code version. The game shipped with version 1.4 but this has subsequently been updated to provide more variability to the roto-target. That concludes this look at the insides of the game.
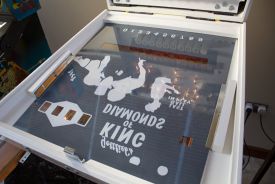
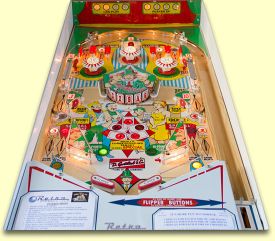
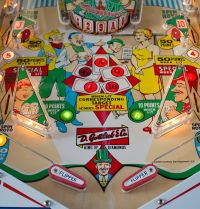
We'll take a look under the playfield a little later, but before we get to that, let's see what the Retro Pinball team has put on the top side for us to play.
The playfield construction is a little different to most other games, as instead of silk-screen printing directly onto the wood, all the artwork in King of Diamonds is printed on a large playfield-sized mylar overlay which is stuck to the wood and becomes the playing surface. Transparent mylar is traditionally used to protect high-wear areas of silk-screened playfields such as around the pop bumpers and where the ball drops off a ramp, so it is certainly more than capable of handling a steel ball rolling over it for extended periods. But mylar has not been without its problems. Edges of mylar patches can lift or collect dirt, bubbles have sometimes appeared where the adhesion has failed, while the transparency has also been known to reduce over time, leading to a cloudy look. However, the adhesion problems have largely been due to the requirement for the mylar to be as thin as possible, so as not to deflect the ball. With mylar as the main playing surface, it can be much thicker and so less liable to lifting at the edges. Plus, it is held down wherever any playfield mechanism or post is screwed into the wooden layer below. The flip-side of that is how anyone removing or tightening any of the screws which pass through the mylar should be careful not to damage the surface by pulling on screws which are not fully out, or over-tightening screws when replacing them or during regular maintenance checks. In play, the mylar surface behaved much like a silk-screened wooden playfield would. It didn't play like a clear-coated game would, but then King of Diamonds was never intended to have a clear-coated playfield, so the feel is still authentic. As usual with our In-Depth Reviews, we'll start our tour of game's features at the flippers and work clockwise around the playfield.
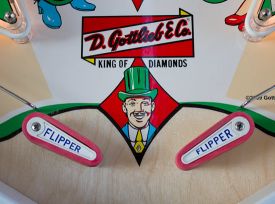
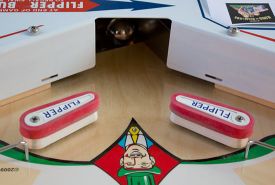
Our card-sharp from the backglass is looking much more relaxed as he returns between the game's two flippers. He's so relaxed, his blood red hat has turned a much more pastoral shade of green and his vexed look has been replaced with a broad smile. The flippers are the two-inch version used on Gottlieb games used throughout the sixties, however this particular design is unusual in having recessed 'FLIPPER' text, whereas most Gottlieb games had this type printed on a raised, curved section. The original game also used white round rubber rings on the flippers, but the Retro Pinball version uses more modern flat flipper rubber bands.
The apron used in the game is a metal one (yay!) and, like the cabinet sides, is painted white to help brighten up the playfield. There is just one inlane and one outlane on the left side, with a simple wire ball guide to separate them.
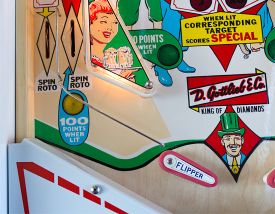
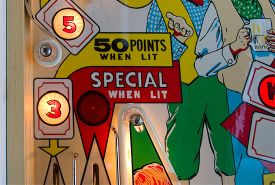
The outlane spots the 3 card, while both it and the inlane spin the game's roto-target when the ball rolls over their switch. The inlane can also be lit to score 100 points and collect a special award. The slingshot is about as simple and basic as a slingshot can be, with three posts, two leaf switches, a single kicker and two lamps, topped with a single-layered plastic cover and surrounded by a single white rubber ring.
The small white rubber nibs which cover the top of the posts and always manage to fall off and get onto the playfield in the original have been replaced with a metal claw-grip version here which will hopefully stay in place for longer. At the top of the outlane is a clear star post with a rubber ring. Whereas this is often adjustable on modern games to vary the width of the outlane entrance and hence the game's difficulty, it's fixed on this game.
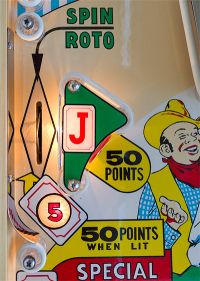
Immediately above the left slingshot is a short side lane with a rollover switch in it and a standup target in front.
The lane spots the five of diamonds and the standup target, the jack. The lane also gives the roto-target a spin any time it is rolled through. There is a little hook at the bottom of the ball guide on the left wall which sends the ball towards the centre of the playfield, and quite possibly between the flippers if you're not careful with your nudging. Above the side lane is the first of the games three pop bumpers.
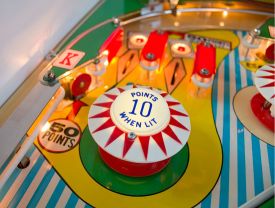
Rubber rings on the left and right sides ensure there is plenty of rebounding action and the pop bumper is kept busy. Top left of the pop bumper is one of the harder targets to hit. The King target can't be shot directly, so you're relying on the pop bumper to fire the ball at it. Directly above the pop bumper are two rollover lanes which can be made from the initial ball launch, or by the pop bumper.
These spot the 8 & 9 targets and also give the roto-target another spin. The post to the left of the entrance to the 9 lane is the very end of the top arch which is where the ball goes when it is plunged from the shooter lane, although it is stopped before it can reach the post by a chromed one-way ball gate.
At the centre of the top arch is another standup target, but this one spots the top value card in the suit, the ace of diamonds.
Like the king, the ace target can't be shot directly but needs help from a pop bumper. In this case, it's the top bumper.
The right side of the playfield is a pretty-much a mirror-image of the left, with two more rollover lanes above the right pop bumper and the queen standup target ready to benefit from a fortuitous bumper ricochet.
Further down there is a companion to the side lane on the left. This right lane spots the four card, while the standup target in front spots the ten.
The right side lane is positioned above the right inlane and outlane, so its there we head next.
The number two card is spot by the right outlane, while the inlane collects specials when lit, with both giving the roto-target a spin. The same plain wire lane divider leads us back to the flippers.
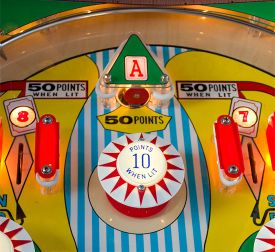
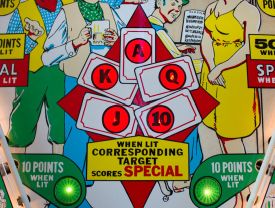
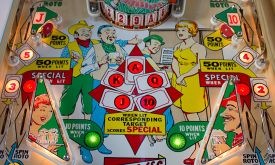
Above the flippers and between the two slingshots is a small collection of inserts which indicate when each of the top five highest cards is lit to collect a special.
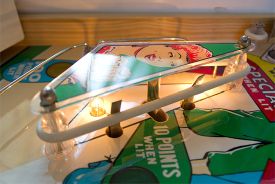
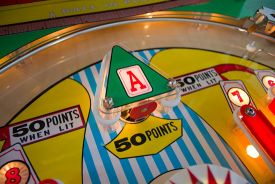
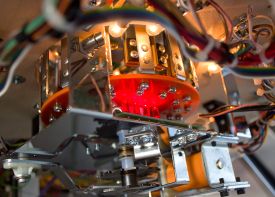
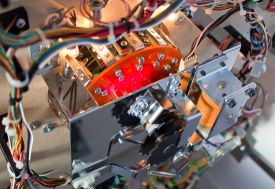
In the centre of the playfield is the games pièce de résistance; the playfield mechanism which accounts for the largest spend and takes up the most real estate. It's the roto-target.
The roto-target is a set of 13 standup targets which spins round to present different sets of five targets to the player. When hit, the targets spot the corresponding cards in the same way as rolling through that card's lane or hitting its standup elsewhere on the playfield.
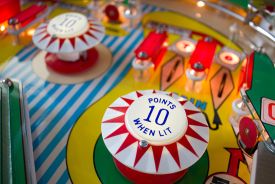
With only five of the thirteen card targets visible at once, you may want to change these to different cards. Rolling through any lane marked with 'Spin roto' does exactly that, making it land on a different set of five cards. Since it is positioned fairly close to the flippers, a direct shot to the roto-target is quite likely to rebound straight between the flippers. So, hitting the side targets is often a better strategy than hitting the card at the front.
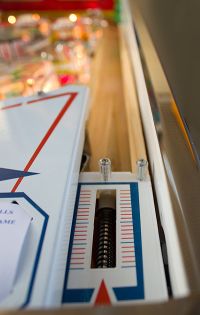
Before we can start playing though, we need to get the ball onto the playfield, and to do that we head to the shooter lane.
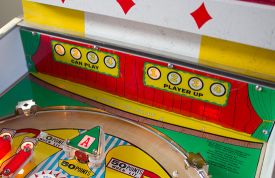
The plunger is a purely manual one and there is a detailed strength gauge which can be useful when plunging for a specific lane. As we said earlier, the ball is plunged to the top arch where it can bounce back and forth between the two one-way gates before dropping into one of the lanes or into the pop bumpers. Meanwhile, just above the top arch, it's the playfield's backboard is where we can see information about the number of players and whose turn it is.
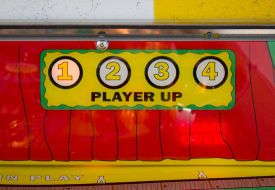
As more players are added, additional numbers light up on the left of the backboard, with a maximum of four players.
The right side shows a similar display but this one indicates which player is currently playing.
Under the current player indicator is the 'game over' message which is only visible when the lamp behind illuminates. Just below the backboard and back on the playfield are the game credits, printed on a plastic on the right side of the top arch.
That concludes this look at the top of the playfield, but now we've seen all the mechanisms, let's see how some of them work by looking under the playfield.
Most of the twelve circuit boards under the playfield are secured with hitch pin clips which allows for their quick removal without a screwdriver.
The chroming isn't just applied to the metal parts visible to the player. The roto-target bracket and mountings are all mirrored, as are playfield rest brackets.
The flippers are fairly basic, with just a single 25-950 winding coil and an end-of-stroke switch.
The game's manual lists these as 25-1050 coils rather than the actual 25-950, so maybe it was felt the strength needed to be increased by removing 100 turns. With the flipper mechs, we come to the end of our look at the hardware of King of Diamonds. Normally at this point we'd say something like "check out part two of the review for information about the game's rules". However, the rules of King of Diamonds are relatively straightforward and there are no dot matrix animations or display frames to show, so we'll carry straight on and look at them now.
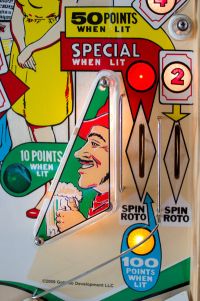
The objectives for King of Diamonds are simple; collect combinations of cards to qualify certain awards, then collect those awards. Unlike modern games, the main aim here is to win replays. Sure, points are important, but with little or no high score recording abilities, the only way to make your mark on games from the King of Diamonds era is rack up those replays and boost the credit wheel number. Remember too, that in some establishments, credits could be converted into cash or other goods, making them far more valuable than mere bragging rights. So winning credits is the name of the game here and to do that you need to find the thirteen cards located around the outer edge of the playfield. Some are on rollover lanes while others are on standup targets. At the very top of the playfield is the ace standup target. Below the ace are four rollover lanes with the six, seven, eight and nine, while below those are the king and queen targets.
Below the king and queen are the jack and ten targets, with the five and four rollover switches right next door. That leaves the three and two which are, rather unfairly, in the two outlanes.
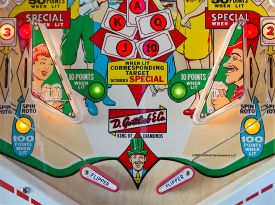
The game's setting allow the owner to change the cards needed to win one of the awards. The awards themselves can also be set to be either an extra ball, lighting a special on the playfield or giving an instant free game special. Spotting all the cards (two to ace) usually awards a special (although this can be changed to one of the other awards) and it lights one of the A-K-Q-J-10 inserts shown in the centre of the picture above. When that insert is lit, any shot to the corresponding target or rollover lane switch awards another special. The game can be set to either turn off the special at this point, or leave it on for multiple collections. At the start of the game, all the cards are lit. As each is spotted, its insert light goes out and the card appears on the backbox display.
A lit card's rollover lane scores 50 points when it is spotted, but only 5 points from then on. The standup targets always score 50 points, whether lit or not. Once all the cards have been spotted, they all relight and the backbox indicator clears down so you can start spotting them again. In addition to the award for spotting all the cards, you can also win awards for spotting groups of them. These can be for spotting;
or they can be for;
These awards will usually be less than a special, so one will give an extra ball and the other light a special in the inlanes. Now, we said the rollover lanes and the standups are the places to spot the cards, but let's not forget the roto-target which can also spot any or all of these. If there are any especially difficult cards to spot, it might be worth your while trying to get the roto-target to spin until that card is shown and then collect it there instead. Of course, part of the fun is getting the elusive card to appear on the roto-target and then not allowing it spin again before you manage to collect it. Apart from lighting one of the ten to ace inserts, each completion of the cards also helps your end-of-ball bonus. Once the ball has drained, every spotted card scores ten points. However, each completed set of cards is also held in memory, up to a maximum of two completed sets. We mentioned earlier about the two lamps hanging from the ceiling in the backglass artwork and how they can illuminate. Well, each completed set of cards lights one of the two lamps.
When the end-of-ball bonus is collected, each lit lamp scores 13 x 10 points in addition to any currently-spotted cards. It's important to note that only two completed set of cards can be stored in memory, so if you complete a third set, you lose it as far as the bonus count is concerned. That means the maximum bonus score is for 2 complete sets of 13 cards and 12 more, making 38 cards or 380 points. When all players have finished, there is a match sequence which lights up random numbers in the 'ball in play' indicator on the backglass and then stops on one which may or may not match your last digit. If it does, you win a free game.
That's it for the rules, so now we'll examine the sounds in the game.
Reviewing the sounds in an electro-mechanical game might seem odd, but as we saw when we looked inside the backbox, Retro Pinball's King of Diamonds supplements the chime unit with digitally-stored sounds. There are various gun shots, a whip snapping for the match, clicks, buzzes and sounds for the score reels which would otherwise move silently. The digital sound effects are kept fairly minimal so they don't detract from the electro-mechanical feel too much, but they do play an important role in not letting the game go silent for long periods. Otherwise, it's the chime unit which provides much of the sound in King of Diamonds, just as it provided the only sounds in the original (apart from those score reels clicking as they changed numbers).
The lighting within the game consists of a mixture of individually controlled lamps, controlled groups of lamps and an always-on lamp group. The usual 8x8 lamp matrix is used for those individually controlled lamps, allowing for a maximum of sixty-four lamps. There are also three individually switchable groups in which all the lamps in the group can be either all-on or all-off. The always-on lamps stay lit for as long as the game is powered. There are no flasher lamps used in King of Diamonds, but with lamps being used for many status indicators, all but five of the possible sixty-four individually controlled lamps are used. The bright colours and wood texture means the playfield doesn't need a huge amount of light thrown onto it, but it still needs some. There are plenty of general illumination lamps scattered around the playfield which create pools of light in their immediate areas. The areas in between are less well-lit, but remain bright enough.
There's not a huge amount to say about the game's artwork, as it is almost exactly the same as Art Stenholm's original from 1967. It may not be timeless in the sense that fashions and recreations have changed somewhat since then, but Retro Pinball would have been ill-advised to make any significant changes and they wisely chose not to. The flecking effect in the paintwork is implemented well and the colours are bright and clear. The backglass artwork is probably better than it was originally, thanks to improvements in printing techniques and paint composition, and looks exactly as you'd hope a new-in-box version would look.
Retro Pinball have achieved what they set out to do. Their King of Diamonds is a well-crafted recreation of Ed Krynski's 1967 design, with some sumptuous chroming applied in all the right places to make it clear this is no ordinary reproduction. The custom controller board appears perfectly capable of running the game with the only disappointment being the lack of USB updating. Although somewhat simplistic by today's standards, King of Diamonds does have the playability which makes you want to try to complete those thirteen cards just one more time. Game time is pretty short which works well in the home, but would irritate anyone putting coins in the slot on location and there are no obvious ways to vary the game's difficulty other than making more awards give out free games. But while some will no doubt operate theirs, this is designed to be a collector piece and it fulfils that brief very nicely indeed. With many of the game elements either missing, deliberately simplified or outside the control of Retro Pinball, it would be unfair for us to rate this game in the same way we usually do. Instead, we'll leave you to draw your own conclusions about whether or not the game appeals to you. Signs so far are that the first 100 machines have almost sold out and the Retro Pinball Team is about to start working on their next game. In the meantime, King of Diamonds is available from Retro Pinball for $3895 plus shipping. And with that we'll bring this In-Depth Review of King of Diamonds to a close. Huge thanks to John Gilbody for his hospitality and for letting us loose on his brand new machine. We hope you enjoyed it, and we look forward to bringing you our next review very soon. In the meantime, why not send us your thoughts about the game and what you've just seen? Just pop your name, e-mail and comments in the boxes below and we'll add them to this review.
© Pinball News 2012 |