|
|
IN-DEPTH REVIEW |
|
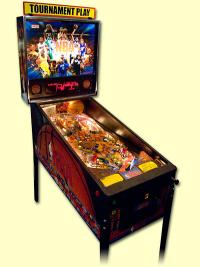
Hello and welcome to the first part of our exclusive in-depth review of Stern's NBA game. The format for this review is the same as usual, which means this part looks at the game's hardware - the cabinet, the backbox and the playfield, while the second part will go into how he rules work, what the lighting, sound and display effects are like and give our overall rating to the game. So, with NBA we've got a theme which is familiar to pinball fans. Basketball has featured many times in pinball's history, from the flipperless ESCO game of the late '30s through Harlem Globetrotters at the end of the '70s to the more recent Shaq Attaq and NBA Fastbreak models of the '90s. Of those, only Harlem Globetrotters set the pinball world on fire, so although it's been a frequent theme, it's not always been a popular one. One basketball-themed game not in that list is Sega's 1996 Space Jam. It was more centred around the Space Jam movie which featured an array of animated Warner Bros characters and the basketball star Michael Jordan. The movie did moderately well although the best part was probably R Kelly's song "I Believe I Can Fly". But the reason we're talking about Space Jam's is because NBA's playfield design is heavily based on Space Jam's. With no full-time designers working for Stern (John Borg is still there, but he has additional duties as well), one way to keep producing "new" games is to re-theme existing designs, and that's what we have here with NBA. Although the design is not entirely new, it does differ from Space Jam in a number of ways and with a new Warner-less theme, new software, new artwork and a new sound package, we won't keep referring back to Space Jam for comparison. NBA is its own game, so let's start reviewing it.
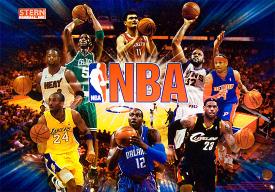
Being a fiercely competitive team sport, basketball has it's devoted followers, which means focusing too much on any one team or any one player is liable to alienate anyone who's not a fan of that team or player. NBA takes the safer approach by including 8 different players on the backglass image who will be well know to devotees of the sport. If you're not one of those, there are 6 regional division of 5 teams each, making a total of 30 teams and all 30 are featured in the game in some way. The first of those ways can be seen as we take a look at the game's cabinet art.
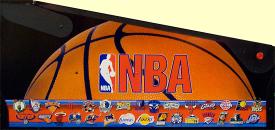
All the teams' logos are plastered like fridge magnets across the bottom of the cabinet side. They are, from left to right, Boston Celtics, Atlanta Hawks, New Jersey Nets, Charlotte Bobcats, New York Knicks, Miami Heat, Houston Rockets, Orlando Magic, Toronto Raptors, Washington Wizards, Dallas Mavericks, Golden State Warriors, Philadelphia 76ers, Los Angeles Clippers, Memphis Grizzlies, Los Angeles Lakers, New Orleans Hornets, Phoenix Suns, San Antonio Spurs, Sacramento Kings, Chicago Bulls, Denver Nuggets, Cleveland Cavaliers, Oklahoma Thunder, Detroit Pistons, Portland Trail Blazers, Indiana Pacers, Minnesota Timberwolves, Milwaukee Bucks and Utah Jazz. So all NBA teams and their fans are covered. The rest of the design is pretty simple with just the NBA logo over a basketball image. Two of the three bolts which support the rail on which the playfield slides are painted white and red to match the NBA logo which is a nice touch, though why the third bolt wasn't also painted to match the orange ball remains a mystery.
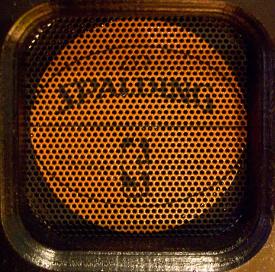
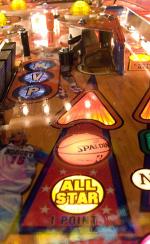
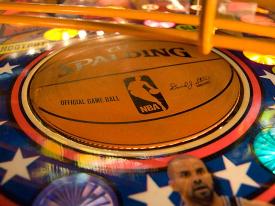
Finally, we have some artwork in a rather unusual place - on the speaker grilles. An orange basketball complete with the NBA logo and the maker's name Spalding is painted onto both grilles.
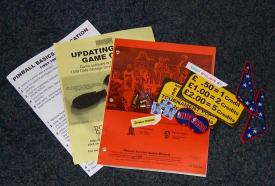
You may not be able to see it from the picture at the start of this review but Spalding appears several times on the basketballs in the backglass artwork and as we shall see, there are plenty more times that manufacturer's name appears in the game. The game is supplied with an orange manual, details about updating the software and instructions on setting the game up. It also comes with a parts bag containing spare slingshot plastics, drop target decals, a coin door button decal and a lock bar decal along with pricing cards, two NBA key rings and a small selection of lamps.
The overall effect of the game's artwork then is to give the game a solid and reasonably attractive look with no great surprises or unnecessary clutter. Let's see if that theme continues onto the playfield.
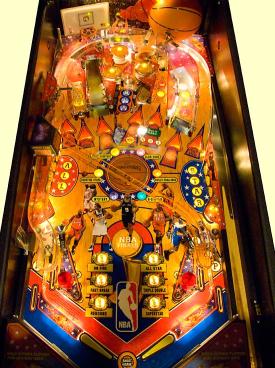
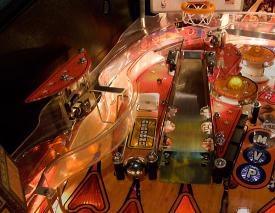
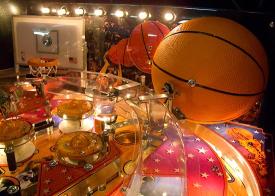
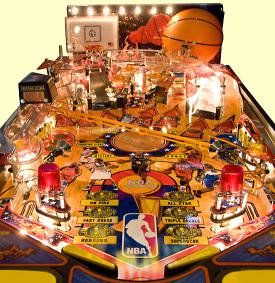
The first things you'll notice about the playfield is how bare and open it is compared to Stern's recent offerings, and also how orange everything is.
The base texture of the playfield art is the wooden floor of the basketball court, which results in the wooden playfield being painted with a wood grain effect. Relief from all that orange comes in the form of the red, white and blue detailing around the A-L-L and S-T-A-R targets at the side, around the basketball disc in the centre and the large chevrons around the flippers. Otherwise, it's pretty much orange all the way. What above-playfield toys there are have been pushed right to the back leaving a lot of empty space between the glass and the playing surface. NBA is to Stern what Breakshot was to Capcom - a simpler, more basic game without the numerous (and some might say, extraneous) toys scattered around the playfield. A number of people have been asking for just this type of game, saying modern pinball machines have become too complicated and off-putting for casual players. For those people, NBA could be just what they've been looking for. Let's take a look and find out. We'll start our tour of the playfield at the flippers and work in a clockwise direction, examining each feature as we come to them.
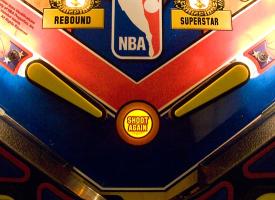
There are just the two flippers in NBA which means all the 11 possible shots fan out from them and there are no cross-playfield shots. The flippers are probably the darkest area of the playfield. The have no direct light and rely on scatter from the inlane/outlane dividers and the slingshots to lift the dark blue and give some definition. The ball saver/shoot again insert sits evenly between the flippers and the red/blue chevrons helpfully indicate the centre drain line, making it easier to see which side of centre the ball is traveling if you're trying to slap-save it.
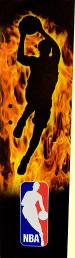
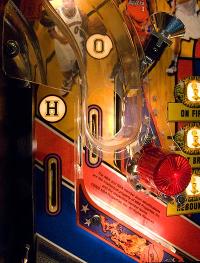
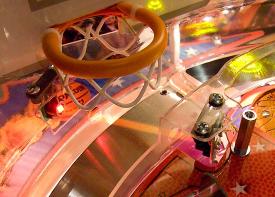
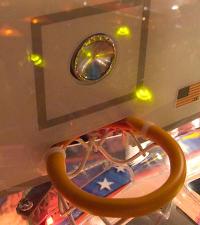
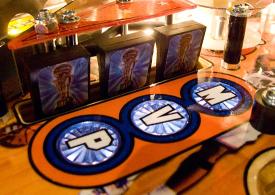
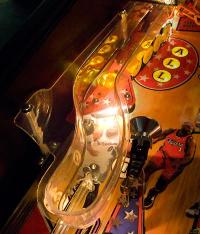
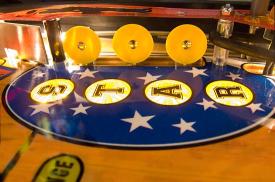
The inlane ball guide is brightly illuminated and is the clear acrylic variety topped off with a flaming basketball plastic featuring that maker's name again. The left inlane and outlane each contain a single insert and a single rollover switch. The switches light the corresponding insert which, together with their companions on the right side, spell out H-O-O-P when completed.
The left inlane is one of the two return paths coming off the main ramp and is made of clear plastic which slightly obscures the inlane/outlane divider, making it trickier to see what's happening and nudge the game accordingly. Here's what is actually under the ramp.
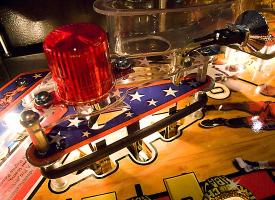
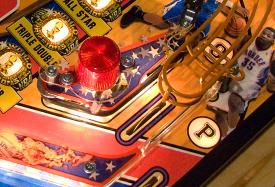
Unusually, the outlane adjuster post just has three holes drilled for the three possible positions and no artwork outline to tidy up the area like we'd normally see. The slingshot design is fairly standard two-tier design with a single flasher and a spot light mounted to the top. However, the top tier is unusual in being largely clear with just a few white stars printed on it.
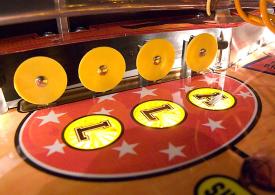
Above the left slingshot is the first of the game's two standup target banks.
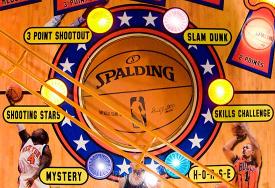
The A-L-L targets light up the corresponding inserts in front when they're hit. Don't worry about there being four targets and only three inserts because hitting any target lights the next A-L-L insert in sequence. This target bank is paired with the S-T-A-R bank on the opposite side of the playfield and when both are completed, the next mode is qualified. Moving up the playfield we come to the first of NBA's seven major shots - the left orbit.
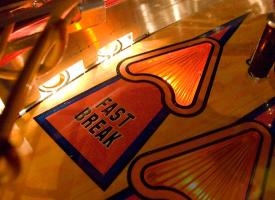
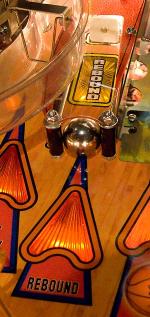
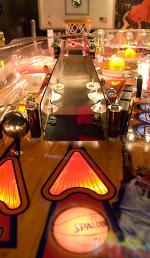
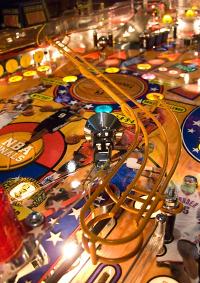
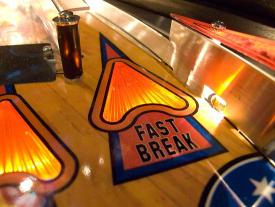
Shooting the left orbit send the ball round the back of the playfield and out the right orbit entrance. There is only a single switch to register a left orbit, so it's not necessary to actually send the ball all the way round and a weak shot can sometimes roll back and register two shots. The left orbit, like its right -side companion, is labeled "fast break" and making the shot counts down towards the start of fast break mode, more about which you'll find in the second part of this in-depth review. The left orbit is one of the major shots in the game which can be lit for jackpots and in all star modes but because it only has the one big orange arrow insert, there's no indication of what exactly it is lit for, nor how you are progressing towards fast break mode. For that information you'll need to look at the display. To the right of the left orbit is the game's sole captive ball - the rebound shot.
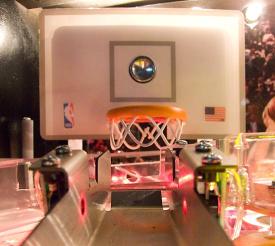
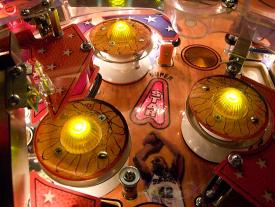
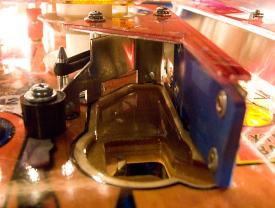
Next to the rebound shot is the smaller of the game's two ramps, the jump ramp.
When the magnet is energised, it grabs any ball which hits the central backboard area and holds it on the silver metal pole for about half a second before releasing it to drop through the hoop onto the clear plastic ramp below. There is a second pair of optos forming a beam across the ramp and it is this pair which record a successful shot.
This should guarantee that any shot which makes it to the backboard will score a basket. In truth though, the ball merely has to break the ramp opto beam and it can do this with a stray airball flying off the ramp as well as an accurate one through the hoop.
The magnet grab is a simple effect and it's repeated may times during a game but it's also quite effective and seemed reliable. Space Jam owners will know how the backboard soon picks up dings and marks but the one used in NBA seems to be made of a more robust material. The silver metal magnet core though did pick up dents quite quickly and looks to be flattening out which may leave the backboard more exposed to damage.
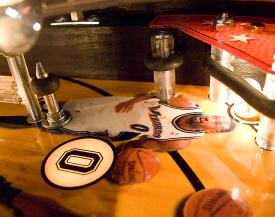
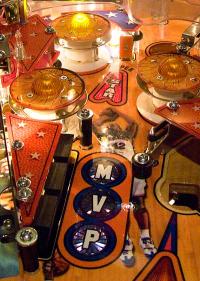
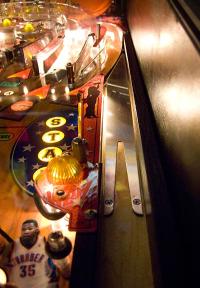
Coming back to earth, we arrive at the next shot on the playfield, the M-V-P (most valuable player) drop targets.
Each target lights the appropriate M-V-P insert in front and when all three are completed they reset and begin MVP double scoring for a short amount of time. These drop targets are at quite an acute angle making it hard to pick out any one particular target but since your aim is just to get all of them, that's not a big problem and the M-V-P targets do seem to be hit quite regularly.
Balls shot at the targets often end up rebounding into the pop bumpers behind or they can hit the short post to the right of the picture above and turn into air balls. We'll see soon why that post is quite as short as it is. If the ball makes it into the bumpers there's a fair chance another M-V-P target or two will be taken out as the ball exits the bumpers and returns to the flippers, so completing them isn't too hard. While we're in this area, let's take a look at the pop bumpers.
There are three ways for a ball to enter the pop bumpers. The first, as we've just seen, is direct from the flippers past (or a ricochet off) the M-V-P targets. The second and third ways you can see in the picture above. The orbit has a white plastic post which can rise to stop the ball and force it into the pops, while the third way is from a weak right ramp shot which, rather than roll back down the ramp, falls through a hole in the ramp into the bumpers. The usual triangular arrangement means the pop bumper action is much as expected although the large flasher lamp window often seen in the midst of the bumpers has necessarily been reduced and moved to the upper entrance the pop bumper area to make way for the super star target. This is effectively the super jackpot shot during NBA multiball but also contributes to the bonus score during regular play. In Space Jam this target was placed at the very back of the game in the orbit lane's rear wall which made it much more challenging but correspondingly more satisfying to nail. In its NBA incarnation, it's very likely any shot into the bumpers will collect it. Just to the right of the lane into the pop bumpers is the all star saucer.
This shot is called the "left eject hole" by the game's announcer which is unusual, both because it's not something a casual player will understand but also because it's actually on the right side of the game. So we'll call it the all star saucer instead and it's used in several ways. First of all it starts the next all star mode when qualified, then it features as one of the shots needed in several of those modes. Thirdly, it scores 1 basketball point whenever it is made - indicated by the basketball ball insert - and its fourth function is to score jackpots during multiball. The saucer itself is an unusual shape, forming a mini-lane in an attempt to kill the ball's momentum without allowing it to bounce out.
The metal piece at the back does the work and is only moderately successful, since bounce outs are not uncommon and will probably increase as the saucer's edges wear down and smooth out. It is quite satisfying to make the shot when it's needed though. If you are successful, the ball settles in the square cutout where it triggers the switch you can see poking up through the hole, until the required animations and effects have played. This is where you get to see the game's party piece as the ball is kicked out. Rather than a gentle push out of the hole like you get in Space Jam, the ball is kicked up with quite some force, into the air and towards the basket.
The backboard magnet is energised and it grabs the ball as it arrives, holding it briefly before dropping it through the basket to score the 1 point shot. Although it is a mechanically simple trick, casual players really seemed to enjoy this effect and the accuracy of the kickout seemed good enough to ensure the ball never missed its target. You can see now why the post on the left of the saucer is reduced in height. Next to the all star saucer, separated by a blue rubber pad is the NBA saucer lane.
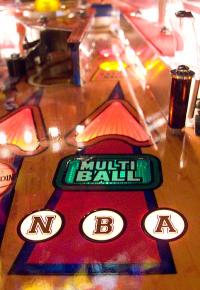
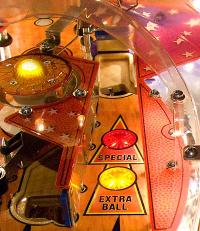
This shot consists of a tapering metal-walled lane which leads to the game's second saucer. At the entrance are three sets of inserts. The bottom N-B-A inserts light in turn as you make shots to the saucer at the end of the lane. When completed, the green multiball insert lights to show the saucer is now lit to start NBA multiball. The large orange arrow shows that this shot is one of the majors shots lit for multiball jackpots and to help advance or complete some of the all star modes. Further up the lane are two more inserts to show the saucer is also used to collect extra balls and specials when lit.
After the appropriate awards have been given the ball is kicked out but not in any clever way like the all star saucer. Instead, the ball is simply pushed out to the left, through a one-way gate and into the pop bumpers.
The sixth of the seven major shots is the game's main ramp.
As the ball rolls up the right ramp and heads towards the basket, it rolls over a long piece of black spring steel which is riveted at its right hand end to the plastic ramp. Under this flap is a white up post (arrowed below) connected to a solenoid. As the ball is shot up the right ramp, it triggers a roll-under switch which powers the solenoid. When the solenoid energises, the post is pushed up through a hole in the right ramp, which in turn pushes up the spring steel flap, creating a jump ramp.
If the ball is moving fast enough, it hits the jump ramp and becomes airborne, flying over the top of the basket. At the same time as the spring steel flap is pushed up, the backboard magnet is also energised which means the flying ball is grabbed by the magnet and dropped through the hoop to score the 2 basketball points. It's not absolutely necessary for the ball to reach the magnet and fall through the hoop to collect the points. As long as it makes it up the jump ramp, it can fall off the end and continue round the right ramp since this will still break the opto beam under the basket and register correctly. Sometime the ball doesn't have the momentum necessary to make it up the jump ramp in which case it rolls back into the escape hole which leads to the pop bumpers. So between them, the left jump ramp, the all star saucer and the right ramp provide three ways to get the ball through the hoop and score basketball points. After dropping through the basket, the ball continues along the right ramp which curves round and runs down the left side of the playfield.
As the ball continues over the top of the A-L-L targets, it comes to a diverter which either allows the ball to continue, or sends it across the playfield instead.
If the diverter is not engaged, the ball rolls under it and continues on the clear plastic ramp to end up at the left inlane and the left flipper.
On the other hand, if the diverter is engaged, the ball rolls across the playfield on an orange wireform which terminates over the right inlane which feeds the right flipper.
The diverter will only energise and send the ball to the right flipper if you need to shoot one of the shots on the left side of the playfield to complete the current feature. Otherwise it will keep out of the way and allow the ball to end up at the left flipper. The final major shot on the NBA playfield is the right orbit which, not surprisingly, is the other end of the left orbit.
Like the left orbit, shooting the right orbit advances towards the start of fast break mode when shot sufficient times. With its big orange arrow, it's the seventh major shot which scores jackpots and advances some of the all star modes. The right orbit is also where the shooter lane sends the ball after launching it.
If the ball enters the right orbit from the shooter lane, there's an up-post at the top of the orbit lane which pops up to stop the ball and force it into the pop bumpers.
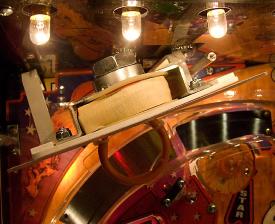
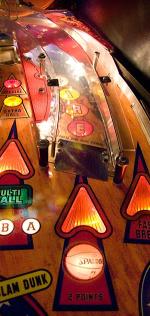
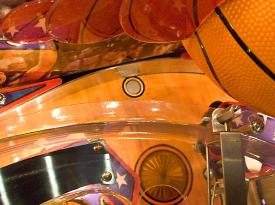
It actually energises as soon as the ball leaves the shooter lane switch, so will pop up even if you plunge too softly to hit it. There didn't appear to be any other time when the post is used during regular gameplay. It would be unfair to move on without mention of what is probably the biggest toy in the game - the plastic half-ball at the back right of the game.
It's big, it's orange and it's dimpled. Oh, and it has a flasher lamp inside it. Unfortunately, it is just decorative and plays no part in the gameplay at all. Something which does affect gameplay is the final feature we can shoot - the S-T-A-R target bank.
If you remember the companion targets on the left side of the playfield, there were 4 targets to spell the A-L-L letters. 3 letters, 4 targets. Well, over on the right side it's the other way round with 3 targets to spell the 4 letters in S-T-A-R. Not that it matters much since hitting any of the three S-T-A-R targets lights the next letter in sequence or, if it's the first time completing them, two letters at once. As we head back to the flippers, we just have the right inlane and outlane to look at.
These two lanes have a single rollover switch each and they light the third and fourth letters in H-O-O-P which, when completed, increase the bonus multiplier. That aside, in all other regards this area is the mirror image of the left side. We now turn our attention to the central playfield area to see what features Stern have in store for us there.
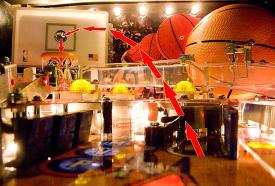
The first feature we'll look at is the most obvious and the most dramatic - the spinning disc.
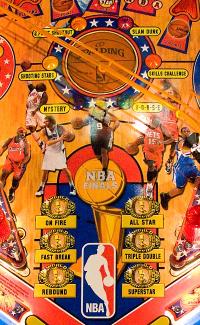
The disc spins whenever the pop bumpers or the slingshots are activated and continues spinning for about 5 seconds after the last bumper or sling was hit, making it highly likely the ball will come into contact with it while it is spinning. The disc has a rubberised surface which throws the ball in a different direction to the way it was originally traveling. The surface material gives it a greater resistance and hence produced a greater effect than similar discs in Whirlwind or Twister, although this particular one showed signs of damage and ingrained dirt after only small number of games, so hopefully that's not typical. Surrounding the spinning disc are six coloured inserts which make up the all star modes.
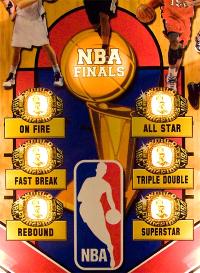
These modes are qualified by completing the A-L-L and S-T-A-R target banks and started by shooting the all star saucer. We'll examine what each one does in the next part but there is a mix of multiball and single ball modes and one random award. The third and final feature in the centre of the playfield is you progress grid which show the features you have played and which ones you still need to play to get to the wizard mode.
To get to the NBA Finals - the wizard mode - you need to collect all six champions rings. The ones on the left are lit by shooting the right ramp, the orbits and the bumpers followed by the captive ball to light on fire, fast break and rebound respectively. The right ones require you to start an all star mode, shoot the three basketball points scoring shots in sequence and collect the super jackpot in NBA multiball. Like the rest of the game, the tasks are reasonably clear and achievable although getting all six in one game is more of a challenge as you would expect.
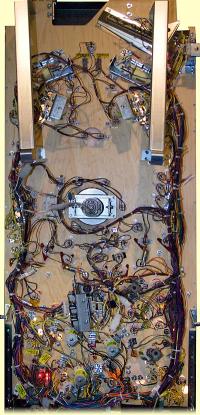
So that very nearly brings us to the end of this first part of the Pinball News In-Depth Review for NBA. Before we go though, here's a look at the underside of the game:
Now, usually at this point we'd give you the main theme music but we've pointed out how NBA is an unusual game in several respects and that's certainly true when it comes to the main theme. Have a listen and see what we mean... Get the Flash Player to hear this audio clip.
Got problems hearing the audio? Consult our help page for assistance. So instead, here's the music for the on fire mode: Get the Flash Player to hear this audio clip.
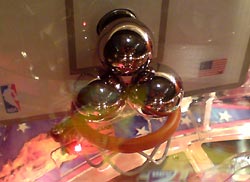
Finally, here's a challenge for anyone out there playing NBA. Get all three balls up the jump ramp in quick succession during NBA multiball and get them stuck like this: © Pinball News 2009 |