|
| THE ROLLING STONES |
|
Hello and welcome to this first part of our exclusive in-depth review of Stern's new The Rolling Stones game. We'll be sticking with the usual format of these reviews. So this first part looks at the game's artwork, the playfield layout and mechanisms, and how the game is built. Then in the second part we'll explore the rules in detail to see the game's objectives and scoring opportunities, followed by summaries of the component parts and wrapping everything up with our overall rankings. First of all though, it's important to note that this review looks at a sample game in an unfinished and unapproved state. There may be minor changes to the artwork on the cabinet or on the backglass, and there will certainly be changes to the rules, dot matrix artwork and playfield art. We'll review these changes as we go along. At the time of writing the game is not yet released, so we'll delay reviewing the rules until we're satisfied we have a production version of the software. This shouldn't take long though, as the game is scheduled to be available to purchase at the end of this month. Stern's Spring release is the model most seasonal operators in the northern hemisphere will be considering for their 2011 operations. Machines made later in the year miss this purchasing window, so those released at the start have additional importance. The Rolling Stones is Stern's first non-movie licence since Big Buck Hunter Pro and like previous music games, it benefits by appealing not only to pinball collectors and operators, but also to fans of The Rolling Stones, many of who wouldn't otherwise consider buying a pinball machine. For them, the number of features and the complexity of the rules is perhaps less important than the music the game plays, how good it looks, the fun things the band members get involved in, and how accessible it is to play. Let's start by examining the game's looks.
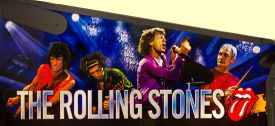
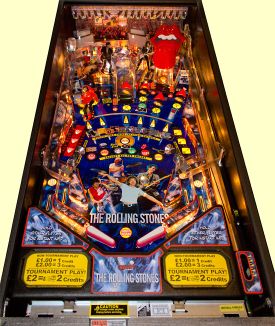
Perhaps more interesting is the background artwork which blends images of the group with elements from the band's album covers and iconic designs over the years.The lion on the right from "Bridges to Babylon", top left is the "Voodoo Lounge" motif, behind Mick you get hints of the "Steel Wheels" cover art, and so on. The only element which seems out of place is the typeface used for the name of the game. It's been used in other Stones products but is disappointingly plain and lacking in character for such a flamboyant band. That's almost certainly not Stern's fault though, as it probably came from the Stone's marketing company Bravado as part of the style guide. That mixture of band members and album covers continues on the cabinet and backbox sides, although the positions of the band members changes.
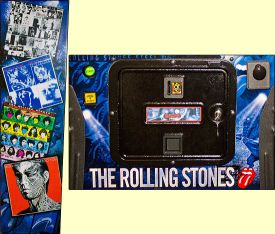
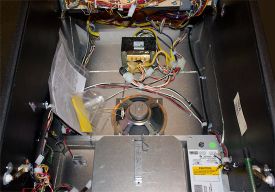
As with the backglass, the cabinet sides and front look better in reality than you might think if you saw earlier pictures. The images look vibrant and detailed, although as with all Stern cabinet art, you don't want to get too close or the low dot density of the printing becomes all too obvious. The left and right cabinet and backbox sides use identical imagery. It would have been nicer if the two backbox sides had featured different album covers. After all, it's not hard to find four more cover designs from a band with 29 studio albums, 10 live albums and 31 compilation albums. In hardware terms, there are no surprises on the exterior of The Rolling Stones. Two flipper buttons, a manual plunger, the regular and tournament start buttons and the standard coin door are all present and correct. The game uses the new style lock bar with the two catches on the inside, as found on Avatar. Having used it quite a few times now, there's no question it's trickier to lock and unlock than the old version. Once the lock bar is removed, we can see there are no surprises lurking inside the game either.
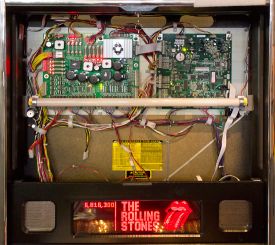
The backbox also contains the usual pair of boards - Driver and CPU - and with this being a European machine, the DMD is an LED version and hence no high voltage board is needed.
So, there's nothing too exciting inside. The interesting stuff is found on the playfield, and that's where we head next.
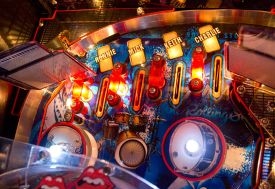
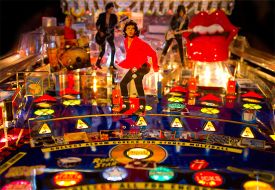
As is customary, we begin our tour of the playfield down at the flippers. From there we'll move clockwise, looking at each feature as we go.
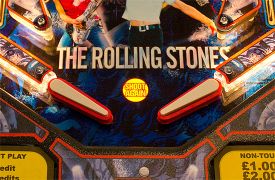
The shoot again insert is the standard orange colour and sits between the flippers, rather than below them. There's no centre post or other ball saving device, so once the ball disappears between the flippers towards the plastic apron, that's it. In case you were looking at the picture above and thinking the title text isn't centred correctly - you're right, it's not. That's due to it being a sample game, and it has been corrected in the finished version as you can see below.
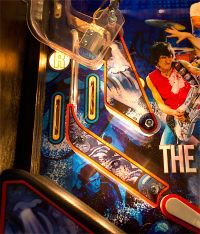
Moving round to the inlane/outlane area, we find a standard arrangement with one of each.
The left inlane is where the left ramp returns the ball and it, like the outlane, lights a letter in R-O-C-K when the switch is triggered. The letters R and O are lit on the left, and there is a matching pair of lanes, inserts and switches on the right for the C and K letters.
There is no kickback on the left outlane, so no opportunity to save the ball once it's gone down the side, which is something that happens a lot on The Rolling Stones. That is mainly due to this...
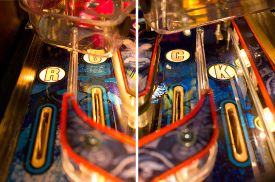
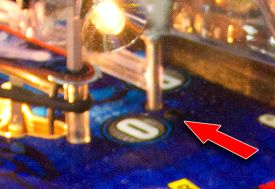
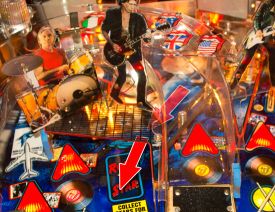
The adjusters for the outlanes only have two positions and this machine shipped with them in the upper hole, making the outlanes really quite cavernous. We've arrowed the worst offender - the left outlane - below.
Stern thought about this and considered adding an additional post above the inlane/outlane diverter. They decided against it, so It was blanked off in this machine and apparently won't be implemented on the production game.
Without that extra post, the outlane adjuster should be moved down to the lower position on both sides, as balls going anywhere near the outlanes are otherwise swallowed almost instantly. In fact, sometimes the ball would roll out of the pop bumpers straight down the side without any opportunity to play it, though that may have been a leveling issue. The left slingshot is a simple affair with just a single layer of plastic and one spot lamp mounted on the top post which also helps support the left ramp.
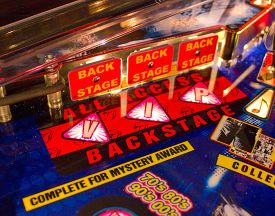
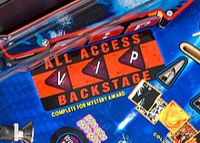
Next on our playfield tour is the first feature to shoot for, the V-I-P targets.
The three standup targets light up their corresponding V-I-P inserts when hit, and completing all three gives an instant mystery award much like Pappy's Porch in Big Buck Hunter Pro. This is one area where quite a bit has changed with the artwork between the sample game and the production version. The target decals now say 'V', 'I' and 'P' rather than 'BACK STAGE' and the explanatory text on the playfield - like all other such text - is no longer black type on a yellow block. Now it is just plain yellow lettering with no block to make it stand out.
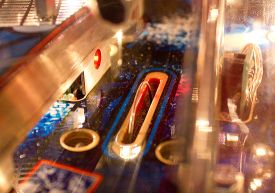
Above the V-I-P targets is the left entrance to the orbit lane, or as we'll call it, the left orbit.
This is the first major shot and it features the customary big red arrow insert to indicate when it's lit for jackpots. Each red arrow is associated with a pair of album covers and you can see them poking out from behind the arrow. As yet, there's no obvious reason why that matters, but the rules might change and... The left orbit also has a yellow record insert which lights when it is one of the required shots in a mode, and a green drumsticks inset to show when the shot value is multiplied.
The left orbit shot also advances towards World Tour mode and includes the game's only spinner - a suspended one like the version found in Iron Man, and just as in Iron Man, it's possible to shoot the orbit from the right flipper and miss the spinner completely. The two spinner decals show alternating left and right hits on the snare, but unfortunately on this game the reverse image was upside-down.
You get the idea of what it should look like though. Don't you? Oh alright then, this is how it is supposed to look.
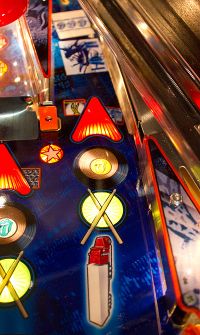
A ball shot up the left orbit continues round to the right orbit entrance unless the shot is too weak, in which case the ball will fall through the top rollovers (or possibly into the lock lane). At the top of the left orbit is a controlled gate.
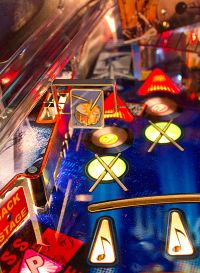
Just to the right of the left orbit is a curious little lane which leads under Charlie Watts and his drums and into the pop bumpers, but it also one of the game's major shots. For the want of a better name, we'll call it the left lane.
Like its neighbour, it features a red arrow jackpot insert along with coloured record and drumsticks inserts for modes and a multiplier respectively. Apart from leading into the pop bumpers, it is also a possible exit route from them. The left lane is quite a tight shot and reasonably satisfying to make, even though you know it's only going to send the ball back to you after a few pop bumper hits. Shot sensing is done by a pair of optos half way up the lane which makes sense as there's then no chance of a ball hangup on a rollover switch in such an inaccessible area. Slightly to the right of the left lane, in this tightly-packed part of the playfield, is the game's first dedicated feature; the Rock Star 2-bank.
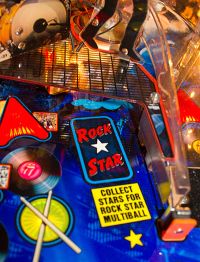
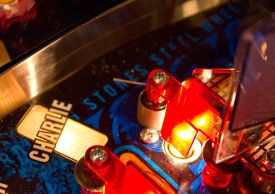
The Rock Star feature consists of two square standup targets under Keith Richards, coupled with three rectangular orange star standups next to the two ramp entrances. The square targets are quite well hidden in a dark area beneath a grating plastic, and they're not as easy to hit as you might think. There is a metal lane guide on the right leading to the targets, but in fact this is just as likely to lead to a black post and not hit the targets at all, which is odd.
There is a #89 flasher beneath the rectangular Rock Star insert and another behind Keith to indicate when a shot to the targets is needed to start a feature. The targets are only used for Rock Star multiball and not used as one of the game's major shots for multiball jackpots or modes. At least not yet. The first of the rectangular orange star standups can be found just to the right of the Rock Star 2-bank.
Hitting this when lit adds a letter to R-O-C-K-S-T-A-R and turns the target's insert off until you hit one of the other star targets. It's one of the more dangerous targets in the game as it can send the ball back at the flippers very quickly. It also acts as a protector for the left side of the left ramp, which is the next feature on our tour.
The ramp is another major shot, but for space reasons its red arrow insert is under the ramp, as is the record insert. The shot multiplier insert is in front of the ramp though. The left ramp lives up to its name by curving to the left and continuing down the left side of the playfield, terminating at the left inlane.
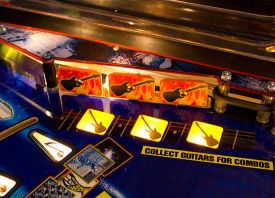
Over the curved part of the ramp is a plastic cover depicting various lips/tongue motifs with different countries' flags.
Their size and the countries featured have both changed in the production version.
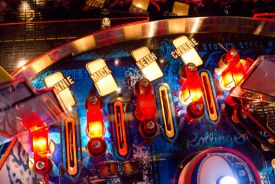
Out go Spain, Australia and Brazil, in come Sweden, France and Canada, while they are all reduced in size to increase the spacing between them and give a clearer view of the ramp and pop bumpers underneath. Speaking of the pop bumpers, let's move up the playfield a little and examine that whole area. At the very back of the game above the pop bumpers is some artwork depicting a row of PAR cans, designed to look like a stage lighting rig. Unusually, this is not just a backboard decal but a physical pelmet mounted on the backboard with general illumination lamps and flashers behind.
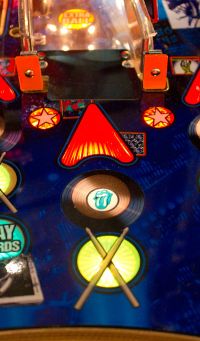
This looks like a good opportunity for those who like to modify their games to add LEDs or improved lighting effects to enhance the feeling of a Stones concert. When the ball is first launched, it normally ends up at the top of the orbit lane where it encounters a closed control gate. This will usually send it into one of the four rollover lanes, each named after a band member.
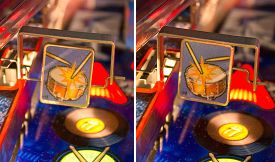
As usual, rolling through one of the lanes lights its insert, with the aim of collecting all four. One of the lanes is flashing at the start of each ball and hitting it earns you a skill shot award. The 'Mick' lane is always the lane flashing at the start, but lane change with the flipper buttons works as expected to allow you to change the lit lane. After traversing one of the rollover switches, the ball enters the pop bumpers area.
The lower pop bumper and the exit route is under the left ramp which makes it hard to see when the ball is about to return to the flippers, even with the smaller ramp decals. Each pop bumper represents a drum in Charlie's kit, and appropriate sound effects are played with each hit to form a mini drum solo. A circular bass drum insert in the middle of the area features a single #89 lamp underneath which flashes with each pop bumper hit while the bumpers themselves have blue-ish white LEDs mounted in the centre. The game comes with mylar fitted as standard to help protect the playfield in this high-traffic area. The ball's usual exit route from the pop bumpers is under the left ramp, rolling to the right of the Rock Star targets towards that dreaded left outlane.
It is possible for the ball to exit through the left lane as well, and that's usually the safer option, but it will travel under the left ramp far more frequently. Continuing on our tour, the next feature - just a small blue rubber pad away from the left ramp - is the lock lane.
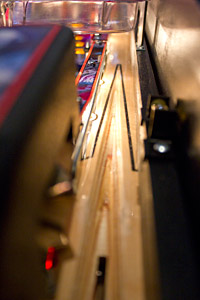
This lane is a little unusual as it's quite long, curving round to the left as it heads to the back of the playfield, but doesn't actually have anything at the end except a rubber stop.
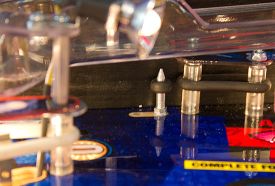
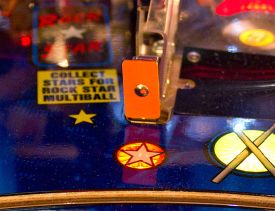
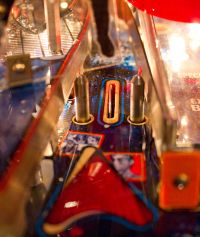
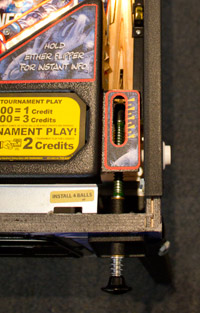
So the business end of the lock lane is at the bottom, and it's here that we find the actual locking mechanism. There are two pins which can be raised to trap the ball, much like the Jake shot in Avatar.
The ball is detected in two ways. There is a rollover switch which sits just behind the pins and senses when the ball is trapped. Just a little further up the lane is a pair of optos.
Between them they should be able to determine the ball's direction, as well as its presence and also detect when more than one ball is locked.
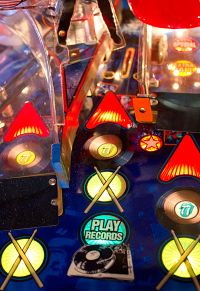
The lock lane is one of the major shots, so it has that familiar red arrow. It also features record and drum multiplier inserts, and additionally has a Play Records insert to indicate when a record mode can be started by shooting the lane.
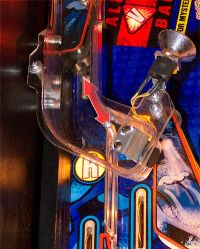
We mentioned there is no target at the end of the lock lane, but that's not to say there's nothing of interest to be found up there. Let's look at it again.
Apart from shooting the lock lane from the front, there is also an way in at the back from the orbit lane. There's no specific shot as such, but a weak orbit shot (or a collision between two balls) can send a ball down the lock lane. This registers as a valid shot to the lane, building up or starting the next feature. It could also act as a super skill shot, but that wasn't implemented in the early version of software we played. While we're examining that area, there's another interesting design feature worthy of consideration.
This little spring arm acts on weaker orbit shots to deflect them either down the lock lane or into the rollover lanes. It's not the subtlest device - and it might put a few nasty scratches on the ball - but it does seem quite effective in making the ball's mind up about which way it's going. Back to where we left off, and the next playfield feature we encounter is the right ramp.
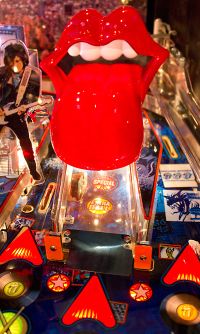
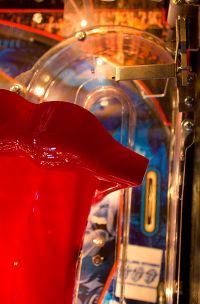
This is visually one of the most diverting parts of the playfield thanks to the large red lips/tongue mounted over the ramp.This is a totally static part and it has no interaction with the ball, but nevertheless it livens up the ramp and ties in with the Licks mode which is started on the two ramps. Guarding the ramp entrance are the second and third orange star standup targets which advance towards Rock Star multiball, while under the ramp are the extra ball and special inserts, indicating you shoot the ramp to collect both these awards. If you do shoot the ramp, the ball is sent round a hairpin bend, down the right side of the playfield above the shooter lane and ends up being dumped into the right inlane.
Like it's counterpart on the other side of the playfield, the right ramp is a straight, clear plastic affair with no curves or climbs to slow the ball down. Being a major shot in the game, the right ramp has the usual trio of inserts; the red arrow, the record and the drum multiplier.
The final major shot in the game sits right next to the right ramp and is called the right orbit.
This mirrors the left orbit except for the absence of a spinner, and usually sends the ball round the top of the playfield and down the left orbit lane. If the controlled gate at the top of the lane is closed however, the ball ends up in the pop bumpers instead. The usual three inserts are present along with a truck image to reinforce how the orbits advance the World Tour feature. There's quite a long lead-in ball guide to make the shot easier and the light spill from lamps under the left ramp keeps it well lit. Like most orbits though, it's difficult to see what the ball is doing as it reaches the top of the lane. In this case it's the large red lips/tongue plastic which blocks our view of the top of both the right orbit and the right ramp.
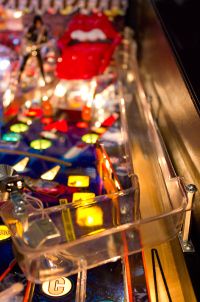
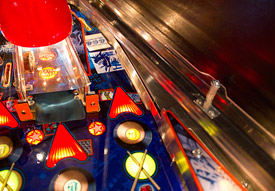
With that long ball guide taking up much of the right side of the playfield, the next feature on our tour takes us just above the right outlane, where we find the guitar standups.
There's not really much more to say about the guitar inserts, so let's leave them, travel past the dead area filled in with a rubber ring and get down to the right inlane/outlane.
There's the regular single inlane and single outlane on this side too. The final two R-O-C-K letter inserts sit at the top of each lane and the right ramp terminates above the inlane so the ball falls onto a mylar pad just above the rollover switch. The right outlane is not quite as voracious as the left, but the general lack of rubber in the area makes it difficult to save a ball intent on exiting the playfield. The right slingshot is also a mirror copy of it's counterpart, with the same single spot lamp mounted on the top corner to help illuminate the central playfield.
Before we get to play any of these features though, we need to get a ball onto the playfield and that brings us to the shooter lane and the plunger.
It's a standard combined manual and automatic plunger with the usual graduation marks to gauge your plunge strength, although at the moment it's only worth sending the ball into the top rollovers. There are no inserts or skill shot features in the shooter lane.
The ball just travels up the shooter lane and joins the right orbit just above the guitar targets.
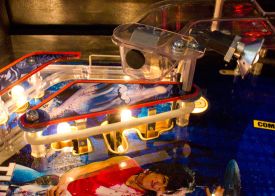
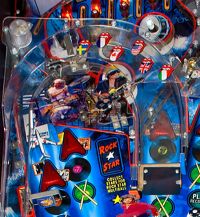
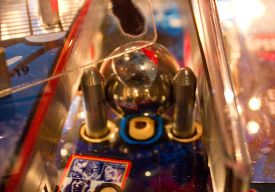
With the ball on the playfield, let's next take a look at the centre of that playfield and the games biggest, heck, the game's only real toy; the moving Mick Jagger.
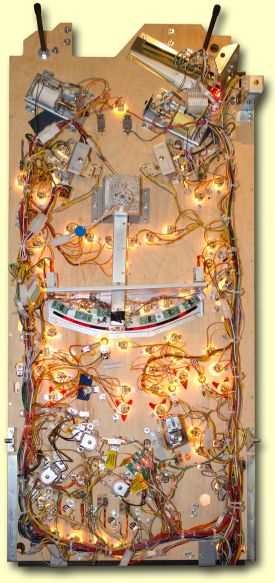
Moving a bash-able feature across the playfield has been tried before, most recently in Stern's Big Buck Hunter Pro where the toy moved out on cue from its resting place behind the blind. The moving Mick Jagger feature is a cross between that and Dracula from Monster Bash. Like Mick, Dracula moved on an arc but he too returned to his hiding place inside his coffin when not needed. Mick differs from these games in two important ways. Firstly, there is no hiding place for Mick on The Rolling Stones. Wherever he is on the playfield, he can be hit with the ball. Secondly, he doesn't only start moving when activated, he's moving all the time. The feature consists of a standup target with a flat plastic picture of Mick Jagger bolted onto an arm above it. A decal on the standup target continues the picture of Mick to give a sense of it being a single object. The effect works only so well. This target/plastic unit then moves left and right across the playfield. It stops briefly at one of six pre-defined positions - indicated by the white musical note inserts - before moving on to a different position. Hitting Mick at one of his resting points will flash or light the corresponding musical note insert, while lighting them all will start a multiball mode. The mechanism to move Mick across the playfield is interesting because of concerns about the playfield warping with such a large groove across the centre and damage to the edges of the groove. In addition, the motor used to move Dracula on Monster Bash required visible mountings to be placed on the playfield to support its weight. The Rolling Stones has no such mountings, so how does it manage a larger range or movement with no impact on the top side of the playfield? Let's find out by looking underneath.
The target is attached to the end of an arm which is driven by a motor. This produces the semi-circular path but also requires quite a lot of hardware to achieve the effect.
Firstly, there's the end which drives everything. A motor is connected to a gearbox and then to the arm. The motor is bi-directional and mounted some way below the playfield. The frame upon which the motor and gearbox sits has a cut-out to allow the arm to move the full width of the track.
The arm needs to move smoothly and accurately, so it sits in a slot which ensures it doesn't move vertically, while a white plastic pad prevents metal-on-metal contact during movement.
The game needs to know where the arm is at any given moment and to do this, six opto pairs are mounted along the curved cutout to detect when the arm is lined up with one of the musical note inserts.
The target unit contains a small blade which slides between the two optos to interrupt the beam.
Microswitches on either side of the frame detect when the arm is at the limit of its travel. Although the optos could also provide this information, the microswitches provide resilience in case an opto should fail.
Flipping over to the top side again, you may have noticed the uneven spacing of the musical note inserts and their associated optos underneath.
There have been some changes to the text seen in the pictures above. Stones Multiball has been renamed Album Multiball and the instructions now say to collect musical notes instead of album covers to start it. The album covers look like they should illuminate as you collect them on various shots, but they don't. They are purely decorative. With those changes in naming noted, let's look at the feature ladder to see what the game's objectives are.
Again, bear in mind this artwork has changed quite a bit on the production game and now looks like this:
Whatever the wording, the objectives are the same; complete World Tour (orbits), Fast Scoring (pop bumpers), Rock Star (star targets), Records (lock lane), Licks (ramps), Combos (guitar targets) and Album Multiball (Mick) to start the Encore wizard mode. That brings us to the end of this first part of our in-depth review of Stern's The Rolling Stones.
We hope you enjoyed it and we'll be back soon with the second part, where we explain the rules and give our verdict on the various different elements which go to make up the game.
We'd normally leave you with a chance to hear the game's main theme. However, this being The Rolling Stones, not only will you probably already have heard Rain Fall Down, we'd probably get into trouble for playing it. Now you've seen how it's put together, why not give us your thoughts about The Rolling Stones? What do you think about what you've seen? Have you played it? Would you buy it? Share your comments with other readers by sending us your thoughts with the message box below: Your comments:
© Pinball News 2011 |