|
|
or THE LEVEL TRUTH or THE PLANE TRUTH or ON THE LEVEL or… |
| You need to start out on the right foot. If your game seems to be constantly in need of leveling, you may need new “leg levelers”. Several styles of levelers are available. This is the style of caster that is attached to every pinball machine as it was shipped from its manufacturer.
This style is a replacement leveler; usually for hard floors.
Heavy duty levelers are recommended. And, don’t forget the securing hardware. Pinball leg levelers use a standard 9/16” nut with a 3/8-16 thread. So a standard 9/16” (14 or 14.5 mm) open ended wrench will work well.
The heavy duty pinball leg levelers, which are shown directly below, are the best type. They are sturdy and have a square at the bottom of the threads.
The square allows the use of a standard 3/8” (9.5 or 10 mm) wrench or thin nosed vice grips.
Be sure to place the retaining nut under the foot of its leg and tighten “up” towards the leg. Not only is this the correct way to install the leveler’s retaining nut, this location gives you the advantage of more working space around the nut. Finally - before you ask, no, two nuts are not needed.
Now that you know what hardware to use to level your game, it’s almost time to learn just how to do that. But first, you will need a way to know if your game is level side-to-side and at the correct slant: aka - tilt. The group of tools used to check for angle of our playfield is – levels. There are several different types of levels. We are only going to cover two families of levels in this article. No matter which level you use, be sure to keep the base of the level at right angles to the cabinet. And, also be sure to avoid any lifting playfield inserts or “toys” that could throw off your measurement.
One of the: oldest, most common, and most useful types of levels are bubble levels. Even though Stern Pinball has implemented an active program to reduce production costs, they felt that the bubble level was so necessary for operators to use, that they brought them back. Bubble levels work on the principal of buoyancy. The bubble, trapped inside of the tube will try to float up to the top surface. The bubble will try to float up to the higher side. When both ends are at relatively the same height above to the horizon, the bubble seems to cling to the top side of the vial. The bubble never falls to the ground under the effect of gravity. It always floats skyward.
A second type of bubble level is the “bullseye”. It is not very useful for pinball.
A “spirit level” is easier to read but they are not very accurate. The proper way to use a “torpedo” level is to use it twice. That is, check to see is the bubble is exactly between the center two lines with the level pointing left, then again pointing right. The liquid inside the vile is viscous. So, give the bubble a few seconds to adjust.
In the two pictures above, you can see that the bubble is first “a little more to the left” then “a little more to the right”. The bubble is “off” because the shoddiness of the tool. I chose to use this level because it fits well on pinball machine playfields. And, the soft plastic body wont scratch the playfield's surface. Even with its faults, this level is still very useable. Go back and look at the two pictures above again. Overall, you can see that the bubble needs to go to the right. You can accomplish this correction by making the right side of the game higher. The more “off” the bubble from center, the higher the game will need to be raised. Now look at the picture below. By spinning the face of the level, I could verify that the right side of the game needed to be lifted. Or, the left side dropped. This is the same correction; only opposite.
Technology has brought forth the advent of electronic levels. These levels use a sensor called an accelerometer. The level of tilt is determined not just by gravity, but by the device “falling” at a constant 32 Ft/Sec/Sec over zero seconds of time. These virtual bubble levels can be easily user calibrated and their faces are easier to read; with some giving audible indication of desired pitch or level. The popular iPhone and iPod Touch have applications which use their internal accelerometers to show very accurate levels and/or inclinometers on their screens.
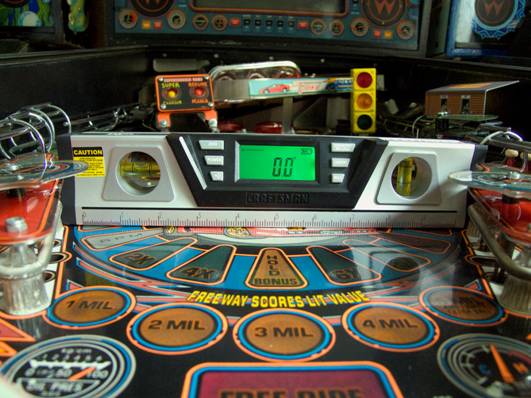
If the electronic level on your phone is un-calibrated, you must use it as you would any other type of bubble level. Use the application once each direction to get the measurement and get the bubble in the center to make the correction. Although cell phones are handy, there are a number of digital alternatives available. These specific purpose tools make it easier to accurately set the pitch and level your game. This particular Craftsman model is available at Sears stores and is easy to read. For non-pinball uses, it also has a built in laser level and a magnetic base. And it is affordable; costing less than $50.
For uses in pinball machines, this electronic level is a good size for pinball playfields; fitting neatly across the top of the two slinghots.
This type of level is particularly useful when leveling a game by yourself. The illuminated display is ideal for use in dark gamerooms. The display shows the current angle and indicates which side has to be raised or lowered. This level also has an audible beep, which indicates when a game is level. So you don’t have to keep “gophering” from under the game to know when you have reached your mark. One clever use of the audible beep is setting the "zero" point to your desired reading. So if you want a 6.5 degree pitch, lift one end of the level until it reads 6.5 degrees, then reset the zero point to that. Now the level will beep when the game is set to 6.5 degrees. Even if you use a sophisticated electronic level, if it is not calibrated, you must take your first measurement in one direction, then spin the level around 180 degrees and take your second measurement. Then determine the difference between your two measurements and adjust your game to the offset value to reach your target.
Electronic accelerometer based clinometers have been made available in the past half-decade. The new tiltmeters may be easier to read and may even have a “voice” which calls out the current reading. But, they are usually very expensive.
Another method, familiar to billiard players, is “the roll”. Some pool players claim that they can tell the “true” of a table just by rolling the ball to the far side and making a keen observation of the event. Well, we are going to do those pool bums one better. We will make a simple machine to take the variability out of our test. This test uses “line of sight”. To perform this test, place a pinball as far up the playfield as possible. Use a book to temporarily hold the pinball in place. Use a yard/meter - stick or broom handle to raise the book, thus releasing the ball. Repeat this test thrice to make your measurement.
When adjusting the level of your pinball machine, you want to mainly consider the playfield; a two dimensional space. The first direction is side-to-side. The second is front-to-back. When adjusting the level of your playfield, you want the side-to-side tilt to be level, or zero degrees. Although six-and-a-half to seven degrees are recommended for the front-to-back tilt of a pinball machine, you may use a range of six to nine degrees slant. The reason for the relatively wide range is that game play is solely dependent upon personal preference. In general, the greater the slant, the faster the game will play. If the tilt of your pinball machine is any less than six degrees, the ball will tend to get stuck on the playfield. Keeping your playfield clean will help lessen the chances of a stuck ball. If your pinball machine tilt was any more than nine degrees, the flippers may not have enough strength to get the ball all the way up the playfield. Keeping your flippers well maintained will help lessen the chances of a weak shot. To raise one side of the machine, make the caster / leveler longer. Perform the opposite to lower. Check the side-to-side and front-to-back levels of your pinball machine in the “front” and as far “back” on the playfield as possible. Then, start making the correction by adjusting pairs of levelers. When you are close, you may only need to adjust one leveler. If you make any adjustment to correct for half of a bubble (about five degrees) or more, you will probably have to go back and readjust your machine again in a few days. This is because your machine will settle after such a large adjustment.
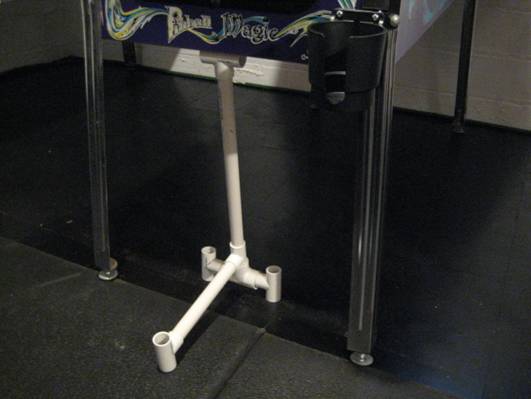
Have you ever tried to level a pinball machine by yourself? Crawling under the game to use yourself as a human lift can be a pain in the back. Leveling a pinball machine is easier with the help of a friend … Jack. You can ask for help. Or you can build something like the “PinRen “Wheelie-Bobber” to help you temporarily raise and hold one side of your game slightly off of the floor; in order to make leveling the game easier.
From the pictures at the beginning of this article you saw that the right side of the pinball machine needed adjusting. I over adjusted the first time. After I adjusted the front right leveler, I retested the side-to-side level with a “stick” level. This second - and always necessary - verification measurement showed that only the front left side needed to be adjusted. In the second of two pictures below, the level was moved from the back to the front of the machine. When you compare the two pictures, you can see that the bubble at the front needed more correction than when at the back.
If you would have taken the above picture, you could have lifted the left side of the level to center the bubble. This action equates to the length of front left needing to be increased. Because you weren’t there with me, I lifted the leg by making its leveler about one full turn longer. In the picture below, look at the gap between the bottom of the leg and the top of the retaining nut. This space is the actual distance that the front left leg was lengthened.
Before I returned the front of the pinball machine to the floor, I used the 3/8” wrench to hold the leveler exactly where I wanted it as I used the 9/16” wrench to “snug” the retaining nut. In the following picture, you can see that the playfield is now level side-to-side. As I happen to like how the game played, I did not bother adjusting the tilt front-to-back. But, this would have been done the same way the side-to-side level was corrected.
Don’t try to level your pinball machine by measuring on the playfield glass. After all, you don’t play on the glass. To properly level your game, use the playfield.
In the above two pictures you can see that the inclinometer placed on the glass shows a slightly different angle than the same clinometer placed on the playfield. The second is the truer measure. Whether you are using an inexpensive old style hand tool or a modern costly measuring device, give the tool time to take the reading you are trying to make. Choose the right tool for the job. The 5” metal level (above) was purchased from Pinball Life and works very well for leveling pinball machines. However, this old level is no longer available. The 5” plastic level (below) is the new and improved replacement; with the addition of a handy and very strong magnet.
One side “up” is the opposite side “down, so don’t always automatically lengthen the levelers. You can shorten the opposite side instead. As the length of your casters increases, the stability of your game decreases, and the chance of bending a leg or leveler increases. In general, keep the length of your levelers “short”. Shorten the front casters to increase the tilt of the game. But, keep enough space to ensure that you can easily go back and readjust. If working space is an issue with the front casters, lengthen the back set. When adjusting the front-to-back tilt of your machine, adjust the front and/or back casters in pairs. Adjust the pairs by turning them the same amount; in the same direction. Once you have made your adjustments, don’t forget to “lock” the casters in place with the retaining nuts. But, don’t over tighten this hardware. Use “short” levelers on the “front” legs. And, use “long” levelers on the “back” legs. This will make it easier to keep track of the front and back legs when putting the same set of legs back on your game. Always try to keep one set of legs with the machine. Using the same set will lessen both the amount and frequency of leveling you will need to perform. If your game required a lot of leveling, or if you had trouble leveling your game, than you will probably have to go back and readjust your machine. Besides worn levelers, broken or misadjusted playfield hooks may attribute to a poorly leveled playfield or one which does not seem to stay adjusted. One possible hint of an improperly or unhooked playfield is when you have trouble putting your lock down bar back in place.
As shown in the picture following the one directly below, another reason you may have trouble keeping your game level is loose of missing playfield pivot hardware.
Think of leveling your game as preventative maintenance; which is needed beyond the initial set up. The levels (side-to-side and front-to-back) should be checked (and adjusted if necessary) at the same time you replace the game’s batteries; at least once a year. After you have properly adjusted the zero level and tilt of your pinball machine, don’t let anyone (especially a pool player) tell you that your game “feels” funny. The way your pinball machine plays is your personal preference. Click the picture if you wish to see a short (5 second) video of “La Machine”. Get the Flash Player to see this video clip.
“SDTM” |